3PAR StoreServ & Site Recovery Manager Expected Behaviour

Purpose

The purpose of this post is to document the expected behaviour of the 3PAR StoreServ 7×00 and VMware Site Recovery Manager in both a ‘planned failover’ and ‘unplanned failover’.

Envrionment

The tests where performed on two different environments each containing the same infrastructure.

  • vCenter 5.5 Update 2 (Build 2001466)
  • Site Recovery Manager 5.8.0 (Build 2056894)
  • HP 3PAR SRA 5.5.2.285
  • HP 3PAR Inform OS 3.1.3 (MU1) P03, P07, P09

3PAR Details

Prominent details about the 3PAR configuration are highlighted below.

  • Single common provisioning group used for virtual volumes and remote copy space
  • Auto LUN ID used
  • Auto Recover enabled
  • A Synchronous replication using 15 minute interval schedule
  • Virtual Volumes are presented to a Host Set at Source Site and are ‘Exported
  • Virtual Volumes are presented to a Host Set at Target Site and are ‘Un-Exported’

During the tests, I was logged into the source and destination 3PAR StoreServ’s and issued the following 3PAR CLI commands to observe behaviour state.

  • showrcopy groups SRMTEST01*
    • Shows state of the remote copy group at each location
  • showrcopy links
    • Shows the status of the remote copy links at each location
  •  showvv
    • Shows the virtual volume information at each location

Planned Failover

Planned Failover is when both the source and target sites are both up.

The table below shows the observed behaviour on the 3PAR StoreServ at both the source and target sites along with the SRM workflow step

SRM Workflow Step Source RG Name Source Role Destination RG Name Destination Role Sync State
Pre Failover SRMTEST01 Primary SRMTEST01.r398979 Secondary Synched/Synching
Planned Failover SRMTEST01 Primary SRMTEST01.r398979 Primary-Rev Stopped
Reprotect SRMTEST01 Secondary-Rev SRMTEST01.r398979 Primary-Rev Synced/Syncing
Planned Failback SRMTEST01 Primary SRMTEST01.r398979 Secondary Stopped
Reprotect SRMTEST01 Primary SRMTEST01.r398979 Secondary Synced/Syncing

Unplanned Failover – Source Site Down

An Unplanned Failover is when the source site is down and the target site is up.

Before the Unplanned Failover workflow is instigated, the 3PAR StoreServ, vCenter and SRM virtual machines are isolated in the source site.

Note: This particular test this was performed during production hours with users accessing the source virtual machines for business as usual activities.  I will create a further blog post on how to achieve this.

The table below shows the observed behaviour on the 3PAR StoreServ behaviour at both source and target sites along with the SRM workflow step when the inter site link is down.

SRM Workflow Step Source RG Name Source Role Destination RG Name Destination Role Sync State
Unplanned Failover SSRMTEST01 Primary (Unconfirmed) SRMTEST01.r398979 Primary-Rev Stopped

The details below describe the behaviour observed and any error messages encountered.

  • 60 seconds is the timeout value for 3PAR remote copy to see the inter site link as down
  • showrcopy grounds SRMTEST01* command ran to verify that SyncStatus field displays ‘stopped’

StoreServ-7200 cli% showrcopy groups SRMTEST01*

Name                                   Target                 Status       Role            Mode       Options

SCC_SRMTEST01.r398979   StoreServ-7200   Stopped   Secondary   Periodic   Period 15m, over_per_alert
LocalVV                               ID                        RemoteVV                    ID          SyncStatus    LastSyncTime
SRMTEST01_DR                   14096                 SRMTEST01_PR           16598   Stopped        2015-04-21 14:22:57 BST

  • showrcopy links command ran on target 3PAR StoreServ to verify partner link is down

StoreServ-7200 cli% showrcopy links

Remote Copy System Information
Status: Started, Normal

Link Information

Target Node Address Status Options
StoreServ-7200 0:3:1 172.16.1.10 Down
StoreServ-7200 1:3:1 172.16.1.11 Down
receive 0:3:1 receive Up
receive 1:3:1 receive Up

  • Target SRM Server Error Message displayed

SRM Error Message

  • Target SRM logs checked which shows this is an expected behaviour as part of the SRM workflow, the target SRA tries to contact the source SRA but fails as the site is down.

Message [2015-04-21 14:35:47.272 ‘arrayMgm.GetRCTargetSysInfo’ 3PAR_3031 verbose (Process id=1652) (Thread id=1)] Complete: Info. Call. –> [2015-04-21 14:35:47.272 ‘discoverDevices.Run’ 3PAR_1013 error (Process id=1652) (Thread id=1)] Error. Peer array id <39897> is not a valid entry in the connected HP 3PAR Storage Server.

Unplanned Failover – Source Site Up

Inter site link re-established and source site checks are performed which entail:

  • Services checked on source  vCenter and SRM Server
    • SRM Service is stopped, expected behaviour as cannot communicate with vCenter. SRM Service started

The next step is CRITICAL in the SRM workflow.   At this point the source and target sites both hold primary read/write copies of data.

SRM at the source site believes that replication is continuing and that nothing has changed!

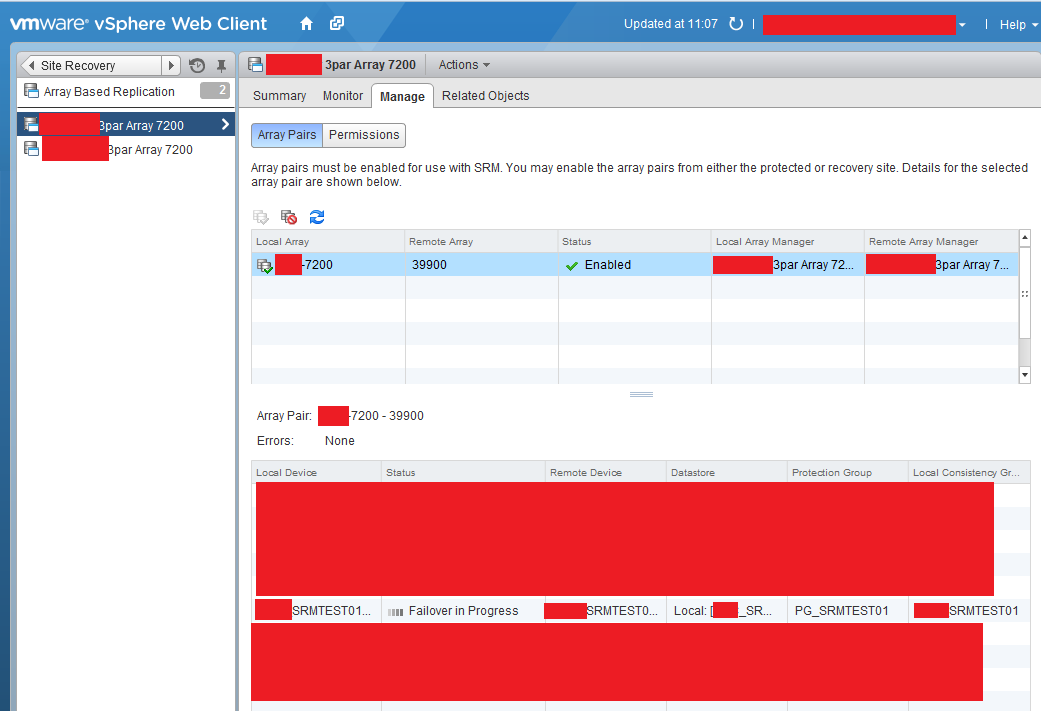
A device refresh is needed to enable to leverage the HP 3PAR SRA to discover the state of the 3PAR StoreServ arrays.  Once done the ‘Failover in Progress’ should be displayed.

Failover In Progress


The table below shows the observed behaviour on the 3PAR StoreServ behaviour at both source and target sites along with the SRM workflow step when the inter site link is up.

SRM Workflow Step Source RG Name Source Role Destination RG Name Destination Role Sync State
Source Site Up SRMTEST01 Primary SRMTEST01.r398979 Primary-Rev Stopped
Planned Failover SRMTEST01 Primary SRMTEST01.r398979 Primary-Rev Stopped
Reprotect SRMTEST01 Secondary-Rev SRMTEST01.r398979 Primary-Rev Synced/Syncing
Planned Failback SRMTEST01 Primary SRMTEST01.r398979 Secondary Stopped
Reprotect SRMTEST01 Primary SRMTEST01.r398979 Secondary Synced/Syncing

Final Thoughts

Using 3PAR StoreServ with Site Recovery Manager provides an easy to use workflow orchestration.  However it is critical to understand the behaviour of each dependency and identify and remediate any action which is not expected.

The key step in an unplanned failover is to refresh your devices once the inter site link is re-established.  If this is not done, you will asking SRM to perform a workflow which is out of synch with the 3PAR StoreServ which will result in a rebuild of your SRM environment and a call to HP and VMware support.

Value of VDI Assessments

Disclaimer: This is a copy of the post that I made for TechTarget recently.

The past eighteen months has seen huge investment by VMware within the EUC space, with the arrival of Sanjay Poonen and Horizon (with View) 6 which introduced application publishing in the Advanced edition.  Finally we had an emerging contender to the heavy weight Citrix XenApp.

With this investment from VMware, the past twelve months have seen an increased number of customers looking at virtualising desktops and applications.  The first part of the engagement process is to access whether or not a physical computer is a virtualisation candidate.  To do this we undertake a desktop assessment.

What Is a Desktop Assessment?

First of all, I want to define what is meant by desktop assessment?  From this blog post perspective it is a piece of centralised software that collates information from remote agent’s installed on end user devices which are perceived to be candidates for VDI.

There are plenty of tools on the market from providers such as:

So the question is what value do these assessments bring to a business that is contemplating a move towards VDI?

Different VDI Guest Operating System

The first question is are we staying with the same operating system or moving to a new one?

If you perform a VDI assessment on a desktop operating system which is going to be replaced with a newer version, what value are you really obtaining? Not a lot, the applications will most likely require updating to support the new OS and this in turn leads to different requirements for compute and storage requirements.

Same Operating System

If you are going to have the same operating system you will get more value from the desktop assessment.  However it’s worth bearing in mind that the results from the desktop assessment often over inflate your compute metrics for example:

  • Compute resources used by in guest Anti-Virus are likely to be offloaded to a host based alternative
  • Compute and storage resources for Windows updates will often be negated by VDI tools such as PVS, MSC and Linked Clones
  • Applications installed by the end user will most likely be removed from the ‘master image’
  • VDI ‘master image’ will be optimised with services, widgets and applications being disabled or uninstalled

This can be viewed as a good thing as you can often show a slightly higher consolidation ratio per physical host.

What about Peripherals?

This is where desktop assessments come into their own.  Most IT departments I have spoken to always say ‘yeah we know what applications and devices our users use’, yeah right!

Desktop assessments will inform you what Parallel, Serial and USB devices are connected to the user’s computer.  This gives you the visibility to determine whether a particular user’s device is appropriate for VDI.

What about Licensing?

Desktop assessments are good for capturing what applications are used by users and what devices have what software installed.  However they often fall down in a number of areas:

  • Application dependencies, to determine why you have five different versions of Java installed
  • Often look to see if an executable is launched not whether an application is used to read or edit a document which can have a huge effect on license cost
  • Application readiness and/or virtualisation assessment, will the application work on Operating System ‘x’ and is it capable of being virtualised?

Often this area is overlooked and requires a large effort from a separate workstream outside of the desktop assessment.  Use the information from any desktop assessment as a starting point.

Group Policy

Most desktop assessments rely on an in-guest agent on the end device to capture metrics and pass them back to a central collection repository.  So what happens when you are waiting for that agent to start? The answer is simple nothing, you miss collecting data on anything that happens prior to the agent starting.

When the agent does start, the metrics collected for login time or log off time can be skewed by group policy applied to the computer object.

Ask yourself the question how often is a new OU created for VDI deployments?

What about the storage?

We have already established that the in-guest agent doesn’t start until when the operating system is ready so we have missed boot metrics IOPS.

Desktop assessments have the ability to capture steady state information which is OK as long as there are no other bottlenecks skewing the provided information.  For example:

  • Is paging occurring which is causing disk I/O to increase?
  • Is the limiting factor the hard drive itself and if unleashed from a 7.2K SATA hard drive, what IOPS would be consumed?
  • Are Anti-Virus scans causing peaks in provided disk I/O information?

What is the value?

For me, the value in a desktop assessment for VDI is in the following items:

  • Enables you to take a ‘bird’s eye’ view of what users are virtualisation candidates when items such as peripherals are taken into consideration
  • Provide user classification into different classes for resource consumption e.g. low, medium and high
  • Enables you to determine concurrent login and logoffs which can help determine storage sizing requirements
  • Gives you an insight into what applications are used by users

Final Thoughts

The desktop assessment does have some value in the VDI world, it is not a panacea to provide you everything you need to know on your journey to VDI.

Do I use desktop assessments, yes is the answer.  However it should be mentioned with a limited use case.  Most of the value comes from a pilot and load testing with products such as LoginVSI to determine the density of users per host.

vSphere 5.x Space Reclamation On Thin Provisioned Disks

Space reclamation can be performed either on vSphere after a Storage vMotion has taken place or when files have been deleted from within a guest operating system.

With the release of LeftHand OS 12.0 as covered in my post ‘How To: HP StoreVirtual LeftHand OS 12.0 With T10 UNMAP‘, I thought it would be an idea to share the process of space reclamation within the guest operating system.

The reason for covering space reclamation within the guest operating system, is that I believe it’s the more common in business as usual operations.  Space reclamation on vSphere and Windows is a two step process.

  • Zero the space in the guest operating system if you are running Windows Server 2008 R2 or below.
    • UNMAP is enabled automatically as in Windows Server 2012 or above
    • If VMDK is thin provisioned you might want to shrink it back down again
  • Zero the space on your VMFS file system

I’m going to run space reclamation on a Windows Server 2008 R2 on a virtual machine called DC01-CA01 and has the following storage characteristics:

Original Provisioned Space

  • Windows C: Drive – 24.9GB free space
  • Datastore – 95.47GB free space
  • Volume – 96.93GB consumed space
    • 200GB Fully Provisioned with Adaptive Optimisation enabled

Space Reclaimation 05

Next I’m going to drop two files onto the virtual machine which total 2.3GB in space.  This changes the storage characteristics of DC01-CA01 to the following:

Increased Provisioned Space

  • Windows C: Drive – 22.6GB free space
    • 2.3GB increase in space usage
  • Datastore – 93.18GB free space
    • 2.29GB increase in space usage
  • Volume – 99.22GB consumed space
    • 2.29GB increase in space usage

Space Reclaimation 06

Sdelete

Next I have deleted the files from the C: Drive on DC01-CA01 and emptied the recycle bin.  Followed by running sdeldete with the command parameters ‘sdelete.exe -z C:’ This takes a bit of time, so I’m going to make a cup of tea!

Space Reclaimation 07

WARNING: Running Sdelete will increase the size of the thin provisioned disk to it’s maximum size.  Make sure you have space to accommodate this on your volume(s).

VMKFSTools

Now sdelete has finished, we need to run vmkfstools on the datastore to shrink the thin provisioned VMDK back down to size. To do this the virtual machine needs to be powered off.

SSH into the ESXi Host and CD into the directory in which your virtual machine resides.  In my case this is cd /vmfs/volumes/DC01-NODR01/DC01-CA01

Next run the command ls -lh *.vmdk which shows the space being used by the virtual disks.  Currently stands at 40GB.

Space Reclaimation 13

Next we want to get rid of the zero blocks in the MDK by issuing the command vmkfstools –punchzero DC01-CA01.vmdk

Space Reclaimation 15

Now that’s done let’s check our provisioned space to see what is happening.

Interim Provisioned Space

  • Windows C: Drive – 24.9GB free space
    • Back to the original size
  • Datastore – 95.82GB free space
    • 0.35GB decrease from original size
  • Volume – 121.35GB consumed space
    • 24.42GB increase from the original size!

Space Reclaimation 16

So what’s going on then?  Well Windows is aware that blocks have been deleted and passed this information onto the VMFS file system, which has decreased the VMDK size using the vmkfstools –punchzero command, however no one has told my HP StoreVirtual it can reclaim the space and allocate it back out again.

The final step is to issue the vmkfstools -y 90 command.  More details about this command are covered in Jason Boche’s excellent blog post entitled ‘Storage: Starting Thin and Staying Thin with VAAI UNMAP‘ on this function.

Note: vmkfstools was deprecated in ESXi 5.1 and replaced with esxcli storage vmfs unmap -l datastorename  See VMware KK2057513 for more details

WARNING: Running vmkfstools -y 90 will create a balloon file on your VMFS datastore.  Make sure you have space to accommodate this on your datastore and that no operations will happen that could drastically increase the size of the datastore whilst the command is running

Space Reclaimation 17

One final check of provisioned space now reveals the following:

Final Provisioned Space

  • Windows C: Drive – 24.9GB free space
    • Back to the original size
  • Datastore – 95.81GB free space
    • 0.34GB decrease from original size
  • Volume – 95.04GB consumed space
    • 1.89GB decrease from the original size

Final Thought

Space reclamation has three different levels, guest operating system, VMFS file system and the storage system.  Reclamation needs to be performed on each of these layers in turn so that the layer beneath knows it can reclaim the disk space and allocate it out accordingly.

The process of space reclamation isn’t straight forward and should be ran out of hours as each step will have an impact on the storage sub system especially if it’s ran concurrently across virtual machines and datastores.

My recommendation is to reclaim valuable disk space out of hours to avoid potential performance or capacity problems.

VSAN Observer Windows Server 2012 R2

Problem Statement

When launching VSAN Observer rvc.bat on Windows Server 2012 R2 from C:Program FilesVMwareInfrastructureVirtualCenter Serversupportrvc the CMD shell automatically closes after entering password.

Troubleshooting Steps Taken

  • Launched rvc.bat using ‘Run As Administrator’
  • Installed nokogiri -v 1.5.5 as described in Andrea Mauro blog post VMware Virtual SAN Observer
  • Followed the steps in VMware KB2064240 ‘Enabling or capturing performance statistics using Virtual SAN Observer for VMware Virtual SAN)
  • Tried the following credentials when launching rvc.bat
    • administrator@vmf-vc01.vmfocus.com
    • administrator@localhost
    • administrator@vmf-vc01

Frustratingly none of these steps worked, so I decided to ask Erik Bussink whom I know has been working with VSAN for a while and had written the excellent blog post ‘Using the VSAN Observer in vCenter 5.5

Resolution

Launch rv.bat and enter the credentials in the format administrator@vpshere.local@FQDN which is administrator@vpshere.local@vmf-vc01.vmfocus.com for me

VSAN Observer 01

Enter the password for the SSO account administrator@vsphere.local

Enter vsan.observer <vcenter-hostname>/<Datacenter-name>/computers/<Cluster-Name>/ –-run-webserver -–force  which for me is vsan.observer vmf-vc01.vmfocus.com/Datacenter01/computers/Cluster01 –-run-webserver -–force

VSAN Observer 02

This fails with ‘OpenSSL::X509::CertificateError: error getting time’.

VSAN Observer runs under http, so to get around this add the parameter –no-https

vsan.observer vmf-vc01.vmfocus.com/Datacenter01/computers/Cluster01 –-run-webserver -–force –no-https

VSAN Observer 03

Launch http://vcentername:8010 which in my case is http://vmf-vc01:8010

VSAN Observer 04

Notice that I’m using FireFox as the browser, I found that Internet Explorer displayed the message {{profilingTimes}} and incomplete information.

VSAN Observer 05

vCloud Air DRaaS – Improvements

Last October, I blogged about the vCloud Air DRaaS – The Good, Bad & Ugly in which I covered the following aspects:

  • Service Overview
  • vCloud Connector
  • Test Recovery
  • Failover and Failback

Logical Overview

The main area which was lacking with vCloud Air DRaaS was failback.  Failback could only occur offline whilst the virtual machine is shutdown.  If we do the basic maths on a 50GB virtual machine on 100Mbps dedicated connection it would take 76 minutes.

Multiple this by 100 virtual machines then the numbers start to get crazy.  It would take 127 hours or a little over 5 days to failback.  Could you image saying to your Directors, sorry we need everyone to take a week off work whilst we failback?

For the sake of brevity the calculation is shown below.  Overhead would be around 10% on 100Mbps link, giving 90Mbps throughput.

Calculation

8Mb equal 1MB

50GB equals 51200MB

51200MB x 8Mb = 409,600 Mb

409,600 / 90Mbps = 4,551 seconds

4,551 seconds / 60 seconds = 76 minutes

100 VM’s x 76 minutes = 7,600 minutes

7,600 minutes / 60 = 127 hours

Good News

VMware understand that this kind of service was never going to be taken seriously by customers and could only be used for non production workloads and have announced some new service enhancements in a blog posted dated 20th January 2015.  The enhancements are:

  • Native failback support – provides seamless reverse replication from vCloud Air data centers to a customer’s environment, as well as support for offline data transfer via physical disk, to accommodate larger environments.
  • Multiple recovery points – enables multiple point-in-time copies of replicated VM(s), allowing you to roll back to earlier snapshots of your data center environment in the event of corruption or the need to recover to an earlier set of data.

Final Thought

This is an excellent move by VMware as now DRaaS could become reality.  What I would have hoped is that during failover VMware would have announced that they could offer virtual machine backups as part of the product offering.

Don’t forget DRaaS isn’t a panacea to fix application or service access for end users.  The same rules apply to an on-premises solution as they do a cloud based solution.