3PAR StoreServ 7000 Software – Part 5

I wanted to spend a little bit of time going over some 3PAR concepts, as this blog post won’t make a huge amount of sense without knowing them.

The basis for any storage system is some physical disks which provide hard disk capacity.  These physical disks and then placed into an enclosure (cage) and are sub divided into Chunklets. Chunklets are used to breakdown each physical disk into 1GB portions.  So a 146GB hard drive get’s broken down into 146 Chunklets.

The Chunklets then form the basis of the Logical Disk.  The Logical Disk is created from Chunklet’s from different physical disks.  The Logical Disks are then pooled together to create a Common Provisioning Group (CPG).  It’s at the CPG level where you set your RAID type which is either:

  • RAID 0 (this is explicitly locked out unless you enable it)
  • RAID 1
  • RAID 5 (explicitly locked out on NL drives unless enabled)
  • RAID 6

Virtual Volumes are then created which draw space from the CPG, and placed back into the CPG, if the Virtual Volume was thin provisioned by using tools such as sdelete at the Windows level or run vmkfstools -y 60 on an ESXi Host.

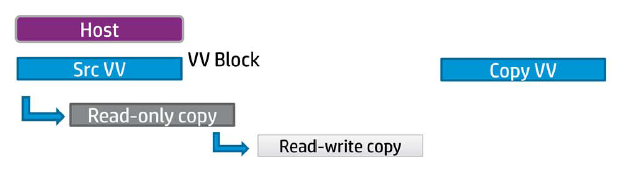
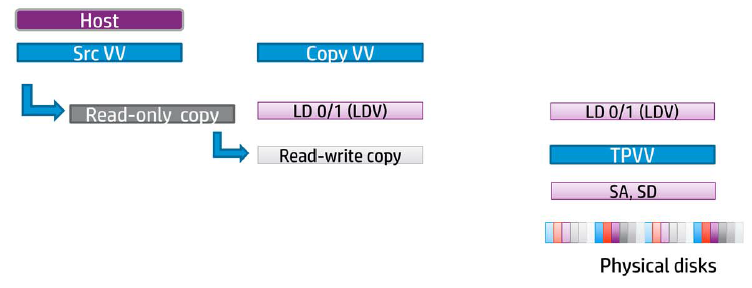
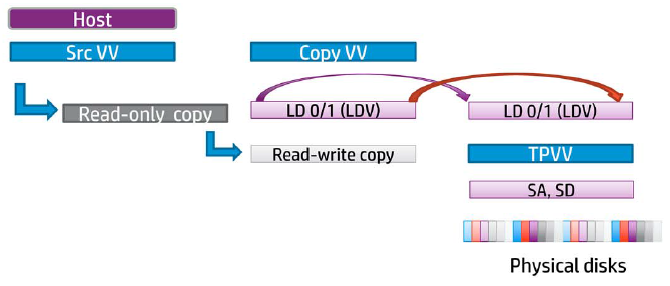
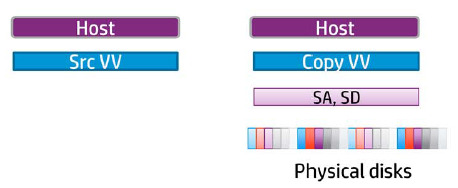
Sometimes a picture speaks a thousand words.

3PAR CPG Overview

With 3PAR StoreServ 7000 you have two availability options the first being High Availability Drive, this is the cheaper configuration option as you are protecting yourself from drive failure.  The other choice is High Availability Enclosure which strips the chunklets across enclosures, so that you are protected from enclosure failure, in the same way as StoreVirtual Replicated RAID 10.

Depending on your build the HA Enclosure option isn’t always massively expensive especially if you are starting with the same drive type.  An example of this, was when I was building a StoreServ 7200 config, which had the following requirements:

  • 10TB usable space
  • 7,200 IOPS

To achieve this, I used a basic config which consisted off 48 x 300GB 15K SAS HDD which gave 7,940 IOPS and 9.9TB of usable space.  Now the interesting thing with the configuration was that it was only 19% more expensive to use HA Enclosure.

Now we have covered off the above, I feel that we a re now in a position to cover Tunesys.

Tunesys

So we now know that 3PAR StoreServ works on Chunklets which are striped across physical disks to make Logical Disks, but what happens if a disk fails or you loose an enclose? how are the Chunklets re introduced?

This is where tunesys comes in, it essentially re balances an entire 3PAR StoreServ with a single command (Dynamic Optimization licenses are required). There are three types of tunesys which are.

Phase 1 – tunevv  this rebalances inter node when a new enclosure with disks is added

tunevv

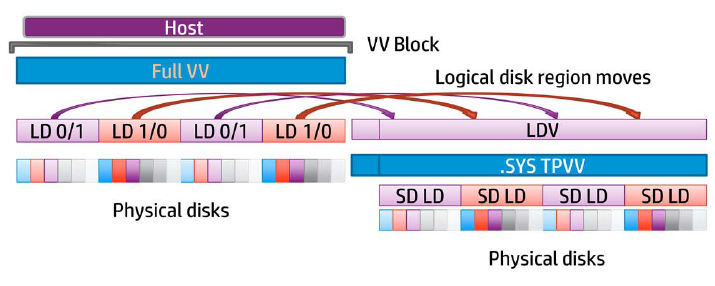
  1. Create a new Logical Disks.
  2. Region moves are started to enable new Virtual Volumes to Logical Disks.
  3. The old virtual volumes is blocked.
  4. Regions are switched and the Virtual Volume is now mapped to the new Logical Disk
  5. Block is removed on the virtual vole
  6. Original Logical Disk is deleted.

Phase 2 – tuneodech this is when new disks are added to an existing enclosure paid.  Tuning is performed per disk type e.g NL, SAS, SSD.

tuneodech

Phase 3 – tuneld  this re-layout’s the CPG if it differs from the Chunklets on the existing logical disks.

The good news is tunesys does not interfer with AO.  A few things to note with tunesys

  • No administration is required after starting
  • Can perform a dry run to see what the tuning will do to the current configuration
  • Default settings should be fine for nearly all systems
  • If you add more enclosures or disks, only newly created Virtual Volumes will use the new capacity/IOPS
  • Tunesys can take along time to run
  • IO pauses are common during some phases

To start tunesys you can use the command

tunesys -nodepct % -chunkpct % -Diskpct %

Nodepct % default is 3%

Chunkpct % default is 5%

Diskpct % default is 10%

From the 3PAR Inform go to Provisioning > Select Tune System

tunesystem

How does tunesys work? Well what it does is pretty straight forward really.  First of all tunesys calculates the percentage utilization for each disk type per node.  It that checks the average utilization across all nodes.  If any of the nodes are more than 3% out (default) then each Virtual Volumes is checked to see if it is well balanced across nodes.  If it isn’t then tunesys does it’s magic and rebalances.

Thanks to Sheldon Smith a HP Technical Consultant who pointed out a couple of extra items.

3PAR StoreServ 7000 Software – Part 4

Adaptive & Dynamics Optimization

This is when of the great 3PAR StoreServ features, allowing ‘regions’ of data to be moved between different storage tiers.  3PAR OS includes the data movement engine, however it has to be unlocked either using Dynamic or Adaptive Optimization.

Adaptive Optimization this is the automated movement of ‘regions’ of data based on policies.  The really cool thing is you can have different RAID types on the same physical disks e.g. RAID 5 and RAID 6 on the same 10K SAS Disks.  The policies can be used to sample performance during the working day and then then data movement can be scheduled out of hours.

Dynamic Optimization is the manual movement of complete LUN.  Using DO, we have the ability to change the class of service seamlessley you want to move from RAID 6 on 10K SAS to RAID 5 on 15K SAS not a problem.  This means we can move an application from a higher class of service to a lower class of service or vice versa on the fly. Sheldon Smith a HP Technology Consultant has confirmed that the limit has been removed when tuning a Virtual Volume using Dynamic Optimization,

Tiering

Now that Adaptive Optimization is On Node, it brings with it a few performance enhancements.

Adaptive Optimisation

Adaptive Optimisation 2

We do have some Adaptive Optimization recommendations for valid configurations, these are:

  1. 2 Tiers with SAS 15K/10K and NL
  2. 2 Tiers with SSD and SAS15K/10K
  3. 3 Tiers with SSD, SAS 15K/10K and NL

So how do I size a 3PAR StoreServ to use Adaptive Optimization? Well the following is the recommended practice:

SSD – 2 – 3% of capacity and 50% of the performance requirement

SAS – 35 – 40% of the capacity and 50% of the performance requirement

NL – Rest of the capacity (don’t include performance figures)

Adaptive Optimization Configuration

Pretty straight forward, you need to have at least three linked Common Provisioning Groups with at least two tiers of storage for AO to work.

I have mentioned before that 3PAR like to use 0’s.   They apply this logic to the tiering.

Tier 0 – Low Capacity & High IOPS normally SSD

Tier 1 –  Mid Capacitity & Medium IOPS normally SAS

Tier 2 – High Capacity & Low IOPS normally NL

We have a choice of three modes, which are:

Performance—Be more aggressive moving data to faster (higher) tiers
Cost—Be more aggressive moving data to slower (lower) tiers
Balanced—Between performance and cost

You can see below that changing the settings is fairly straight forward, we have our System Name, Domain (if applicable) and then our Tiers and how often we want AO to run.

AO Settings

Adaptive Optimization Sampling

The the sampling begins this is performed at a 5 minute interval and captures the following details:

  • Sample time
  • Read IOPS, Write IOPS and Total IOPS
  • Read KB/Sec, Write KB/Sec and Total KB/Sec
  • Read service time, Write service time and Total service time
  • Read KB size, Write KB size and Total KB size
  • Queue Length

Note, that System Reporter has to run for at least three hours before any Adaptive Optimization can be scheduled.

Adaptive Optimization Troubleshooting 

A common issue is the sampling period hasn’t had enough time to complete, the resolution to this is to err leave it a bit longer.

Another issue is that when you go to start Adaptive Optimization you receive the error ‘no matching VV found’ this is resolved by creating an .srdata volume by using the ootb command.

3PAR StoreServ 7000 Software – Part 3

Fat to Thin & Thin to Fat Converstion

No we aren’t talking about a revolutionary new diet! It’s the ability to take a fat volume and turn it into a thin volume or vice versa!

The steps taken for a Fat to Thin conversion are:

  1. Create a System Thin Provisioned Virtual Volume
  2. Place a temporary block on the Full Virtual Volume
  3. Move User Space into the Thin Provisioned Virtual Volume
  4. Unblock the Full Virtual Volume
  5. Start region mover to copy data from the LDV to the Thin LD (same as Online copy)
  6. Convert the Full Virtual Volume to a Thin Provisioned Virtual Volume

Fat to Thin

The steps for Thin to Fat are the same as above.  So I won’t repeat myself.

You may have noticed that  blocks are placed on the virtual volumes, so how it data written? Well when a conversion is initiated writes are cached, however there has to be a start and stop block, which can cause a temporary disruption of I/O.  I haven’t tested this but it is meant to be transparent to the users.

If for some reason you have a system failure e.g. power outage then the conversion is not automatically restarted.

Windows Server 2012

It seems that Windows have followed on from VMware and have introduced ODX (Offload Data Copies) which offloads copies to the 3PAR StoreServ in a similar way to VAAI.

Perhaps the coolest new feature of Windows Server 2012 is that it has T10UNMAP command built in for Thin Provisioning space reclamation.  So no more sdelete!

Calvin Zito (twitter handle @HPStorageGuy) has an excellent demo which can be found here on YouTube

System Reporter 3.2

System Reporter in my opinion was always a pain to install.  It was pretty complex and it always took me a couple of attempts to get it working.  One of the really cool things with 3PAR OS 3.1.2 is that it’s been built in!

The only thing you need to do is run one of the following commands to create the .srdata Virtual Volume

oodb

adminthw

The On Node System Reporter sits on the Non Master Node, if this fails then it continues on remaining nodes Non Master Nodes.  Yes that’s right you need to have a four node system to benefit from this.

Adaptive Optimization (scheduled block tiering) is actually included in 3PAR OS 3.1.2 meaning it has no dependency to the On Node System Reporter.  However, a couple of things to note:

  1. If using an external System Report, Adaptive Optimization will not work with 3PAR OS 3.1.2
  2. Off Node Adaptive Optimization is no longer supported

Data sampling intervals for performance statistics are High (5 minutes), Hourly and Daily, these are non configurable.

Logical Disk Region access rate data for Adaptive Optimization is sampled every 30 minutes, again this is non configurable.

Something to note, there is no migration of data migration for System Reporter.  Meaning you will loose all previous performance metrics.

With the new System Reporter we get some new CLI commands which are

• srcpgspace—Space reports for common provisioning groups (CPGs)
• srldspace—Space reports for logical disks
• srpdspace—Space reports for physical disks
• srvvspace—Space reports for virtual volumes (VVs)
• srrgiodensity—Region I/O density reports for CPGs or Adaptive Optimization configurations
• sraomoves—Space report for Adaptive Optimization moves
• srhistld—Histogram performance reports for logical disks
• srhistpd—Histogram performance reports for physical disks
• srhistport—Histogram performance reports for ports
• srhistvlun—Histogram performance reports for VV LUN exports (VLUNs)
• srstatcmp—Performance reports for cache memory
• srstatcpu—Performance reports for CPUs
• srstatld —Performance reports for logical disks
• srstatpd—Performance reports for physical disks
• srstatport—Performance reports for ports
• srstatvlun—Performance reports for VLUN

3PAR StoreServ 7000 Software – Part 2

hp-3par-storeserv-7000-1

Online Firmware Upgrades (OLFU)

Online Firmware Upgrades means that the storage controllers can be updated with minimum disruption to data being transferred by using NPVI as discussed in 3PAR StoreServ 7000 Software – Part 1

Call me old school, but I’m still not 100% comfortable performing firmware upgrades on SAN’s live.  However, I do appreciate that some businesses such as cloud providers have no other alternative.

3PAR introduced a new way of upgrading from 3.1.1 to 3.1.2 which is as follows:

1. Firmware is loaded into the Service Processor

2. Service Processor copies the new code onto all nodes

3. Each node is updated one by one

4. Each node continues to run the old firmware until every node has been upgraded

5. A copy of the old firmware is kept in the ‘altroot’ directory

The upgrade process has a timeout value of 10 minutes, a few commands to have in your upgrade toolbox are:

  • upgradesys -status
  • checkhealth
  • checkupgrade

Common reasons for a failed upgrade are:

  • Disks may have degraded or failed.
  • LUNs may not have Native and Guest ports configured correctly and therefore would not be able to connect on the alternative node.

If everything has gone wrong you can revoke the upgrade by issuing the command upgradesys -revertnode

Node Shutdown Active Tasks

3PAR OS 3.1.1 would not allow you to shut down a node with active tasks, which I think is a thing of beauty.  However with 3PAR OS 3.1.2 when you issue the command

shutdownnode reboot 0

you will be prompted asking if you are really sure you want to do this? If you answer yes then any active tasks are stopped and the node is rebooted.  I haven’t been able to test this yet, however my understanding is that some tasks will automatically resume after the node has been rebooted.

Delayed Export After Reboot

This is actually pretty handy especially if you need to make sure that certain LUN’s are presented in a particular order after a power outage.

I haven’t been able to think of a particular application that would require this feature, never the less, it’s still handy to know it can be used.

Online Copy

Online Copy is 3PAR’s term for making a clone of a virtual volume.  It allows for backup products to directly make snapshots of  virtual volumes reducing the impact of backups on VM’s.  Perhaps more importantly it allows for entire VM’s to be recovered more quickly rather than relying on instant restore mechanisms which run the backup from the backup target which ultimately results in performance degradation.  Veeam have announced support for this integration for Q1 2013

An enhancement with 3PAR OS 3.1.2 is that you no longer have to wait for the copy to complete before you can gain access to the copied volume.

So how does this work?

Step 1 – A read only and read write snapshot of the source volume is created.  A copy volume is then created which could be on lower tier of disks.

Online Copy 1

Step 2 – A logical disk volume (LDV) is created to map the copy volume to.  Next a thin provisioned virtual volume is created along with another LDV.

Online Copy 2

Step 3 – Region moves then take place from one LDV to another.

Online Copy 3

Step 4 – The copy volume can now be exported whilst the region moves continue in the background (that is pretty awesome).

Step 5  – Once the region moves complete the read only and read write snapshots are removed as well as the LDV’s.  Then last of all the thin provisioned volumes are removed.

Online Copy 4

3PAR believe that online copies are faster as they use the ‘region mover’, however no performance figures have been released to substantiate this.  A few things to note:

  • Online copies need a starting and end point and therefore it has to have an interruption in I/O
  • Online copies cannot be paused only cancelled
  • Online copy does not support snapshot copying
  • Online copy can only be performed via CLI

3PAR StoreServ 7000 Software – Part 1

Upgrading To Inform OS 3.1.2

Before beginning an upgrade of the 3PAR Inform OS to version 3.1.2 it is recommended to use the following guides:

When performing the upgrade, 3PAR Support will either want to be onsite or on the phone remotely.  They will ask for the following details:

  • Host Platform e.g. StoreServe 7200
  • Architecture e.g. SPARC/x86
  • OS e.g. 3.1.1
  • DMP Software
  • HBA details
  • Switch details
  • 3PAR license details

A few useful commands here are:

  1. showsys
  2. showfirmwaredb
  3. showlicense
  4. shownode

A quick run threw of the items that are recommended to be checked.  The first item is your current Inform OS version as this will determine how the upgrade has to be performed

Log into your 3PAR via SSH and issue the command ‘showversion’  This will give you your release version and patches which have been applied.

OS Version

Here our 3PAR’s is on 3.1.1 however it doesn’t specify if we have a direct upgrade path to 3.1.2 or not, see table below.

Upgrade Path

If going from 3.1.1 to 3.1.2 then Remote Copy groups can be left replicating, if you are upgrading from 2.3.1 then the Remote Copy groups must be stopped.

Any scripts you may have running against the 3PAR should be stopped, the same goes for any environment changes (common sense really).

The 3PAR must be in a health state and each node should be multipatted and a check should be undertaken to confirm that all paths have active I/O.

If the 3PAR is attached to a vSphere Cluster, then the path policy must be set to Round Robin.

Once you have verified these, you are good to go.

3PAR Virtual Ports – NPIV

NPIV allows an N_Port which is that of the 3PAR HBA to assume the identity of another port without multipath dependency.  Why is this important  Well it means that if the storage controller is lost or rebooted it is transparent to the host paths meaning connectivity remains albeit with less interconnects.

When learning any SAN, you need to get used to the naming conventions.  For 3PAR they roll with it is Node:Slot:Port or N:S:P for short.

Each host facing port has a ‘Native’ identify (primary path) and a ‘Guest’ identity (backup path) on a different 3PAR node in case of node failure.

Node Backup

It is recommended to use Single Initiator Zones when working with 3PAR and to connect the Native and Backup ports to the same switch.

S1 – N0:S0:p1

S2 – N:S0:P2

S3 – N0:S0:P1

S4 – N0:S0:P2

zoning

For NPIV to work, you need to make sure that the Fabric switches support NPIV and the HBA’s in the 3PAR do.  Note the HBA’s in the Host do not need to support NPIV as the change to the WWN will be transparent to the Host facing HBA’s.

How does it actually work? Well if the Native port goes down, the Guest port takes over in two steps:

  1. Guest port logs into Fabric switch with the Guest identity
  2. Host path from Fabric switch to the 3PAR uses Guest path

NPIV Failure

The really cool thing as part of the online upgrade, the software will check:

  1. Validate Virtual Ports to ensure the same WWN’s appear on the Native and Guest ports
  2. Validate that the Native and Guest ports are plugged into the same Fabric switch

Online Upgrade

If everything is ‘tickety boo’ then Node 0 will be shutdown and transparently failed over to Node 1.  After reboot Node 0 will have the new 3PAR OS 3.1.2 and then Node 1 is failed over to Node 0 Guest ports and Node 1 is upgraded.  This continues until all Nodes are upgraded.

When performing an upgrade it shouldn’t require any user interaction, however as we all know things can go wrong. A few useful commands to have in your toolbox are:

  • showport
  • showportdev
  • statport/histport
  • showvlun/statvlun