In my last blog post I covered the VSAN Lab for VMFocus.com. In this post I’m going to cover the prerequisites that need to be met before I will be in a position to install VSAN.
VMware Compatibility Guide
For a production environment your first point of call should be the VMware Compatibility Guide with the ‘what are you looking for tagged with ‘Virtual SAN’ to confirm that your hardware is compatible and perhaps most importantly will be supported by VMware.
 It’s also worth pointing out that in a production environment, you should cross reference the recommended drivers against those used within an custom OEM ESXi image from Dell or HP as pointed out in Cormac Hogans blog post entitled VSAN and OEM ESXi ISO images.
My preference would be to use a custom OEM ESXi image and then downgrade the drivers as you get visibility to the of all the manufacturers MIBs.
Even though the HP DL380 G6 is on the VMware Compatibility Guide the Smart Array P410i isn’t and nor are my hard drives. So as this is a lab environment, I will be using the HP ESXi 5.5 U2 Custom ISO on the HP DL380 G6 with the latest drivers.
Step 1 – Firmware
The first step is to ensure the firmware is up to date on my HP DL380 G6 servers. The easiest way to do this is to download an install HP Service Pack for ProLiant ISO which includes HP Smart Update Manager v7.1.0.
Launch the batch file entitled ‘launch_hpsum.bat’ and you will be redirected to the HP Smart Update Manager 7.1.0 web browser.
An inventory of the software packages on the HP Service Pack for ProLiant ISO will be undertaken so that HP SUM understands what firmware it has access to within the HP SUM ISO repository.

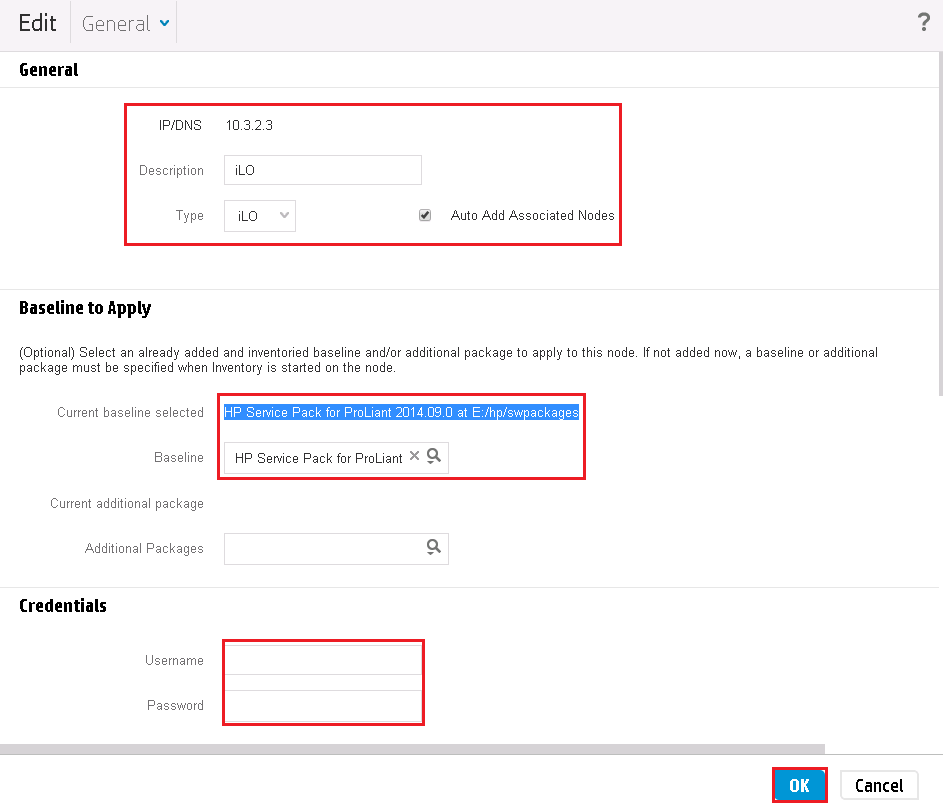
Once this completes launch Nodes, I will need to add in two Nodes for each ESXi host, one for iLO and one for the ESXi Host. The iLO node will update the iLO firmware and the ESXi Host node will update the hardware firmware on the HP DL380 G6.
When each Node is added, you need to supply the correct credentials to access the iLO and ESXi Host and also apply the Baseline (in my case HP Service Pack for ProLiant 2014.09.0 at E:/hp/swpackages).
Next we perform an Inventory of the Node to see if any firmware needs to be upgraded

Once the inventory is performed, its simply a case of Deploying the updates and restarting the ESXi Host.

Step 2 – Storage Controller Queue Depth
Storage Controller queue depth can cause an issue with VSAN when it is serving normal SCSI requests and undertaking a rebuild operation after a failure. The recommended queue depth for VSAN is 256. We will verify that the Smart Array P410i meets this requirement by jumping into ESXTOP and pressing d then f and then d again to select QSTATS.
The Smart Array P410i is on vmhba1 and the queue depth is 1011.
![]()
Step 3 – Storage Controller Read Cache
Now the firmware has been updated, the next step is to disable write caching on the Smart Array P410i. This needs to be done to allow VSAN to make the decisions about write buffering and de-staging of IO to magnetic disk rather than the storage controller.
The Smart Array P410i does not allow direct pass through so we need to configure each SSD and SATA drive in RAID 0 and change the storage controller to 100% Read Cache and 0% Write Cache. To do this we will use hpssacli (which is included in HP ESXi Custom ISO). The hpssacli enables us to make changes to the storage controller via SSH.
Note: For each command we want to run, the prefix /opt/hp/hpssacli/bin/hpssacli
The first thing we need to do is identify the slot the Smart Aray P410i is in, by typing /opt/hp/hpssacli/bin/hpssacli ctrl all show config

As you can see mine is in ‘slot 0’ with is embedded. Next I’m going to run the command /opt/hp/hpssacli/bin/hpssacli ctrl slot=0 show detail to check the cache ratio.

Mine is currently set to 25% Read and 75% Write. To change this run the command /opt/hp/hpssacli/bin/hpssacli ctrl slot=0 modify cacheratio=100/0 then another /opt/hp/hpssacli/bin/hpssacli ctrl slot=0 show detail confirms the change has been made

Step 4 – Wipe Hard Drives
For VSAN to be able to see my and claim my hard drives they need to be wiped clean of the existing VMFS format. This can be achieved using parted Util which is included in vSphere kernel or Gparted.
My preference is to keep things simple, so I’m going to download Gparted and boot from the ISO to wipe my hard drives.
Step 5 – Check SSD Enabled
As my Smart Array P410i is running RAID 0 for my SSD drives, we need to verify that they are shown in vSphere as SSD by running the command esxcli storage core device list to obtain the network address authority (NAA)

As we can see Is SSD: false. So I’m going to change this by running the command esxcli storage nmp satp rule add –device naa.600508b1001c3ffd07cece41dbad09b4 –satp VMW_SATP_LOCAL –option enable_ssd
Then we are going to reclaim the SSD by running the command esxcli storage core claiming reclaim –device naa.600508b1001c3ffd07cece41dbad09b4
To verify it’s now displayed as an SSD run the command esxcli storage core device list again

Step 6 – IGMP Snooping
VSAN requires Multicast traffic to be enabled for two reasons:
- To discover participating members in a VSAN cluster and to determine VSAN host states
- To update Clustering Service (CMMDS) for items such as object placement and statistics
IGMP (Internet Group Management Protocol) snooping is a multicast constraining mechanism that runs on layer 2 devices to manage and control multicast groups.
- Reduces broadcast traffic
- Increases security
- Per host interaction
Best to show this with a picture!

VSAN traffic on my HP v1910 is on VLAN 20, so I will enable IGMP snooping for this VLAN only. The first step is to enable IGMP on the HP v1910. To this this click Network > IGMP Snooping > Enable

After enabling IGMP globally, next I need to apply it to VLAN 20, select ‘Operation’

IGMP Snooping ‘Enable’ > Version 3

Verify that it IGMP is enabled for VLAN 20.

Step 7 – Virtual Machines
Now that I have completed the tasks above, it’s time to create the following virtual machines on VMF-ESXi03 which has a 6 x 72GB 10K SAS drives in RAID 5
- VMF-DC01 (Windows Server 2012 R2 Domain Controller
- VMF-DC02 (Windows Server 2012 R2 Domain Controller)
- VMF-CA01 (Windows Server 2012 R2 Certificate Authority)
- VMF-SQL01 (Windows Server 2012 R2 running SQL Server 2012)
- VMF-VC01 (Windows Server 2012 R2 running vCenter 5.5 U2)
See you on the next post when I have these all up and running.

Thanks for the blog post. It would help if you referred people to the VSAN portion of the vSphere Compatibility Guide. That’s where the most current list of support hardware, drivers and firmware is maintained. Specific drivers and firmware listed there may or may not be part of another distribution, which is where folks could run into trouble by following your instructions.
Thanks
Thanks Chuck, I have pointed this out at the start of the blog post.
My question is: if I change the ratio on the cache read and write to 100% read on the smart array, what happens to the datatstore where I have installed the esxi software?