Load Balancing Horizon View – Design

Load balancing Horizon View Connection and Security Servers is key to any VDI design, the ability to provide connectivity to a desktop internally or externally is a must.  The bad news is that Horizon View doesn’t come with any inbuilt load balancing techniques.

As a Horizon View Architect, we have four options open to us:

  1. Don’t Load Balance
  2. Use DNS Round Robin
  3. Use Windows Network Load Balancing
  4. Use a Load Balancer

For the purpose of this blog post, I’m going to discount Option 1 as it’s self explanatory. To perform any type of load balancing you need to have two target Connection or Security Servers. Let’s explore the rest of the options.

DNS Round Robin

This is the simplest form of load balancing.  Creation of two ‘A’ records pointing to different View Connection Servers.

DNS Load Balancing

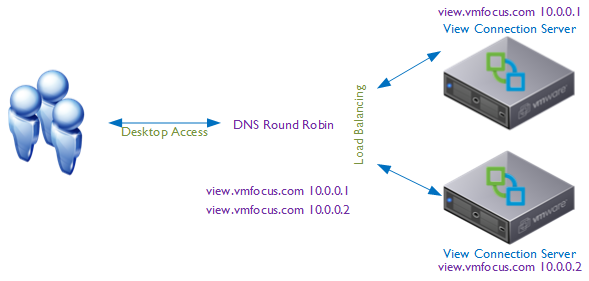
When a client resolves view.vmfocus.com the DNS server will send both IP address’s to the client.  The client will always use the first one returned e.g.

view.vmfocus.com 10.0.0.1 10.0.0.2

The DNS server is intelligent, so that when the next client resolves view.vmfocus.com the DNS server again sends both IP Address’s.  However this time they are returned the other way round e.g.

view.vmfocus.com 10.0.0.2 10.0.0.1

DNS Round Robin Advantages

  • It’s simple and easy to configure

DNS Round Robin Disadvantages

  • Their is no monitoring of the Horizon View Connection Servers at any layer of the OSI model.  If a Horizon View Connection server has an issue or is powered off for maintence, DNS Round Robin will continue to send client connections.
  • After the initial connection to the ‘A’ record view.vmfocus.com the client (local PC) caches the IP address that view.vmfocus.com resolves to.  Only when the TTL expires will the client (local PC) go to the DNS server to request another record which may be the same as the first!

Windows Network Load Balancing

More intelligent than DNS Round Robin is Windows Network Load Balancing which operates at Layer 3 of the OSI model.  A special driver is installed on each Windows host and a ‘cluster IP address’ is created.

NLB Load Balancing

When a client resolves view.vmfocus.com the Cluster will distribute the incoming connection to the appropriate Horizon View Connection Server, this can be configured on a weighted basis e.g.

  1. View Connection Server 1 – 10
  2. View Connection Server 2 – 90

Which means that 90% of the traffic will be directed to View Connection Server 2.

The servers in the cluster are rather chatty, exchanging heartbeat messages, if a server isn’t reached within five seconds it is failed and any new connections are sent to other surviving servers.

Windows Network Load Balancing Advantages

  • Load can be distributed between the Horizon View Connection Server members using a weighted average.
  • Support for up to 32 servers in a cluster
  • Add/Remove servers into the cluster for expansion/patching
  • Detect server failure at network level
  • Included as part of Windows Server 2003/2008/2012

Windows Network Load Balancing Disadvantages

  • Fairly complicated to configure and maintain
  • Extensive network considerations such as separate Port Groups/VLANs to reduce network heartbeat chatter plus  MAC Address Changes and Forged Transmits have to enabled on your Port Groups that the NLB servers reside on
  • Is not Layer 4 or above (service awareness)

Load Balancer

Load balancers are the ‘numero uno’ when it comes to load balancing Horizon View, offering features such as health checking where a probe is sent to the Horizon View Connection Server on a number of service connections e.g. TCP probe on 443 to ensure service availability. Perhaps the greatest reason for load balancer use is to stop new connections going to Connection/Security Server whose services are down.

Load Balancers No Failure

The user is disconnected from the desktop and then when they reconnect they go back to the same desktop.

Load Balancers Failure

Load Balancer Advantages

  • Service awareness, actively ‘polls’ the Horizon View services (PCoIP 4172 UDP, TCP and HTTPS) to ensure they are available
  • Protect against failure at LAN or WAN depending on chosen model and features
  • No session loss with failed components
  • Weight load to Horizon View Connection Servers based on different factors
  • Offload SSL, which can become a major part of the demand for Horizon View Connection Servers
  • Can offer firewall features such as DDoS and IPS depending on chosen model and features
  • Can be used in Global Server Load Balancing configuration to protect from WAN failures (note that Desktop Pools should not spam more than one physical location due to Java Message Service requirements, see this excellent post by Simon Long)

Load Balance Disadvantages

  • Expensive!
  • Need to purchase at least two otherwise you have no high availability
  • Configuring can be complicated, if no ‘Horizon View’ templates are available

Horizon View Design

The purpose of this blog post was to consider the design for load balancing for Horizon View.  Now that we have covered the techniques that can be used, we need to consider the requirements:

  • Is redundancy required?
  • What network throughput is required?
  • Can users access their desktop remotely? If so by Blast and View Client?
  • Can users access their desktop internally by Blast?
  • How will routing maintenance be undertaken?
  • How will upgrades be undertaken?
  • Is Smart Card authentication required?
  • Is Two Factor authentication required?
  • Is a Secure Connection required to the desktop?

These are some off the questions that will influence your Horizon View design.  A common question is: ‘How do we govern who has access to their desktops internally and externally?’ This can only be achieved by having ‘Connection Server Tags’.  Connection Server Tags are a unique reference from a desktop pool to a Connection Server to allow manipulation of desktop pool variables. Let’s work over a scenario, different users require internal and external access.  To achieve this we would need at minimum:

  • One Security Server for remote access
  • One Connection Server for internal access tagged ‘internal’
  • One Connection Server for external access tagged ‘external’
  • One Desktop Pool for internal users with Connection Server restriction to ‘internal’
  • One Desktop Pool for external users Connection Server restriction to ‘internal and external

In reality you probably wouldn’t design for the above scenario due the single point of failures.  The design below is what I would expect to see as a minimum.

Example Internal External Load Balance Design

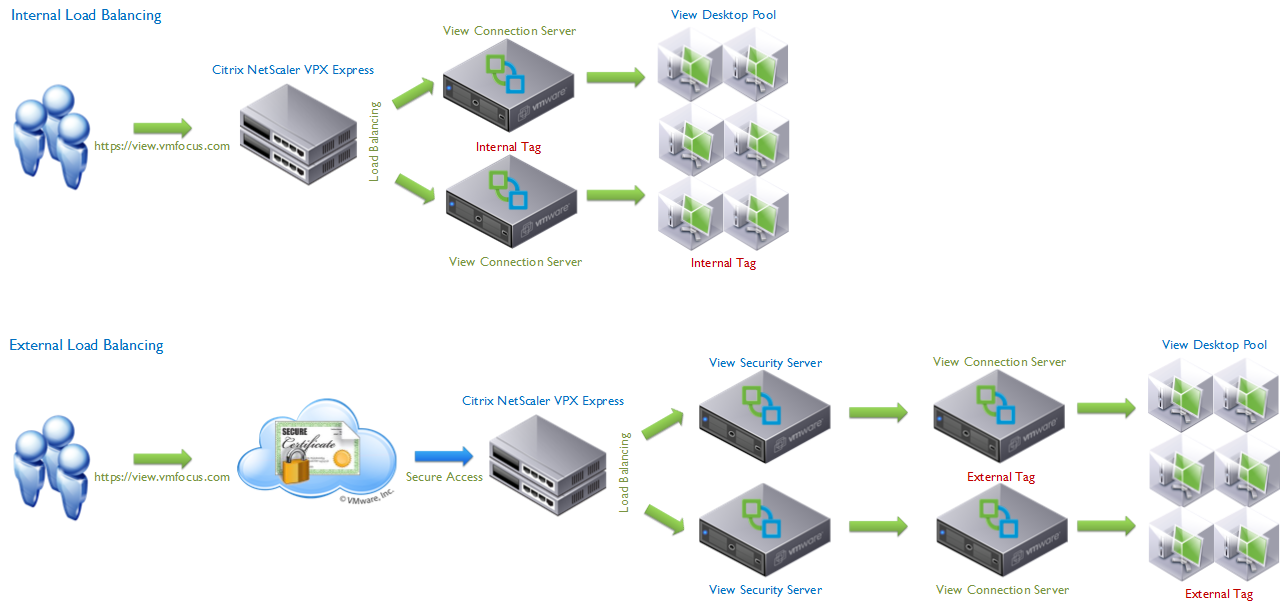
Note: You need 4 x Load Balancers in this design.

Key Concept

Secure Tunnel/Gateway connection to desktop for HTTP(S) and PCoIP are key to the expected results you will achieve on your load balancing design.

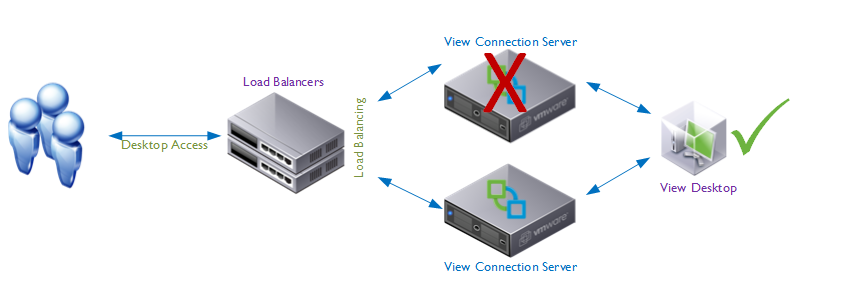
HTTP(S) Secure Tunnel, PCoIP Secure Gateway & Blast Secure Gateway unticked

Connection Server Unticked

The connection from the View Client goes to the Connection Server, authentication is achieved and the desktop is loaded.  The connection from the View Client is then established DIRECTLY to the View Desktop bypassing the View Connection Server.

  • Step 1 (Login to Desktop) View Client > Connection Server > View Desktop
  • Step 2 (Logged into Dekstop) View Client > View Desktop

In this design your Connection Servers are only required for the login, after this they become redundant.  Considerations for this design:

  1. Communications are not secure between View Client and View Desktop
  2. Can only be used for LAN connections, Security Server requirement is to have Secure Connection/Gateway enabled (ticked).
  3. Consider using for a design when requirement is to have desktop ‘always on’ with no disconnect if a Connection Server fails.

HTTP(S) Secure Tunnel, PCoIP Secure Gateway & Blast Secure Gateway ticked

Connection Server Ticked

The connection from the View Client goes to the Connection Server, authentication is achieved and the desktop is loaded.  The connection from the View Client is then always PROXIED via the Connection Server to the View Desktop.

  • Step 1 (Login to Desktop) View Client > Connection Server > View Desktop
  • Step 2 (Logged into Dekstop) View Client > Connection Server > View Desktop

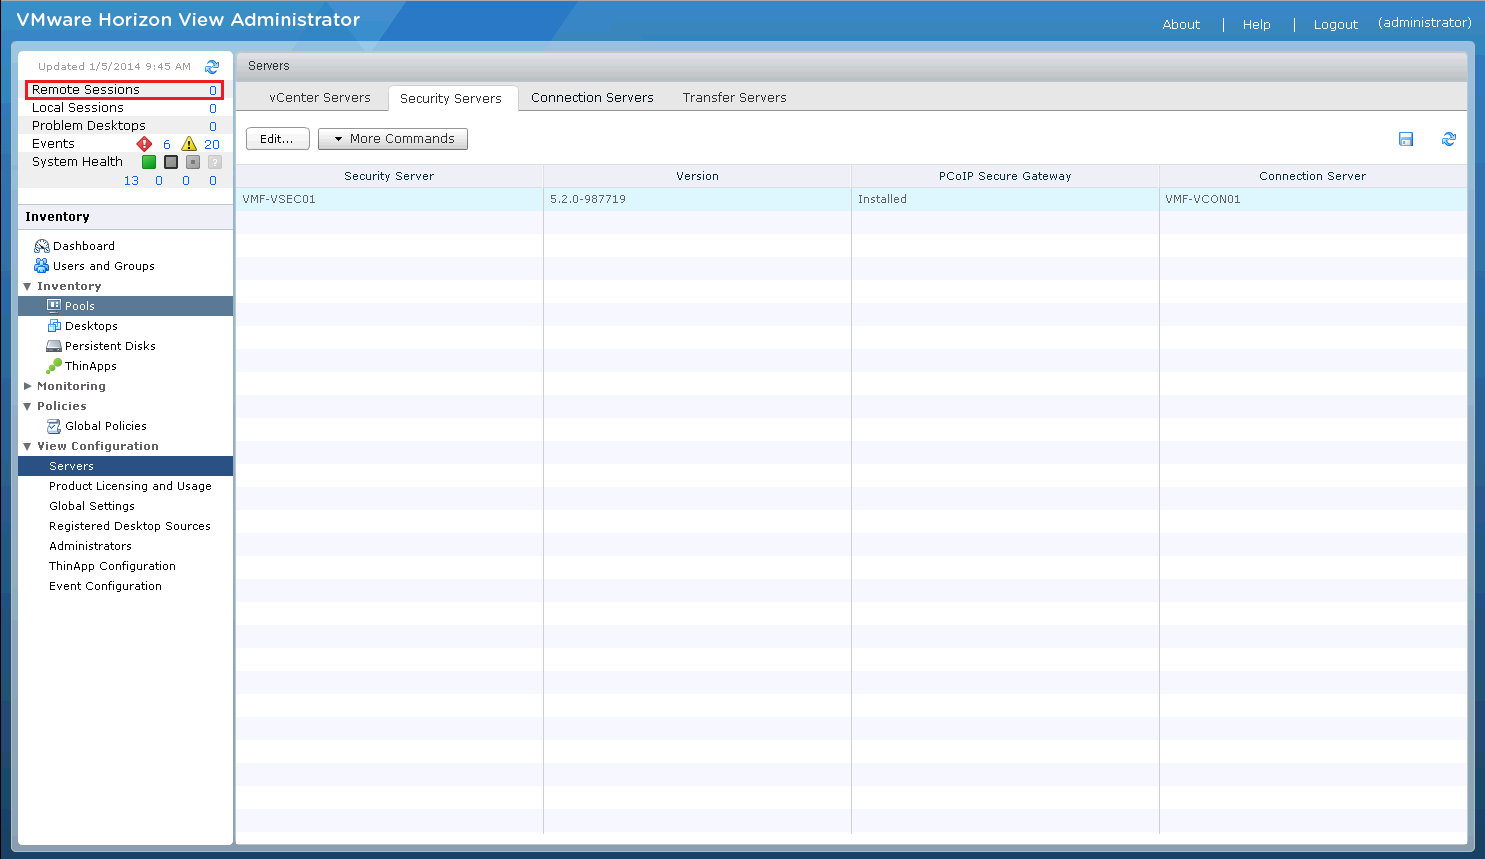
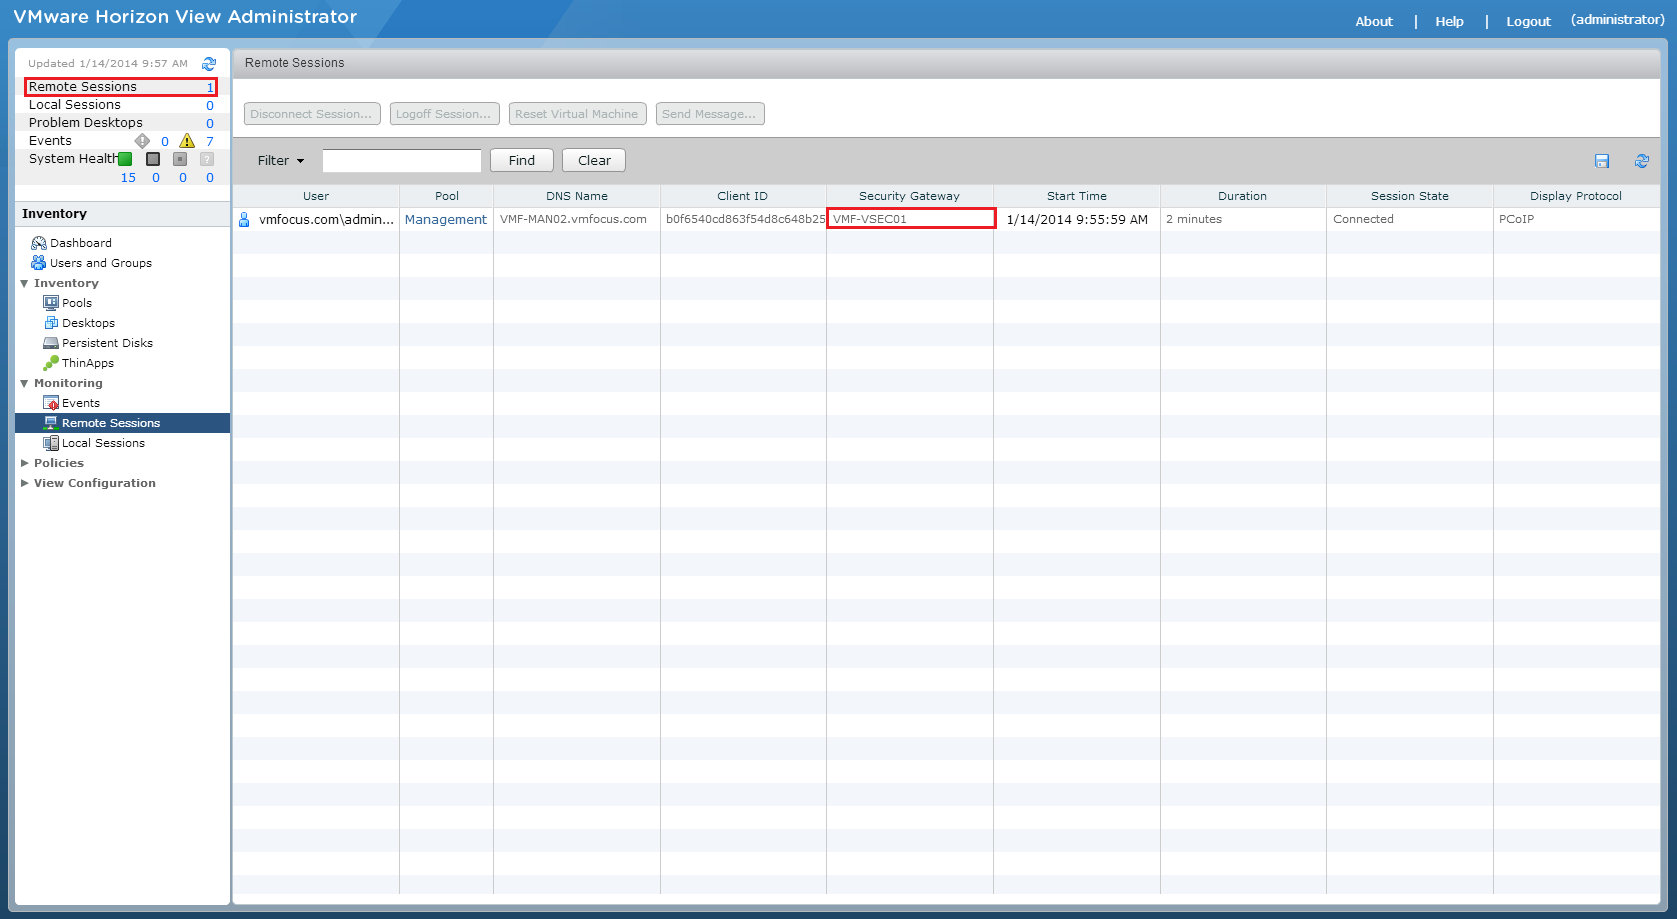
This can be confirmed in the View Administrator Portal be selecting Remote Sessions and you will see the Secure Gateway the desktop connection is using.

Secure Gateway

In this design your Connection Servers are always required.  Considerations for this design:

  1. Communications are secure between View Client and View Desktop
  2. Requirement to use Security Servers (your View Client will connect and authenticate successfully, however you will see a black desktop background then a disconnect).
  3. If you loose the Connection/Security Server, the user will be disconnected and will need to reconnect.

Basic Principles


The fundamentals of a Horizon View Load Balancing Design are driven by the requirements from the customer.  The basic principles that need to be followed are:

  • Security Server to Connection Server is a 1 – 1 relationship.
  • Two Factor & Smart Card Authentication are at Connection Server level
  • Internal and external access control is governed by Connection Server ‘Tags’
  • Differences between Pool Settings require different Desktop Pools (obvious eh?)
  • Desktop session will always get disconnected if using Secure Connection/Gateway

In the next blog post, I will look at Horizon View Load Balancing Failure Scenarios so that you know what results to expect.

Upgrading To Horizon View 5.3 – Step 4 – View Agent

In the last blog post we upgraded our Security Server which had a couple of issues which we resolved.  We did experience some downtime for remote access, but this was to be expected. Upgrading the Horizon View Agent consists of two parts:

  1. View Agent
  2. View 5.3 Remote Experience Agent

Upgrade Process

It is assumed that you have access to your existing ‘golden template’ for your Horizon View Desktops and that the recompose operation will be undertaken out of hours.

View Agent

In my lab, I have two ‘golden template’ images for Horizon View desktops, one which is a Windows 7 32 Bit and the other which is Windows 8 64 Bit. For this upgrade, I’m going to concentrate on the Windows 7 32 Bit desktop. The first thing we are going to do is download the correct installation which is at the time of writing is  VMware-viewagent-5.3.0-1427931 Launch the installer and hit ‘Next’

View Agent 01

Accept the EULA and hit ‘Next’

View Agent 02

Select the components you wish to install, I have ensured that Persona Management and vCenter Operations Manager are selected.

View Agent 03

Click Install

View Agent 04

After the install completes, you will need to reboot the ‘golden template’.

View 5.3 Remote Experience Agent

Next up is the View 5.3 Remote Experience Agent, with the latest version being VMware-Horizon-View-5.3-Remote-Experience-Agent-1.0-1404669 Launch the installer and accept the EULA

View Agent 05 Select your installation options

View Agent 06

Next hit Install

View Agent 07

Now this is done, you will need to do the following:

  1. Ipconfig /release on the ‘golden image’ desktop
  2. Shutdown the ‘golden image’ desktop
  3. Create a new snapshot
  4. Perform a recompose of the desktop pool
  5. Upgrade your View Client to 5.3

I’m sure you can appreciate the above are out of scope for this post, however I did want to give you a high level overview.

Final Thoughts

The upgrade process has been fairly straight forward.  VMware have made some drastic improvements to HTML access via Blast, it is now a usable method for accessing a desktop and makes using Horizon Workspace much more appealing.

I have yet to do more thorough testing, but so far so good.

Upgrading To Horizon View 5.3 – Step 3 – Security Server

In the last blog post we upgraded our Connection Server which was straight forward (great job VMware).  Next we need to upgrade the Security Server.

To make things slightly harder, I’m performing a ‘twist test’ which means that the upgrade is being performed using a Horizon View 5.2 dedicated desktop.  Any issues to the usability of the desktop will be in the table at the end of the post.

Upgrade Process

Before we embark on this upgrade process, the number one rule is to get a good backup.  Plus I recommend you check that everything is in good working order in your Horizon View 5.2 environment.

View Upgrade 01

View Security Server 

In my lab, I have a single View Security server called VMF-VSEC01.  Before we can start the upgrade, we need to make sure we have no Remote Sessions as these will be effected.

View Upgrade 22

The first thing we are going to do is download the correct installation which is at the time of writing is VMware-viewconnectionserver-x86_64-5.3.0-1427931

Launch the installer and hit ‘Next’

View Upgrade 10

Accept the EULA and hit ‘Next’

View Upgrade 11

Select Paired Connection Server and hit ‘Next’

View Upgrade 20

I then received an error message ‘Unable to connect to the server VMF-VCON01.vmfocus.com on TCP port 8009.  Please check that the specified Connection Server is running and that this TCP port is not being blocked by a firewall’

View Upgrade 23

A telnet to VMF-VCON01 on 8009 shows that the Connection Server is listening correctly.

I was unable to select ‘Prepare for Upgrade or Re installation’ of my View Security Server as this was ‘greyed out’.

To resolve this, go into Windows Advanced Firewall on both your View Connection and Security Server > Connection Security Rules > Delete > VMware View Security Pairing

View Upgrade 24

A quick re try and we are now able to enter a Security Server Pairing Password.  This needs to be set in View Administrator by going to View Configuration > Servers > Connection Servers > More Commands > Specify Security Server Pairing Password

View Upgrade 25

We can now enter the Security Server Pairing Password in our installation screen

View Upgrade 26

Check your External URL, PCoIP External URL and Blast External URL to ensure these are correct and hit ‘Next’

View Upgrade 27

Select Configure Windows Firewall Automatically and hit ‘Next’

View Upgrade 28

Then hit ‘Install’

View Upgrade 29

A quick check of the vmfocus.com Horizon View environment shows everything is working, so onto the next step!

View Upgrade 30

Twist Test

Question Answer
Did the installation cause any disruption to existing internal Horizon View 5.3 desktop connections? No
Able to connect to existing composed desktops after installation? Yes
Recompose tasks work on Horizon View 5.2 desktops? Yes
Did the View Security Server require a reboot? No
Did external remote access work during installation? No
HTML 5.3 Access via Blast working after installation? Yes
External remote access working after installation? Yes

Upgrading To Horizon View 5.3 – Step 2 – Connection Server

In the last blog post we upgraded our Composer Server which was straight forward (great job VMware).  Next we need to upgrade the Connection Server.

The upgrade process is in two parts, first of all we need to upgrade the Connection Server and then install HTML Access.

To make things slightly harder, I’m performing a ‘twist test’ which means that the upgrade is being performed using a Horizon View 5.2 dedicated desktop.  Any issues to the usability of the desktop will be in the table at the end of the post.

Upgrade Process

Before we embark on this upgrade process, the number one rule is to get a good backup.  Plus I recommend you check that everything is in good working order in your Horizon View 5.2 environment.

View Upgrade 01

The Connection Server upgrade forms two parts:

  1. Connection Server
  2. View HTML Access

View Connection Server 

In my lab, I have a single View Connection server called VMF-VCON01.

The first thing we are going to do is download the correct installation which is at the time of writing is VMware-viewconnectionserver-x86_64-5.3.0-1427931

Launch the installer and hit ‘Next’

View Upgrade 10

Accept the EULA and hit ‘Next’

View Upgrade 11

Click Install

View Upgrade 12

A quick check of the vmfocus.com Horizon View environment shows everything is working, so onto the next step!

View Upgrade 13

Twist Test

Question Answer
Did the installation cause any disruption to existing external Horizon View 5.2 desktop connections? No
Able to connect to existing composed desktops after installation? Yes
Recompose tasks work on Horizon View 5.2 desktops? Yes
Did the View Connection Server require a reboot? No
HTML 5.2 Access via Blast working after installation? No

View Connection Server HTML Access

Download the correct installed which is at the time of writing is VMware-Horizon-View-HTML-Access_x64-2.2.0-1404668

Launch the installer and hit ‘Next’

View Upgrade 14

Access the License Agreement and hit ‘Next’

View Upgrade 15

Select install location

View Upgrade 16

Hit Install

View Upgrade 17

Twist Test

Question Answer
Did the installation cause any disruption to existing external Horizon View 5.2 desktop connections? No
Able to connect to existing composed desktops after installation? Yes
Recompose tasks work on Horizon View 5.2 desktops? Yes
Did the View Connection Server require a reboot? No
HTML 5.3 Access via Blast working after installation? Yes

Upgrading To Horizon View 5.3 – Step 1 – Composer Server

Horizon View 5.3, brings with it a host of new features.  The one which I’m most excited about is being able to use Windows Server 2008 R2 as a desktop operating system.  A list of enhancements is shown below (source VMware Horizon View 5.3 release notes)

What’s New?

  • Windows Server 2008 R2 Desktop Operating System Support
  • Windows 8.1 Desktop Operating System Support
  • VMware Horizon Mirage Support
  • VMware Virtual SAN Support
  • vDGA Support
  • VMware Horizon View Agent Direct-Connection

TOP TIP: Horizon View does not support Windows 2012 Active Directory

Upgrade Process

Before we embark on this upgrade process, the number one rule is to get a good backup.  Plus I recommend you check that everything is in good working order in your Horizon View 5.2 environment.

View Upgrade 01

Twist

To make things a little more interesting, I’m going to do the upgrade whilst using a Horizon View 5.2 dedicated desktop to see if any part of the upgrade effects my experience or the ability to work.

Upgrade Order

The order in which I’m going to tackle the upgrade is as follows:

  1. View Composer
  2. View Connection Server including HTML Access
  3. View Security Server
  4. View Transfer Server (I don’t have one of these in my environment)
  5. View Agent including Remote Experience Agent
  6. View Client

View Composer

In my lab, View Composer is on a seperate Windows 2008 R2 Server called VMF-VCOM01.

The first thing we are going to do is download the correct installation which is at the time of writing is VMware-viewcomposer-5.3.0-1427647

Launch the installer and hit ‘Next’

View Upgrade 02

Accept the EULA and hit ‘Next’

View Upgrade 03

Select install location and hit ‘next’

View Upgrade 04

Enter your ODBC Password

View Upgrade 05

In my environment, I’m using an existing SSL certificate.

View Upgrade 06

Hit Install

View Upgrade 07

Once finished a reboot is required.

A quick check of the vmfocus.com Horizon View environment and we can see everything is ‘tickety boo’.

View Upgrade 08

Twist Test

Question Answer
Did the installation cause any disruption to existing Horizon View 5.2 desktop connections? No
Able to connect to existing composed desktops after installation? Yes
Recompose tasks work on Horizon View 5.2 desktops? Yes
Did the View Composer Server require a reboot? No
HTML 5.2 Access via Blast working after installation? Yes