Horizon View 5.2 Local Mode – How It Works & Best Practices

I wanted to put together this blog post as there doesn’t seem to be a huge amount of information out on Horizon View Local Mode, on how to configure it and how you should expect to see it working.

I’m going to assume that you have built your Horizon View environment correctly, if you need some pointers, then I did a series of blog posts on the VCP5-DT exam objectives.

View Local Mode Best Practices

  • The first thing we need to remember is that Persona Management does not work with Local Mode, why’s that you ask? Well if you think about it if I’m working offline how do I synchronize my ‘user data’ with a UNC path?
  • It’s all about the ‘Persistent Disk’ this needs to be  large enough to accommodate AppData/Contacts/Desktop/Documents/Downloads/Favorites/Links/Music/Pictures/Saved Games/Searches/Start Menu/Videos one of the key things is always the users Outlook OST file if this is 10GB in size you need to start with at least a 20GB Persistent Disk and expand as needed.
  • When the user goes offline with the desktop, in my experience it is best for them to stay offline rather than check in and out as the time taken to do this can negate the all important end user experience.  The downside to this, is that  they can only access there desktop on the device which the desktop has been downloaded to.  Consider giving them access to a ‘floating’ desktop as well for use with HTML5 access.
  • Create a separate pool for Local Mode users as if you perform a recompose, they are going to have to download another full desktop over a WAN link, ouch!
  • Consider turning off, Compress and De Duplication as this put’s more strain on the offline desktop host and also on the View Transfer Server.  Yes you will get more data and bandwidth used, but happier end users as they see a performance impact on their desktop experience.
  • Make sure that the initial ‘Check Out’ of the Local Mode desktop is done on a LAN environment.
  • Depending on how many Local Mode Clients you have, stick to less than 20 per View Transfer Server.
  • Only replicate Persistent Disks, your OS Disk should be considered disposable.
  • Set a maximum time without server contact, I know this contrary to item 2.  However, the user should have to login to the View Client on a regular basis to force server contact.  As without this, you as a View Administrator have no control on what happens to their desktop.
  • Check that your user laptops will support the hardware reqiurements to work in Local Mode

How Local Mode Replication Works

Let’s say your Target Replication Frequency is once per day for ease.

  • On Monday your replication completes.
  • On Tuesday your replication starts but you go offline.
  • On Wednesday, Tuesday replication will continue until it completes and then Wednesday replication will start.

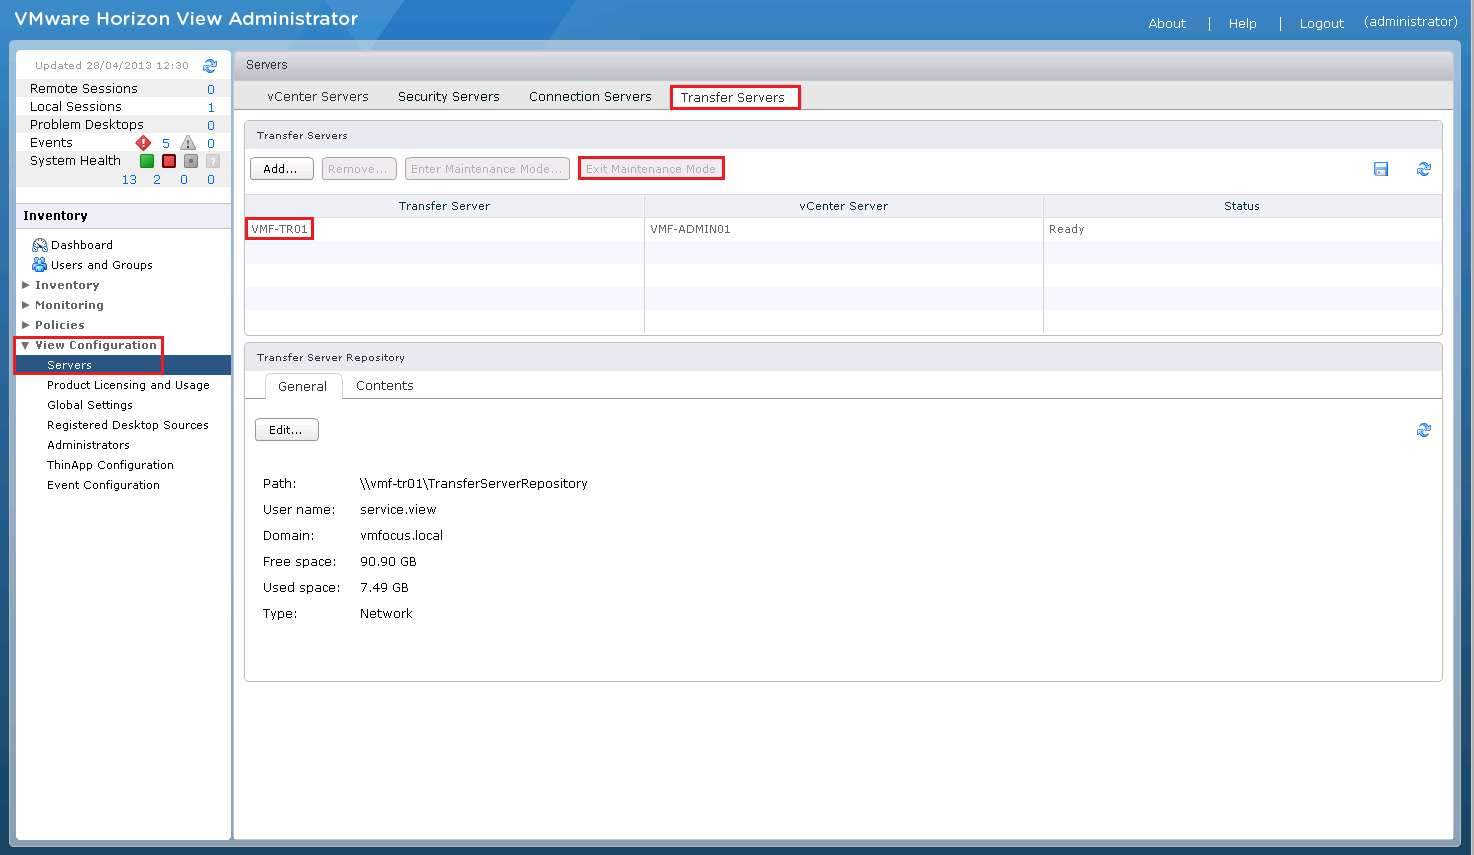
What To Expect In Horizon View Administrator/vCenter

When I first started using Local Mode, I couldn’t really find any information on what to expect, so below is the chain of events that I consider takes place.

Note, this is all my own research that has not been ratified by VMware.

Term Clarification

‘Online’ Local Mode Desktop is the VM held on vCenter

‘Offline’ Local Mode Desktop is the VM held on the users laptop

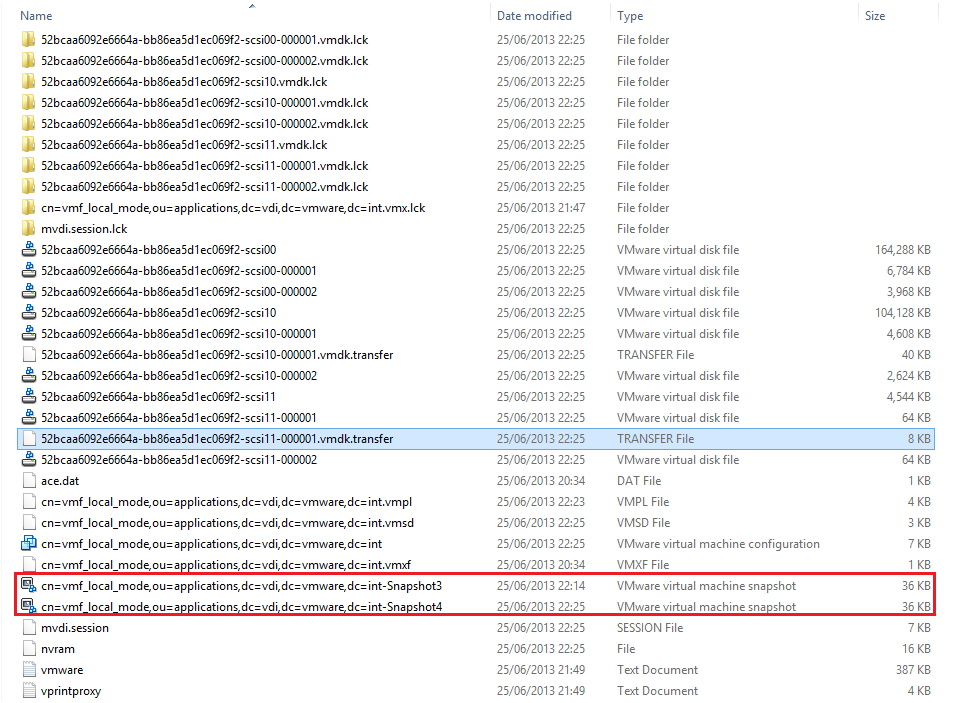
If you monitor the location of your ‘Offline’ Local Mode Desktop, the default location is C:UsersUser NameAppDataLocalVMwareVDMLocal Desktops you will notice a Virtual Machine Snapshot File

This is the last known good snapshot which has taken place, which has been committed to the ‘Online’ Local Mode Desktop

Snapshot3

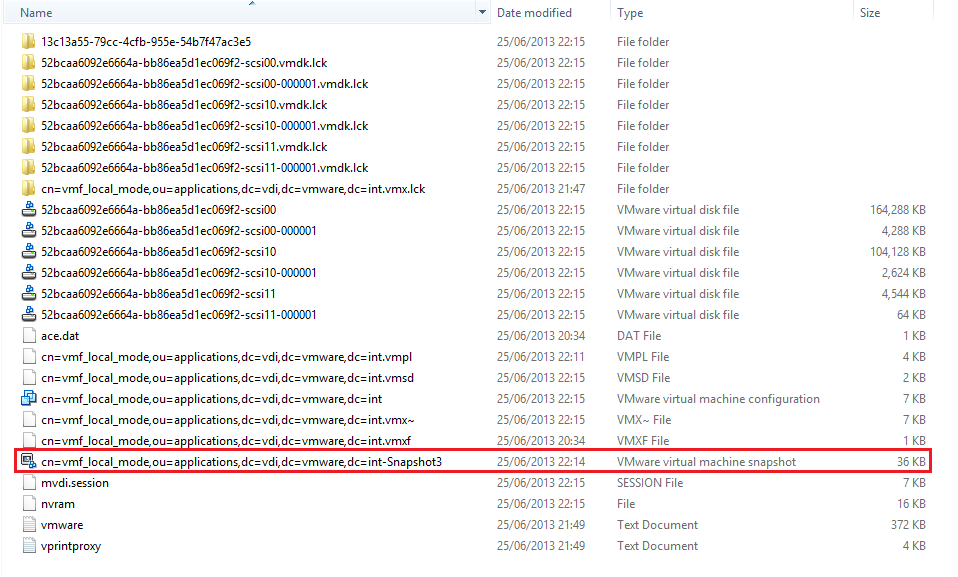
At the next Target Replication Frequency interval, another snapshot is taken, in this case we have Snapshot3 and Snapshot4 in situ.

Snapshot4

The snapshot delta is uploaded to the View Transfer Server which ‘adds’ the snapshot Virtual Disk from the ‘Offline’ Local Mode Desktop to itself

VMF-TR01

You will see this Recent Task appear in vCenter

Snapshot Overview01

View Transfer Server then processes the changes from the last delta and releases the Virtual Disk and goes back into it’s normal state.

Snapshot Overview

An acknowledgement is sent from the View Transfer Server to the ‘Offline’ Local Mode Desktop releases the oldest snapshot as this has been committed to the View Transfer Server and you are left with the last known good snapshot.  In this case it would be snapshot4.

Next your ‘Online’ Local Mode Desktop in my case VMF-LM01 creates a snapshot from the View Transfer Server process to commit the changes to the ‘Online’ Local Mode Dekstop (VMF-LM01)

Snapshot Overview04

This can be verified by checking the Snapshot Manager for VMF-LM01.

VMF-LM01

This snapshot is then committed and removed to ensure that both the ‘Offline’ and ‘Online’ Local Mode Desktops VMF-LM01 are kept in sync.

Snapshot Overview03

For those of you paying attention, some of the timelines aren’t 100% in synch, this is due to my inability to keep up with the transfer process.  However the chain of events are correct!

If anyone is able to add anymore information to this post, it will be welcomed.

Horizon View 5.2 Common HTML5 Access Issues

I run into a number of minor issues when I was configuring Horizon View 5.2 HTML access, so thought it would be a good idea to get my frustrations, I mean fixes down in a blog post.

1. Connection Server

Check your Connection Server settings, as URL’s are reset after the upgrade.  In specific make sure that

HTML5 Issues 1

2. Security Server

Check your Connection Server settings, as URL’s are reset after the upgrade.  In specific make sure that

HTML5 Issues 2

3. View Desktop

When connecting to the View Desktop if you receive error message ‘the display protocol for this desktop is currently not available.  Please contact your system administrator’.

HTML5 Issues 5

Double check to make sure the VMware Blast service is running on your target View Desktop and that you can telnet to the View Desktop on port 22443 as this is the  port that it listens for connections on.

HTML5 Issues 3

If you close your Horizon View HTML5 session without logging out and then try to reconnect again you might see the error message ‘All available desktop sources for this desktop are currently busy. Please try connecting to this desktop again later, contact your system administrator.

HTML5 Issues 4

To rectify this, log out and then log back in again.

4. Firewall

You can authenticate correctly to your View Connection/Security Server however when you go to launch your desktop, it sits on sending request and times out.

HTML5 Issues 6

Check your NAT rules on your Firewall to make sure that Port 8443 is NAT’d to your Horizon View Security Server.  To double check this telnet to your external IP address on Port 8443.

Upgrading To Horizon View 5.2 – View Agent

In the previous four posts we upgraded all the servers in our Horizon View environment.

  1. Upgrading To Horizon View 5.2 – Composer Server
  2. Upgrading To Horizon View 5.2 – Connection Server
  3. Upgrading To Horizon View 5.2 – Security Server
  4. Upgrading To Horizon View 5.2 – Transfer Server

Now it’s time to update our View Desktop sources with the Horizon View 5.2 Feature Pack.  It’s fair to say that I’m a little excited by this as it means I can demo the Horizon View awesomeness over HTML5.

Horizon View Agent

Before we can install the Horizon View 5.2 Feature Pack, we need to upgrade the View Agent.  The View Agent can be found here. At the time of this blog post, the most recent version is VMware-viewagent-x86_64-5.2.0-987719.exe

Launch the installer

View Agent 1

Click Next

View Agent 2

We have another EULA to Accept

View Agent 3

The default settings normally suffice, the only thing you might want to change is if you are using SmartCard authentication.  Hit Next

View Agent 4

Ready to hit the Install button

View Agent 5

This is going to take some time.  Hooray it’s finished.

View Agent 6

Time for  a quick reboot before we move onto installing the Horizon View 5.2 Feature Pack

View Agent 7

Horizon View Feature Pack

Now we have updated the Horizon View Agent, next on the agenda is downloading the Horizon View 5.2 Feature Pack which comes in two flavors  a 64 Bit and 32Bit version, both of which can be found here.

At the time of writing this blog post, the most recent version is VMware-Horizon-View-5.2-Remote-Experience-Agent-x64-1.0-1046150

Launch the installer

View FP 1

Crikey, straight onto accepting the EULA

View FP 2

We are going to install both HTML Access and Unity Touch, so click on Install.  Note that the Windows Firewall service must be running.

View FP 4

You don’t have to restart your View Desktop source, but I’m going to as I like to make sure everything is working.

The next step is to take a snapshot and then a recompose on our desktop pool to use this.

View FP 5

On your Desktop Pool, you need to enable HTML Access which is under Pool Settings

View FP 6

I would strongly recommend Disabling the Pool before you change the images.

Just so you know that I’m using the correct image, here is a screenshot of my vCenter Settings after the recompose.

View FP 7

This seems to be a good place to leave this blog post, I will do a separate post on a few things to check to make sure Horizon View 5.2 HTML Access works.

Upgrading To Horizon View 5.2 – Transfer Server

We are on a roll, this is the fourth post in the upgrading to Horizon View 5.2.  To upgrade the Transfer Server we use the Connection Server installer from here and at the time of writing the latest release is VMware-viewconnectionserver-x86_64-5.2.0-987719.exe

Before we start the upgrade process, it’s a good idea to place the Transfer Server into Maintenance Mode, to do this, login to View Administrator and go to View Configuration > Servers > Transfer Servers > Enter Maintenance Mode

Security Server Upgrade 1

Now that’s done, lets crack on and launch the installer

Connection Server Upgrade 1

Click Next

Connection Server Upgrade 2

As always, accept the EULA

Connection Server Upgrade 3

Double check your domain details, transfer server FQDN and your administrators email address and click Next

Security Server Upgrade 2

Select ‘Configure Windows Firewall automatically’ and hit Next

View Security Server 7

Then click Install

View Security Server 8

This is going to take a few minutes, so time for  a quick brew.

View Security Server 9

Let’s double check Programs & Features to make sure we are on the correct Horizon View version.

View Security Server 10

At this point, I suggest you reboot your Transfer Server just to make sure everything is ‘tickety boo’.

Now it’s back online let’s go into View Administrator and go to View Configuration > Servers > Transfer Servers > Exit Maintenance Mode

Security Server Upgrade 3

Upgrading To Horizon View 5.2 – Security Server

The good news is that to upgrade the Security Server we use the Connection Server installer from here and at the time of writing the latest release is VMware-viewconnectionserver-x86_64-5.2.0-987719.exe

Launch the installer

View Security Server 1

Click Next

View Security Server 2

Accept the EULA

View Composer Upgrade 3

Verify that your Connection Server FQDN is correct

View Security Server 3

Next we need to jump into the View Administrator and go to View Configuration > Servers > Connection Servers > More Commands > Specify Security Server Pairing Password

View Security Server 4

Cool, once you have done this, enter the same password on the Security Server installation and click Next

View Security Server 5

Verify your URL’s for your Security Server and click Next

View Security Server 6

Choose ‘Configure Windows Firewall Automatically’

View Security Server 7

Now let’s click Install

View Security Server 8

Quite a quick installation, hopefully you should have the Finish button available.

View Security Server 9

As always, we are going to give the server a reboot and check Programs & Features to make sure we are running the correct version.

View Security Server 10