VMware View – Objective 1.5 Preparing Active Directory For Installation

Knowledge

  • Describe characteristics of required Active Directory domain accounts (e.g., permissions).
  • Describe characteristics of required Active Directory groups
  • Identify and describe the GPO template files
  • Describe Organizational Units (OUs) for machine accounts and kiosk mode client accounts
  • Verify trust relationships

Active Directory Requirements

Each View Connection Server must belong to an Active Directory domain, in my case this is vmfocus.local.  The View Connection Server must be a member server and not a domain controller (same requirements for vCenter Server).

Note, the View Connection Server can be located in a different domain as along as you have a two way trust relationship in place.

Active Directory Security Groups are used to specify which users are allowed to access which desktops and pools.  Active Directory Security Groups are also used to define which users are allowed to administrator the View Connection Server.  To make things simple, I have created two Security Groups:

  • ViewAdministrators
  • ViewUsers

ViewSecurityGroup

Note, Security Servers reside in the DMZ and as such are not required to be part of an Active Directory domain.

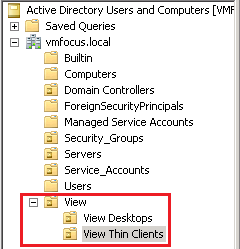
Organizational Unit’s should be created for View Desktops, to ensure that only specific Group Policy Objects are applied to them.  As you can see I have created one called ‘View Desktops’.

Different OU’s should be used for Kiosk/Thin Clients as different Group Policy Objects will be applied to them e.g. for a kiosk/thin client you would want to be locked down so only View can be launched and on a normal laptop or desktop the Group Policy Object would be less restrictive.

View AD

Template Files

VMware View comes with a number of Administrative Templates twhich have common configuration settings to make our life a bit easier!

These can be found on your View Connection Server under …VMwareVMware ViewServerextrasGroupPolicyFiles

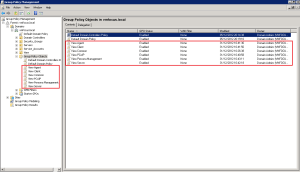
To import the ADM template files, launch Group Policy Management

GPO1

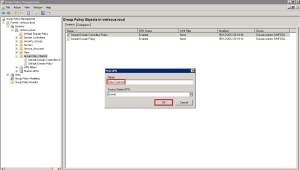
Right Click Group Policy Objects and click New

GPO2

Give the new Group Policy Object a name, in my case, I’m going to roll with ‘View Common’ then hit OK

GPO3

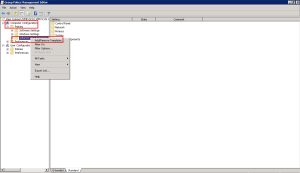
Now we are going to Right Click and Edit the ‘View Common’ Group Policy

GPO4

Double Click ‘Computer Configuration’ then expand ‘Policies’ and lastly Right Click Administrative Templates and select Add/Remove Template
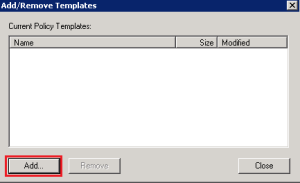
GPO5

Click Add

GPO6

Browse to the location on your View Connection Server and select the ADM template you want to add.  In this example, we are going to use vdm_common.adm by going to \VMF-CON01c$Program FilesVMwareVMware ViewServerextrasGroupPolicyFiles

GPO7

If you have been successful, you should see the ‘vdm_common’ ADM in your Add/Remove Templates dialogue box.

GPO8

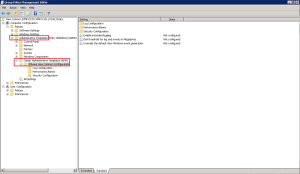
To verify the ‘vdm_common’ ADM expand Administrative Templates > Classic Administrative Templates (ADM) and you should see VMware View Common Configuration

GPO9

Rinse and repeat for the rest of the View ADM templates you want to import.

TOP TIP: Create a GPO for each View ADM Template, to make management easier.

GPO10

Remote Desktop Users

To allow users access to there View Desktop, we need to give them the Remote Desktop Users rights.  Does this mean that each user has access to any desktop? Nope, as the connection still goes via the ‘View Connection Server’ which checks rights to access the relevant desktop.

The easiest and most effective way to grant ‘Remote Desktop User’ rights is to use Restrictive Groups.

Create a new Group Policy Object, I’m going to call mine ‘Remote Desktop Users’, I know very original!

Edit the GPO, and browse to Computer Configuration > Windows Settings > Security Settings > Restricted Groups

Restricted Groups 1

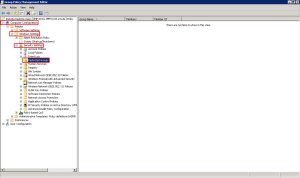
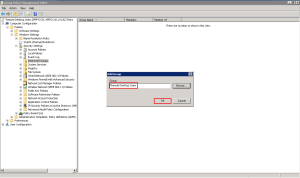
Right Click anywhere on the right hand side and Select Add Group

Restricted Groups 2

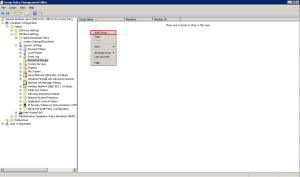
Type in Remote Desktop Users and hit OK

Restricted Groups 3

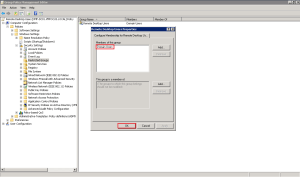
Now we need to specify who is going to be a member of the Remote Desktop Users group.  Click Add from the ‘Members of this group’ dialog box.

Restricted Groups 4

To keep things simple, I’m going to add ‘Domain Users’

Restricted Groups 5

Hit OK and you will see ‘Members of this group’ has been updated to include ‘Domain Users’.

Restricted Groups 6

Now you need to link the ‘Remote Desktop Users’ GPO to the appropriate OU in your Active Directory environment.

VMware View – Objective 1.4 Install View Security Server

Knowledge

  • Identify minimum hardware and software requirements for installation
  • Identify required firewall rules
  • Identify security server pairing password
  • Navigate the View Connection Server installation wizard

Hardware Requirements

Processor Pentium IV 2.0GHz or higher.  Recommended 4 CPU

Networking One or more 10/100Mpbs NIC’s.   Recommended 1Gbps NIC

Memory 4GB RAM.  Recommended 10GB RAM for 50 or more desktops

Operating System – Software Requirements

Windows Server 2008 R2 64 Bit Standard or Enterprise

Windows Server 2003 R2 32 Bit Standard or Enterprise

Note, to use PCoIP Secure Gateway component, the OS must be Windows Server 2008 R2 64 Bit.

Virtualization – Software Requirements

The following version of vSphere are supported:

vSphere 4.0 Update 3 or higher

vSphere 4.1 Update 1 or higher

vSphere 5.0 or higher

Note, both ESX and ESXi hosts are supported.

Firewall Rules

The Security Server acts as a ‘secure gateway’ to the View Connection Server and as such should be placed in a DMZ (a logical zone between the internet and LAN).  As the Security Server is internet facing it will require the following Ports to be opened:

TCP 443 Inbound

PCoIP View Client to Security Server

TCP 4172 View Client to Security Server

UDP 4172 View Client to Security Server

UDP 4172 Security Server to View Client

PCoIP Security Server to Virtual Desktop

TCP 4172 Security Server to Virtual Desktop

UDP 4172 Security Server to Virtual Desktop

UDP 4172 Virtual Desktop to Security Server

Security Server Installation

As with previous posts, it’s a good idea to recap on what the Security Server does.  Essentially, the Security Server bypasses the need for a third party VPN device such as PPTP, L2TP IPSEC.

An SSL connection is made directly to the Security Server.  The link to a View Connection Server is a one to one relationship.  Therefore, if you have two View Connection Servers then you would need two Security Servers.

If you decide that two Security Servers are required then a third party load balancing device will need to be obtained as View doesn’t have this ability natively.

How does it work? Well two SSL tunnels are created, the first to the Security Server when the user authenticates, a secondary SSL tunnel is then created when the user accesses the View Desktop.

As mentioned previously, the Security Server should sit within a DMZ and therefore should not be part of your Active Directory domain.

Taking the above into account, I have created a VM called VMF-SS01 with the following specifications:

1 x vCPU

4 GB RAM

1 x vNIC

We use the same installer as the VMware View Connection Server which can be downloaded from here.  As at the time of this blog post, the most recent version is VMware-viewconnectionserver-x86_64-5.1.2-928164.exe

Launch the installer and click Next

View Instal 1

Accept the EULA and click Next

View Install 2

Choose the installation location, in most setups I tend to leave this as the default.

View Install 3

Select View Security Server and click Next

Security Server 1

Now we have to pair the Security Server with a View Connection Server.  This relies on DNS, with this in mind, you can choose to do a number of things:

  1. Create a host entry for your View Connection Server
  2. On the Security Server use a LAN DNS server and open up UDP and TCP Port 53 to the LAN

In my configuration, I’m going to opt for option 2. As it means the Security Server can resolve all my LAN servers, you probably wouldn’t do this in production!

Security Server 2

This is where things start to get interesting, we need to enter a ‘pairing password’ on both the Security Server and View Connection Server.  You need to enter the password on the Connection Server first. Jump onto your View Connection Server and go to View Configuration > Servers > Connection Servers > More Commands > Specify Security Server Pairing Password

Security Server 3

We now have to enter our one time password to enable authentication between the Security Server and View Connection Server.  A couple of things to note before we do this.

1. Windows Firewall doesn’t need to be turned on, even though it mentions it does.

2. The password is one time only to validate each server.

With this in mind, enter your passwords and hit OK.

Security Server 4

Jump back onto the Security Server in my case VMF-SS01 and enter the same password and click Next

Security Server 5

Next we need to enter in our external URL, I’m going to roll with view.vmfocus.com and we also need to enter our external IP Address.

Note, the external IP Address has to be static, using DNS with dynamic records such as no-ip.org do not work.

Security Server 6

We will allow Security Server to configure the Windows Firewall automatically

Security Server 7

We are cooking on gas now! Click Install

Security Server 8

Voila all Finished

Security Server 9

Now the strange thing is that even though we have installed the Security Server, the PCoIP Gateway is not enabled! This is covered in Objective 2.4.

VMware View – Objective 1.1 Install View Composer

Knowledge

  • Identify minimum hardware and software requirements for installation
  • Describe Composer database and connectivity
  • Describe Composer service and dependencies
  • Navigate View Composer installation wizard

Hardware Requirements

View Composer must be installed on the same server as vCenter which rules out the vCenter Server Appliance.

Operating System Requirements

vCenter 4.0 Update 3 or Higher Windows Server 2008 R2 Standard or Enterprise with no service pack or service pack one.

vCenter 4.1 Update 1 or Higher Windows Server 2008 R2 Standard or Enterprise with no service pack or service pack one.

vCenter 5.0 or Higher Windows Server 2008 R2 Standard or Enterprise with no service pack or service pack one.

Database

View Composer requires a SQL database or Oracle database.  For SQL this can be 2005 or 2008 and for Oracle both 10g or 11g can be used.   Both can be on the same instance as the vCenter database.  The database stores data related to:

  • vCenter Server connections
  • Active Directory connections
  • Linked Clone desktops
  • Replicas created by View Composer

Note, that each View Composer service must have it’s own database.

View Composer Installation

Before we install View Composer, it’s probably a good idea to recap what View Composer does.  It’s probably the main reason that makes View so viable, essentially it provides linked clone functionality.  You have a ‘parent VM disk’ which is read only, from this desktops are created using snapshots with very minor differences such as Computer Name and Active Directory GUID.

If we think about this, it gives us some unique advantages which are:

  • Storage requirements decrease (not from an IOPS perspective)
  • Quick desktop deployment as each linked clone only starts at 32MB in size difference from the parent rather than needing to copy the whole 10 or 20 GB VMDK.
  • Easier patch management by updating your ‘golden image/template’ with new patches, then point the parent image at the new snapshot.

The VMware View Composer Server needs to be downloaded from here.  As at the time of this blog post the most recent version is VMware-viewcomposer-3.0.0-691993.exe

For this installation, I’m using SQL 2008 Express, I have created a database called ViewComposer and service.vmware has DBO rights.  If you are unsure on how to do this, I wrote a guide which can be found here under SQL Configuration.

Launch the View Composer installer on your vCenter Server and click Next

View Composer 1

Accept the EULA and click Next

View Composer 2

Choose the installation location, in most setups I tend to leave this as the default.

View Composer 3

Now we need to enter the Data Source Name (DSN) details, click on ODBC DSN Setup

View Composer 4

Select System DSN and then Add

View Composer 5

Select SQL Server Native Client 10.0 and click Finish

View Composer 6

Enter the Name, Description and the SQL Server you want to connect to and hit Next.

View Composer 7

TOP TIP: If using SQL Express, go into services.msc and find SQL* and it will tell you the instance name.   In my case it’s VIM_SQLEXP

We are going to roll ‘With Integrated Windows Authentication’, so click Next

View Composer 8

Select ‘Change the default database to:’ and choose your View Composer database.

View Composer 9

Lastly click on Finish

View Composer 10

Give the connection and test and hopefully you get success!

View Composer 11

Back to the Database Information screen and enter in all the credentials.  I’m using my service.vmware account for connectivity to the View Composer database.  I strongly suggest you have a service account rather than using an administrator account.

View Composer 12

View Composer uses SOAP and uses the Port 18443 for this.  As no SSL Certificates are installed on my vCenter Server, View Composer will create an SSL.  So all we have to do is click Next

View Composer 13

Finally, we click Install and watch the magic happen.

View Composer 14

All done, click Finish

View Composer 15

Dang, we need to reboot vCenter.  In a production environment, this is key, so you may want to advise the client before hand, saving you having to wait around twiddling your thumbs!

View Composer 16

VMware View – Objective 1.2 Install View Standard & Replica Connection Server

Knowledge

  • Identify minimum hardware and software requirements for installation
  • Identify required firewall rules
  • Navigate the View Connection Server installation wizard

Hardware Requirements

Processor Pentium IV 2.0GHz or higher.  Recommended 4 CPU

Networking One or more 10/100Mpbs NIC’s.   Recommended 1Gbps NIC

Memory 4GB RAM.  Recommended 10GB RAM for 50 or more desktops

Operating System – Software Requirements

Windows Server 2008 R2 64 Bit Standard or Enterprise

Windows Server 2003 R2 32 Bit Standard or Enterprise

Note, to use PCoIP Secure Gateway component, the OS must be Windows Server 2008 R2 64 Bit.

Virtualization – Software Requirements

The following version of vSphere are supported:

vSphere 4.0 Update 3 or higher

vSphere 4.1 Update 1 or higher

vSphere 5.0 or higher

Note, both ESX and ESXi hosts are supported.

Firewall Rules

To allow communication to the View Connection Server, certain ports are required to be opened, as follows:

View Objective

View Connection Server Installation

The first server in our View environment is going to be the ‘View Connection Server’.

The Connection Server as we mentioned in the first VMware View – Overview Architecture is responsible for centralised management and handles all authentication requests via Active Directory to access a desktop.  It’s the first server in the ‘View’ infrastructure.

With this in mind, I have created a VM called VMF-CON01 with the following specifications:

1 x vCPU

4 GB RAM

1 x vNIC

I have then downloaded the VMware View Connection Server from here.  As at the time of this blog post, the most recent version is VMware-viewconnectionserver-x86_64-5.1.2-928164.exe

Launch the installer and click Next

View Instal 1

Accept the EULA and click Next

View Install 2

Choose the installation location, in most setups I tend to leave this as the default.

View Install 3

We are going to install a View Standard Server, click Next

View Install 4

Next we have to enter a password, which essentially protects any backups that View makes.

View Install 5

Good old Windows Firewall makes an entrance, select ‘Configure Windows Firewall Automatically’

View Install 6

Next we need to specify an Active Directory Security Group who can perform initial configuration tasks.  In my case, I’m rolling with ViewAdministrators

View Install 7

To access the Active Directory Domain, we need to specify a users credentials with appropriate access.  I like to use a service account for these purposes.

View Install 8

We can choose to participate in the ‘User Experience Improvement Program’ as this is a test lab, I’m going to opt out.

View Install 9

Finally, click Install, to let the View magic begin.

Capture 10

Boom, you should be greeted with ‘Installer Completed’.

View Install 11

You should notice an Icon on your desktop called ‘View Administrator Console’

View Install 12

Launch this or alternatively go to https://localhost/admin/

Ah, man down, it’s not working as we don’t have Adobe Flash Player installed

View Install 13

A quick Adobe Flash Player installation later and voila we now have access.

View Install 14

TOP TIP: I recommend choosing ‘Notify Me To Install’ Flash Updates as with many auto updates can break software access

VMware View – Overview Architecture

So it’s time to get involved with VMware View as per my last blog post.

Now it’s time to start learning this product, to do this, I use the following template which ‘touch wood’ has always worked for me in the past:

1. Carry the Building End-User Computing Solutions with VMware View book with me during my work week and read it at least once per day.

2. Watch VMware View 5 Essentials Training by Brian Knudtson and Lane Leverett

3. Lab time what I have learnt and then destroy and rebuild the lab until I have the content nailed.

4. Document my learning on this blog, this generally contains information I have learned but placed into my own words.

What is Virtual Desktop Infrastructure (VDI)

I thought that I knew what VDI was as I have worked with Remote Desktop Services (Terminal Services) and Citrix XenApp in the past, however I was wrong!

The key differences between ‘old school’ VDI AKA RDS and XenApp is that the users log into a ‘server desktop’ which is locked down by GPO.  Whereas, with VMware View each user has there own ‘virtual machine’ as a desktop, meaning that what they do doesn’t effect the other thirty users logged in.

VMware View Architecture

This is my understanding of each component in View.

Client – application locally installed to gain access to desktop, much the same as using RDP or Citrix Receiver

Agent – appears to be the same as VMware tools, it’s installed into the guest OS and provides ‘enhancements’.

Composer – allows the ability to create linked clone desktops from a master image, saving on storage space.

View Manager – this comes as four seperate components which are

  • Connection Server which handles all authentication requests via Active Directory to access a desktop.  This is the first server in the View Infrastructure.
  • Replica Server which is an exact copy of the Connection Server used for load balancing and redundancy
  • Security Server which sits in your DMZ and enables remote access to users Desktops.
  • Transfer Server enables the use of ‘Local Mode Desktop’ allowing users to take the ‘desktop’ offline and any block changes are transferred back to the Desktop on the ESXi Host

Something which stands out is that you can have multiple connection servers, however View doesn’t have any inbuilt load balancing so either a service aware load balancing device would need to be purchased such as a Kemp/Barracuda/F5 or you can use Windows Network Load Balancing.

VMwareView4