VMware View – Objective 2.6 Configure Advanced Display Protocol Settings (PCoIP/RDP)

Knowledge

  • Reference GPO templates
  • Describe RDP requirements
  • Locate ADM template files
  • Explain GPO settings including Describe “build to lossless” and Describe how to configure cache size
  • Identify maximum number of monitors and resolution
  • Configure Flash quality and throttling
  • Configure software 3D rendering capabilities

Reference GPO Templates

View comes with a number of built in Group Policy templates which are as follows:

View GPO

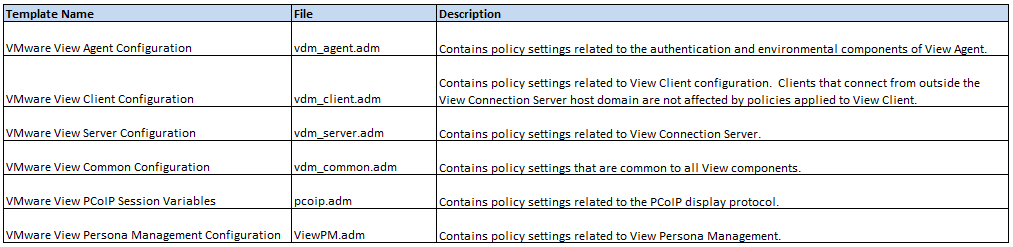
For a full break down of each Group Policy setting, I recommend reading the VMware View Administration – View 5.0 guide.

Describe RDP Requirements

To enable users to connect to there View Desktop, RDP has to be enabled on the Operating System.  When they grant the View Desktop Users access to a Restricted Group called ‘Remote Desktop Users’ and apply this group policy to the Organisational Unit that the View Desktops will be held.

I covered the configuration steps in VMware View – Objective 1.5 Preparing Active Directory For Installation under Section Remote Desktop Users.

The requirements for RDP are as follows:

  • Remote Desktop Connection 6.x > Windows XP
  • Remote Desktop Connection 6.x or 7.x > Windows Vista
  • Remote Desktop Connnection 7.x > Windows 7

The good news any of the above RDC protocols support dual monitors!

Locate ADM Template Files

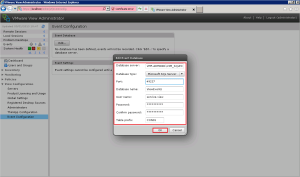
The ADM Template Files are located on your View Connection Server under …VMwareVMware ViewServerextrasGroupPolicyFiles

A bit like Blue Peter, I made this earlier which shows you how to import the ADM Templates VMware View – Objective 1.5 Preparing Active Directory For Installation under Template Files.

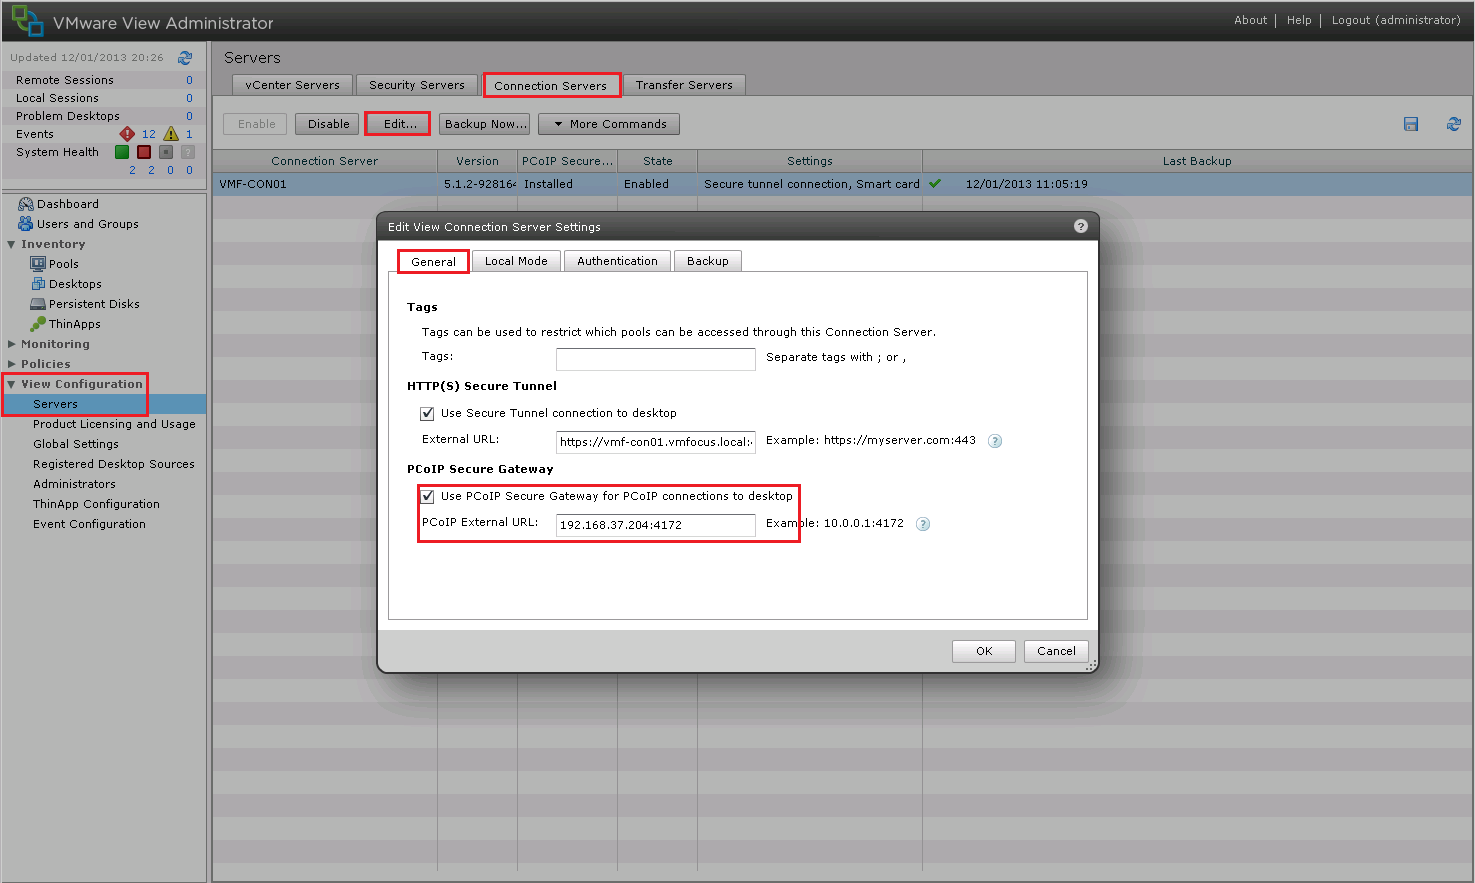
Explain GPO Settings Including Describe “Build To Lossless” and Describe How To Configure Cache Size

I feel like a parrot repeating myself, but here goes, for a full break down of each Group Policy setting, I recommend reading the VMware View Administration – View 5.0 guide.

One of the most important features of the PCoIP protocol is ‘build to lossless’ so what does this actually mean.  Well the essence of ‘build to lossless’ is to give the user the best experience possible.

Let’s say a user is in a cafe, and the are using there mobile phone to act as there WAP.  The likelihood is the connection will have high latency and there bandwidth is probably less than 1 Mbps. Rather than sending the complete desktop image immediately, the PCoIP protocol will send it in a ‘lossy’ state first which is a highly compressed initial image.  As the connection continues more data is sent and the ‘lossy’ initial image becomes fully rendered.

The good news is the user, has no idea this is going on in the background, they just think it’s sheer awesomeness!

PCoIP is a clever little protocol, as it uses the clients (dumb terminal) memory to cache portions of the display to save them having to be re-transmitted and re-rendered.  Currently this setting is only supported in Windows and Linux.

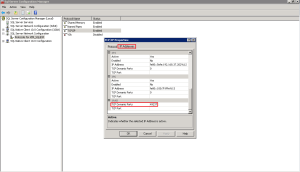
The VMware View PCoIP Session Variable ADM contains the setting.  If this isn’t configured or enabled then PCoIP uses 250MB.  If you do configure it, then the minimum setting is 50MB and the maximum is 300MB.

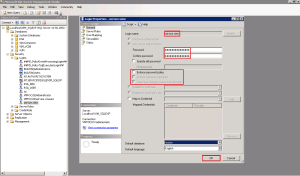
To get to this settings open up Group Policy Editor > View PCoIP > Computer Configuration > Policies > Administrative Templates > Classic Administrative Templates > PCoIP Session Variables > Not Overridable Administrator Settings > Configure PCoIP Client Image Cache Size Policy

PCoIP Client Image Cache Size Policy

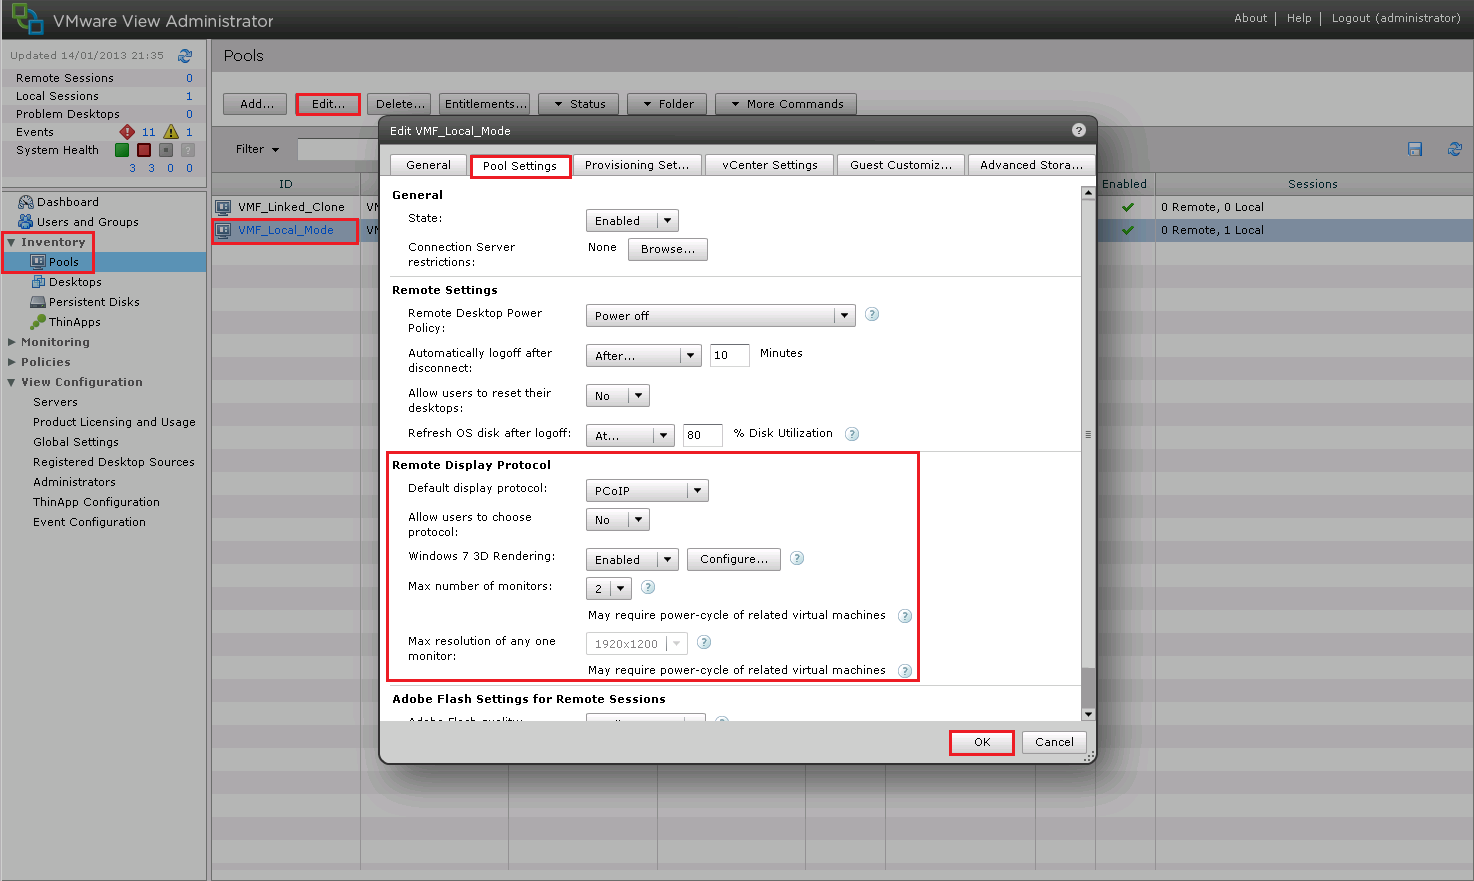
Identify Maximum Number Of Monitors and Resolution

If you really want too, you can have four monitors running up to 2560 x 1600 display on each!

Or if you want to roll with 3D enabled, then I’m afraid it’s only two monitors at 1920 x 1200.

Configure Flash Quality and Throttling

Before we go into the configuration, a couple of items about Flash.

  1. Bandwidth reduction is only available in Internet Explorer with Flash version 9 or 10.
  2. Flash cannot be running in full screen mode

Flash settings are configured per pool.  To change settings go too Inventory > Pools > Edit Pool Settings > Scroll Down to Adobe Flash Settings

Flash Settings

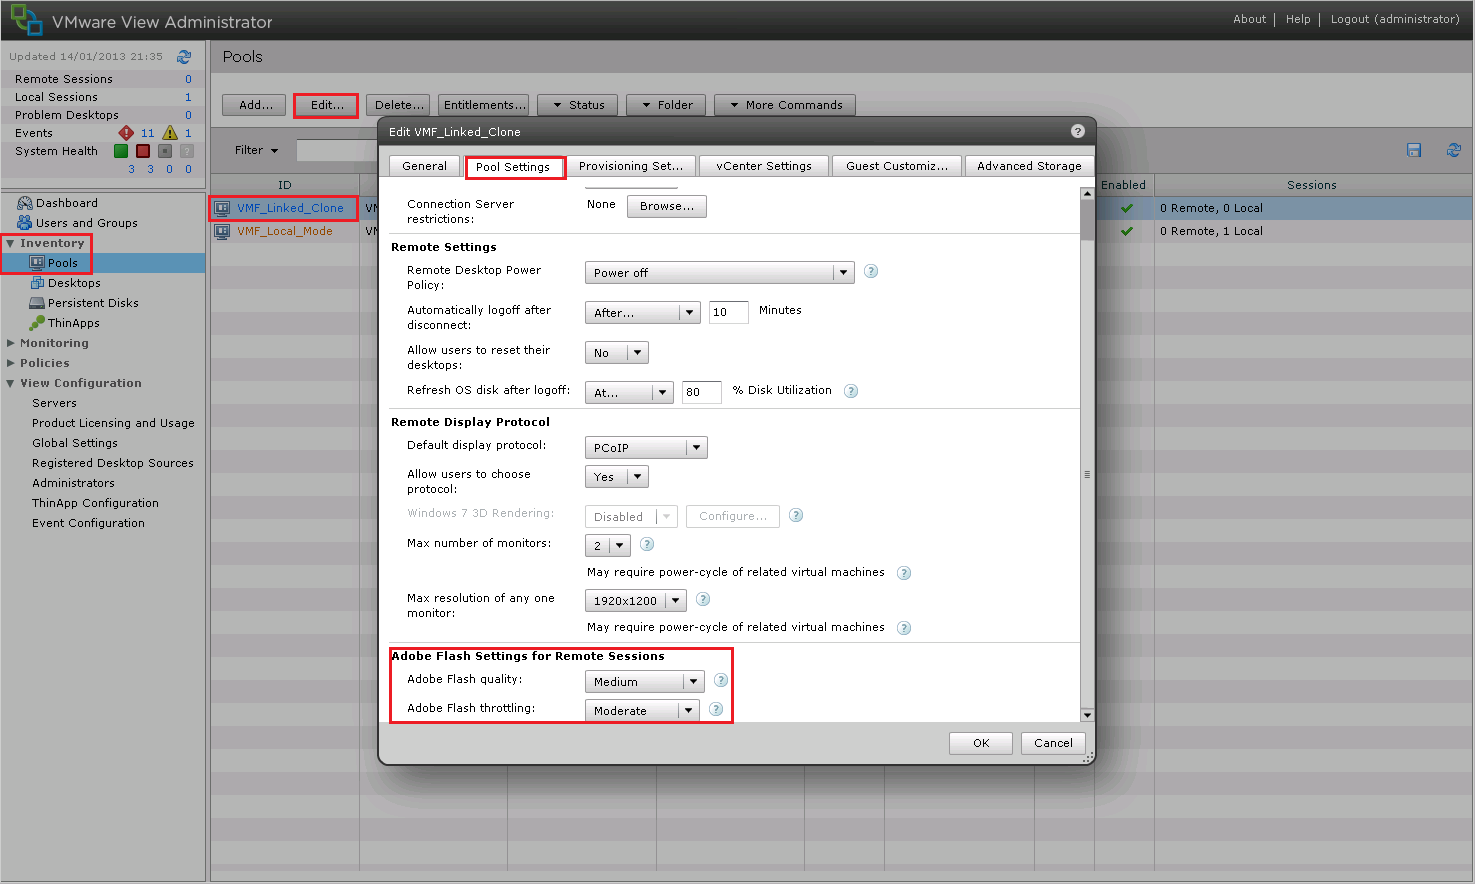
Naturally, you can select the Flash settings that work best for your environment.

Configure Software 3D Rendering Capabilities

So you really want to use the Windows 7 Aero theme? Well good news is that View supports it, however you need to make sure the following requirements are met:

  • ESXi 5.0 or later Hosts
  • vCenter 5.0 or later
  • Desktops must use Virtual Hardware 8 or later
  • PCoIP must be used
  • Users cannot choose there own display protocol

To enable 3D Rendering go too Inventory > Pools > Edit Pool Settings and change the following:

  • Default display protocol PCoIP
  • Allow users to choose protocol No
  • Windows 7 3D Rendering Enabled

3D Rendering

VMware View – Objective 2.5 – Configure View Transfer Servers

Knowledge

  • Identify Transfer Server repository
  • Identify vCenter Server that contains the Transfer Server
  • Identify the Transfer Server virtual machine

I’m not going to follow protocol on this blog post, as I want to show you the configuration steps, you will see by doing this we cover the objectives above with ease.

The Transfer Server Repository is the location for your Linked Clone Replicas (the snapshot of your original Operating System) or your Manual Desktop Pool.  It’s worthwhile noting that the Transfer Server can only be used with Dedicated Desktops, not Floating Desktops.

If you are rolling with Linked Clones, then you need to Publish your Snapshot which is the base image for your Linked Clone Pool.

Couple of caveats before we move forward:

  • Make sure your VM is running Hardware Version 7 (at the time of this post 8 is meant to be supported but I haven’t tested it yet).
  • Make sure that your Transfer Server SCSI Controller is set to LSI Logic Parallel

The Transfer Server Repository can be a network share located on another server or NAS, or in my case it’s an extra VMDK added to the VMF-TR01.

I have already added my Transfer Server into View to make sure I had it working before I did a blog post!

However, the process to enable the Transfer Server is fairly straight forward, go to View Configuration > Servers > Transfers and Select Add and choose your vCenter Server

View Transfer 1

Select your Transfer Server from the drop down list and Click Finish

View Transfer 2

Next we need to add some images to our Repository, so click on Transfer Server Repository and Click Edit and we get an epic failure ‘the settings for the Transfer Server repository cannot be edited until all the Transfer Servers are placed into maintenance mode’.

View Transfer 3

Simple fix, we just need to do what View tells us.  We need to Enter Maintenance Mode, by virtue of this, no new transfer will be able to take place, so bear this in mind in production.

View Transfer 4

Cool, now we are in Maintenance Mode, we can add an Image to our Repository.  First thing we are going to do is add another HDD to our Transfer Server.  You can see that I have added a 100GB VMDK Thinly Provisioned

View Transfer 5

In this instance, I have created a D: Partition called Data and a Folder named ‘TransferServerRepository’

View Transfer 6

This folder has then been shared out and I have given the Active Directory User ‘service.view’ Read, Write and Modify permissions.

Back to View Administrator and we want to Edit the Transfer Server Repository and enter the following details:

  • Network Share \vmf-tr01TransferServerRepository
  • User Name service.view
  • Password Password
  • Domain vmfocus.local

View Transfer 7

Now we need to Publish our Snapshot to the Transfer Server Repository.  Hit the Contents Tab and Click Publish and we get another epic fail ‘Publishing is not enabled because no Transfer Servers are currently working properly’.

View Transfer 8

The reason being we are still in ‘Maintenance Mode’ so lets ‘Exit Maintenance Mode’ and try again.

Cool, select your View Composer Image and Click OK (mines already been uploaded).

View Transfer 9

This is going to take quite a while, so it might be worth grabbing a cup of tea.

Once it’s all done you should see that the Image is Published and the Transfer Server is Ready.

View Transfer 10

That’s this objective done, we play around with the Transfer Server in a bit more detail during Objective 2.10

VMware View – Objective 2.4 Configure View Security Server

Knowledge

  • Configure View Connection Server backup settings
  • Identify external URL settings
  • Identify PCoIP secure gateway
  • Identify View Connection Server general settings
  • Edit View Security Server settings

Configure View Connection Server Backup Settings

So what actually needs backing up? Well the following components

  • View Connection Server
  • View Connection Server Active Directory Lightweight Directory Service
  • View Composer Database
  • View Security Server

We covered where to find the backup settings and how to backup the View Connection Server in VMware View – Objective 2.2 Configure View Standard & Replica Connection Servers.

The good news is that in this backup location we also have a copy of the View Connection Server Active Directory Lightweight Directory Service.

You can confirm this by accessing your View Connection Server and browsing too C:ProgramDataVMwareVDMbackups

View Backups

To backup the View Composer Database you can do this manually by stopping the View Composer Service and then logging into SQL Server Management Studio and Right Click the Database selecting Tasks and then Backup.

View Backups 2

However, most likely you wouldn’t want to stop the View Composer Service as Linked Clone Desktops won’t be available. Rather you would use a product such as Veeam or Unitrends to create a VSS Snapshot of your SQL Server instead.

Last of all VMware recommend you backup your Security Server on a monthly basis, as the server is static (data doesn’t change).

Identify External URL Settings

To allow remote users to access there View Desktop we need to enable access from the outside world.   This is where the External URL Settings come into play.

We need to use a Public IP Address which has an A record assigned to it e.g.

12.89.23.1 = view.vmfocus.com

This Public IP Address then needs to be routed and NAT’d to our View Security Server on Ports:

  • TCP 443 Inbound
  • TCP 4172 Inbound
  • UDP 4172 Inbound

To find the location of your External URL Settings go to View Configuration > Servers > Security Servers > Edit

View External URL

As you can see, I have updated mine already to https://view.vmfocus.com:443 and 12.89.23.1:4172

Identify PCoIP Secure Gateway

I mentioned back when we installed the Security Server that the PCoIP Gateway wasn’t enabled. So what is the PCoIP Secure Gateway?

Well it allows secure connections to your View Desktop remotely.  No VPN Client software required, how awesome is that?

To enable PCoIP Secure Gateway go to View Configuration > Servers > General and place a tick in ‘Use PCoIP Secure Gateway for PCoIP connections to desktop’.

PCoIP Secure Gateway

Note, when you have the Security Server role installed all connections go via this rather than too the Connection Server.

Identify View Connection Server General Settings

I’m slightly ‘miffed’ by this one, I don’t really understand what VMware want.  I have searched through the Administration  Security and Install guides and I can’t see anything relevant.  So onto the next part.

Edit View Security Server Settings

The Security Server Settings are located under View Configuration > Servers > Security Servers > Select Security Server > Edit

Security Server 1

Not a huge amount to see really, the only items we can change are the External URL and the Public IP Address.  We covered both of these earlier on i this blog post.  So it’s time to move onto the next objective.

VMware View – Objective 2.3 Configure View Standard & Replica Connection Servers

Knowledge

  • Identify View Connection Server backup settings
  • Identify View Global Settings
  • Identify the account to connect to vCenter
  • Add View license settings
  • Modify Global Policies
  • Configure external URL settings
  • Identify View Connection Server general settings
  • Identify default roles, custom roles, and what permissions are available
  • Describe the use of folders within the View Connection Server

Identify View Connection Server Backup Settings

View Connection Backup Settings are located in View Configuration > Servers > Connection Servers you can perform a Backup Manually by Clicking on Backup Now

View Connection Backup 1

By default the Connection Server settings are backed up to C:Program DataVMwareVDMBackups on a daily basis at midnight.  The default setting is to keep 10 backups.

This information can be viewed by Selecting the Connection Server and Clicking on Edit and Selecting the Backup Tab

View Connection Backup 2

Identify View Global Settings/Modify Global Settings

View Global Setting allow the configuration of items such as Session Timeouts, Pre Login Messages and allows us to change the Data Recovery Password.

View Global Settings can be found at View Configuration > Global Settings

View Global Settings

View Global Settings can be modified by Clicking on Edit to change either the General or Security Settings

View Global Settings 2

Identify The Account To Connect To vCenter

This is the account that forms the ‘link’ between View Connection Server and vCenter.

The account can be found by going to View Configuration > Servers > vCenter Servers

View vCenter Account

Add View License Settings

To Add your View Licenses go to View Configuration > Product Licensing & Usage > Edit License

View License

Configure External URL Settings

When you configure the View Connection Server, the External URL is going to be the internal FQDN of the View Connection Server.

We want to change this to be an External URL, but which can resolved by internal clients.  To achieve this we need to go to View Configuration > Servers > Connection Servers > Edit > General and change the External URL.

Old URL: https://vmf-con01.vmfocus.local:443

New URL: https://view.vmfocus.com:443

View External URL

As we have changed the DNS name to something external it won’t be able to resolve it in DNS on the LAN.  So let’s create an Active Directory Forward Lookup Zone for vmfocus.com and add in the A record view.vmfocus.com

Jump onto your Domain Controller and open DNS

Expand Forward Lookup Zones and then Right Click New Zone

View External URL 2

Click Next

View External URL 3

We want to create a Primary Zone so Click Next

View External URL 4

The Primary Zone wants to be replicated ‘To all DNS servers running on domain controllers in this domain: vmfocus.local’

View External URL 5

We are going to name the zone ‘vmfocus.com’ and Click Next

View External URL 6

‘Allow only secure dynamic update’s and Click Next

View External URL 7

Hit Finish and the vmfocus.com Forward Lookup Zone will be created

View External URL 8

Go into the Forward Lookup Zone for vmfocus.com and a New Host (A or AAA)

View External URL 9

Enter the first part of your external DNS name, for me it’s ‘view’ and then the internal IP address of your View Connection Server.  Then Click Add Host

View External URL 10

Now go to ping your external DNS name and it should be resolving correctly.

View External URL 11

Identify View Connection Server General Settings

I’m slightly ‘miffed’ by this one, I don’t really understand what VMware want.  I have searched through the Administration  Security and Install guides and I can’t see anything relevant.  So onto the next part.

Identify Default Roles, Custom Roles, and What Permissions Are Available

Roles and Permissions enable the administrator to see items and also perform action on objects.  If an administrator doesn’t have rights to view a certain item/area then this will not be visible.

As with vCenter, permissions can either be object specific or global.

View’s default roles are located within View Configuration > Administrators > Roles

View Roles

The Default Roles are:

  • Administrator
  • Administrator (Read Only)
  • Agent Registration Administrators
  • Global Configuration and Policy Administrator
  • Global Configuration and Policy Administrator (Read Only)
  • Inventory Administrator
  • Inventory Administrator (Read Only)

Custom Roles can be created by Clicking ‘Add Role’ As you can see View has a plethora of privileges.

View Roles 2

Then giving the role a name for instance ‘View Help Desk’ and choosing what permissions they have e.g. ‘Manage Desktops’

View Roles 3

The Custom Role will then appear in the left hand side.  Don’t forget you need to apply the Permissions to the Custom Role, otherwise it err won’t work!

View Roles 4

Permissions are essentially who we apply the Custom Role privileges too.  Pretty much it’s going to be an Active Directory Security Group.

Select your Custom Role > Permissions > Add Permissions

View Roles 5

Click Add and then Select what Security Group you are going to apply the Permissions too.  I’m going to roll with ViewAdministrators

View Roles 6

View’s Permissions are based around Folders, so we need to choose which Folder (or Root) that we want the Permissions to be applied too.  These ViewAdministrators are new, so they can only have access to the ‘Manual Pool’

View Roles 7

Quick recap, we have created a Custom Role called ‘View_Help_Desk’ who have Permissions to ‘Manage Desktops’.  The users who can apply the Permissions to the ‘Manual Folder’ belong to the ‘ViewAdministrator’ Active Directory Security Group.

View Roles 8

Describe The Use Of Folders Within The View Connection Server

Folders are at the epicenter of View permissions.  As we assign Permissions too Folders, they should be designed in a logical format.

For example you may wish to have Folders that represent different Company Departments that have different View Desktops.  These View Desktops are then managed by different View Administrators.

Accounts Folder > Managed By > View Help Desk Team A

Marketing Folder > Managed By > View Help Desk Team B

Sales Folder > Managed By > View Help Desk Team C

The only time Folders don’t come into play is when you have a Global Privilege such as ‘Manage Global Configuration and Policies’.

VMware View – Objective 2.2 Configure VMware View Events Database

Knowledge

  •  Explain the purpose of the Events Database
  • Identify minimum requirements for the Events Database
  • Identify which database server is being used (i.e., Oracle or SQL).
  • Determine port number
  • Configure the Events Database settings
  • Configure the connection to the Event database

Events Database

The Events Database is like ‘ronseal’ it does exactly what it says on the tin! It’s a repository of VMware View events held in a central location to allow the administrator to view the events for a period of time.  Note, that the time frame the events are held for is configurable.

Great we have an events database which is cool, however, one feature which I have to say, I’m amazed is not within VMware View is the ability to alert on events.  Within vCenter event X occurs you can send an email to your helpdesk or an SNMP notification.  In VMware View we can do err nothing!  I do hope this is addressed in future releases.

The Events Database has the same requirements as the database for View Composer.  To recap the requirements are a SQL database or Oracle database.  For SQL this can be 2005 or 2008 and for Oracle both 10g or 11g can be used.   Both can be on the same instance as the vCenter database.

Installing Events Database

For this installation, I’m using SQL 2008 Express, I have created a database called ViewEvents and service.vmware has DBO rights.  If you are unsure on how to do this, I wrote a guide which can be found here under SQL Configuration.

The really cool thing is this is the first VMware product that we don’t have to mess about with creating a DSN, it’s all done from within the View Connection Server, boom!

Access your View Connection Administrator Console by going to https://servername/admin then to View Configuration > Event Configuration and then click on Edit

Event Database 1

As I’m using SQL Express, this means it’s doesn’t use the Port 1433 it uses a dynamic one.  So before we complete the Event Database information we need to check this.

Jump onto your vCenter Server and access SQL Server Configuration Manager and Expand ‘SQL Server Network Configuration’ and you should see ‘Protocols for VIM_SQLEXP’.

Event Database 2

Right Click TCP/IP and Select Properties

Event Database 3

Select the IP Addresses Tab and scroll all the way to the bottom and you will see our ‘friend’ TCP Dynamic Ports with your number.

Event Database 4

Now we have the Port number we can complete the Event Database information as follows:

Database Server: VMF-ADMIN01VIM_SQLEXP

Port: 49237 (your Dynamic Port number)

Database Name: ViewEvents

User Name: service.vmware

Password: Password

Confirm Password: Password

Table Prefix: CON01

The Table Prefix allows you to have one Events Database shared by many Connection Servers.  So the prefix in mine is CON01 which stands for VMF-CON01 which is my first View Connection Server.

Event Database 5

Hit OK, and we get a lovely error! ‘An error occurred while attempting to configure the database.  Double check the database parameters and ensure that the database is not down, restarting, or otherwise unavailable’.

Error

I spent a lot of time troubleshooting this starting with the basics which was telnet from the VMF-CON01 to VMF-ADMIN01 on Port 49237 which worked.  I then created a DSN on VMF-CON01 connecting to VMF-ADMIN01 and this also worked.  So it was time to hit google! I followed these resources:

  • VMware KB 1029537 Configuring VMware View Event database fails with the error: An error occurred while attempting to configure the database*
  • This article by Jason Langone, which was very informative but didn’t fix my issue.

*Note don’t change your SQL Port to 1433 from Dynamic as you will find that your vCenter Services won’t start.

I was still in the same boat, so it was time to hit the View Connection Server log files to dig a bit deeper.  These are located in C:ProgramDataVMwareVDMlogs if you used the detault installation location.  Now searching threw log files is painful so to narrow it down, I start from the bottom (most recent events) and search for the keyword SQL.  This is where I found the golden gem that is

‘SQL exception when connecting to database: Login failed for user ‘service.vmware’

Now I was really puzzled as my DSN connected correctly without any issues.  That’s when the light bulb went off, maybe the Event’s Database uses SQL Authentication rather than Windows Authentication.  Checking the DSN again I used SQL Authentication with a random account I created and it worked.

With this in mind, I created a SQL Authentication Login called ‘service.view’ using the following settings:

  • Untick Enforce password policy
  • Untick User must change password at next login
  • Untick Enforce password expiration

Error 1

Next I created a Database called ViewEvents and made ‘service.view’  the Owner

Error 2

Back into Logins > service.view> Properties and change the Default database to ViewEvents and Hit OK

Error 3

Let’s give it another whirl shall we.  Jump back onto your View Connection Server and go into View Configuration > Event Configuration > Edit and enter the following details:

Database Server: VMF-ADMIN01VIM_SQLEXP

Port: 49237 (your Dynamic Port number)

Database Name: ViewEvents

User Name: service.view

Password: Password

Confirm Password: Password

Table Prefix: CON01

Event Database 6

Hit OK, and boom, it has worked!

Event Database 7

We are now in a position to change the Event Settings or in other words how long we can see stuff for.  The default setting allows 3 Months of events to be shown within View Administrator and an event is classified as new for 2 Days.

These can be changed by clicking on Edit and selecting the desired values.

Event Database 8

This has been a slightly longer than expected blog post, but it’s great when things go wrong as ultimately you end up learning more!