
OpenFiler SAN Setup
We need to open VMware Workstation and we are going to configure a virtual SAN to be the shared storage for our ESXi hosts to use.
Go into VMware Workstation and create a New Virtual Machine
Select Custom Advanced
Select Hardware Compatibility Workstation 6.5-7.x
Install from ISO and browse to your OpenFiler ISO
Guest Operating System choose Other and Other 64-bit
Virtual Machine Name type OFSAN01 Location V:OFSAN01
Number Of Processors choose 1, Number Of Cores Per Processor choose 1
Memory For This Virtual Machine choose 256MB
Network Type choose Use Host Only Networking
I/O Controllers Type choose LSI Logic
Disk choose Create New Virtual Disk
Virtual Disk Type choose IDE
Maximum Disk Size choose 10GB
Disk File choose Next
Deselect Power On This Virtual Machine
Click Finish
Next we need to Edit Virtual Machine Settings then Add Hardware
Select Network Adapter
Select Custom and choose VMnet1
It should now look like this

Now Power on OFSAN01 and choose Enter to install in ‘graphical mode’
Click Next
Click United Kingdom
Click Yes to the warning
Click Next
Click Yes to both warnings
On the network devices screen change this to the following for eth0:
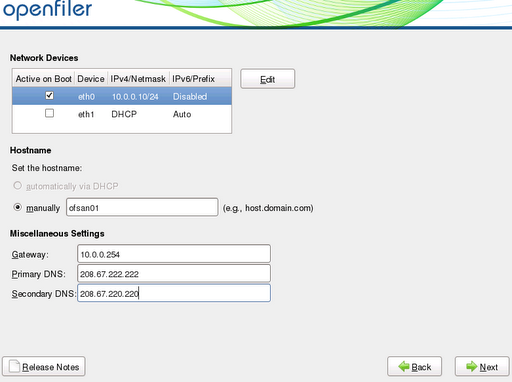
Enter a root password
Click Next
Click Next
Click Reboot
Once installed we should be greeted with a screen like this:
We now need to add three Hard Drives to add OpenFiler we do this by editing OFSAN01 virtual machines settings.
Edit OFSAN01 Settings
Click Add
Select Hard Disk
Create New Virtual Disk
Next
100GB in size
O:Disk01vDisk01.vmdk
Repeat this twice more for vDisk02 and vDisk03
Browse to https://10.0.0.10:446 and login with the following credentials:
openfiler
password
Once inside OpenFiler, click on ‘System’ and then add in Network Access Configuration the following:
LAN 10.0.0.0 255.255.255.0 Share
iSCSI 192.168.1.0 255.255.255.0 Share
Your screen should resemble the following:


We have configured access to our SAN from the LAN 10.0.0.0/24 and also to allow iSCSI paths to connect to it from 192.168.1.0/24.
Next we need to add some drives so that OpenFiler can convert them into a usable disk format. We do this by going onto Volumes and then selecting Block Devices.
The first disk you will see is labelled /dev/sda this is the disk that OpenFiler is installed on, leave this alone!
Click on /dev/sdb which is on the ‘Edit Disk’ column, scroll down and click create. Repeat this for /dev/sdc and /dev/sdc.
The next step is to create our Disk Groups, to do this go to Volume Groups and select /dev/sdb and type in vdisk01 then Add Volume Group, repeat this for vdisk02 and vdisk03.
We now need to add a LUN to our Disk Groups, these are what we will present to our ESXi hosts as there iSCSI targets.
Go into Add Volumes and select vdisk01 and create volumes as follows:
Next onto Add Volumes and select vdisk02 and create volumes as follows:
We will leave vDisk03 alone as you can use this to create some LUNs in your own lab.
The next step is to turn on the iSCSI service on OpenFiler, to do this go to Services and then turn on iSCSI target so it resembles this.
Now we need to present the LUN’s as iSCSI targets, to do this we need to go to Volumes then iSCSI Targets.
In Target IQN, change where is states openfiler to vmos as this will make it easier to map the LUN’s in vCentre, see below.

Click Add then go to LUN Mapping and Map VMOS to LUN vmos by clicking on Map on the right hand side
Next go onto Network ACL and we will Deny LAN traffic and allow iSCSI traffic
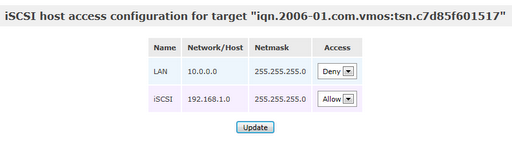
Repeat this for VMDATA, VMISO and VMTEMPLATE

