AWS Concepts – S3

First of all, what does S3 stand for? The answer is Simple Storage Service which was launched by AWS in March 2006, so it’s over 13 years old at the time of writing this blog post!

S3 provides developers and IT teams with a secure, durable and highly scalable object storage. Examples of object storage are flat files such as word documents, PDFs, text documents etc.

S3 allows you to securely upload and control access to files from 0 bytes to 5TB into a ‘Bucket’ which is essentially a folder. The ‘Bucket’ requires a globally unique namespace across S3. AWS claim that S3 provides unlimited storage (not sure if anyone would or could test this claim!).

Data Consistency

S3 uses the concept of read after write consistency for new objects. In a nutshell this means when the object is committed to S3, you can read it.

However when you are updating or deleting the object you receive eventual consistency. So if you have a file which you have just updated and you access it immediately, you may get the old version, wait a few seconds and you will receive the new version.

S3 The Basics

S3 is built for 99.99% availability, however AWS only provides a 99.9% availability SLA see here. Which means you could have just over 8 hours 40 minutes of acceptable downtime per annum.

Think about the impact of AWS S3 availability SLA on any designs

Amazon provides a 99.999999999% (11x9s) durability SLA which means data won’t be lost. However does this same guarantee apply to data integrity?

S3 provides the option for tiered storage with lifecycle management, for example if an object is older than 30 days move it to a lower cost/class tier.

Outside of this, S3 allows versioning of objects, encryption and policies such as to delete an object you have to use MFA.

S3 Storage Tiers/Classes

At the time of writing this blog post, S3 offers six different classes of storage. Each of these has it’s own availability SLA, differing levels of costs and latency.

It’s easiest to explain this in the table below which is taken from AWS.

If we look at all of the different storage classes except for S3 One-Zone IA they can suffer the loss of two availability zones. Whereas only S3 Standard and S3 Intelligent-Tiering includes data retrieval fees.

Lastly if we examine ‘first byte latency’ this determines how quickly you will be able to access any objects.

Replication

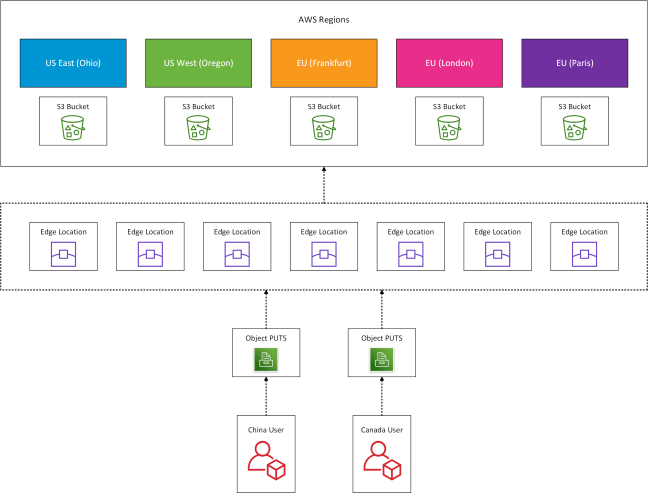
When you create an S3 ‘Bucket’ you are able to replicate this from one AWS region to another, providing either high availability or disaster recovery (dependent on your configuration). This can also be coupled with S3 Transfer Acceleration which uses CloudFront edge locations. The benefits this provides are that users upload files to the closest of AWS’s 176 edge location which are then transferred securely to the S3 Bucket.

The diagram below provides a logical overview of this process.
A few things to note about S3 Cross Region Replication:

  • Only new objects and changed objects are replication, not existing objects
  • Cross Region Replication requires versioning to be enabled
  • The target bucket can use a different storage class
  • The target bucket receives the same permissions as the source bucket
  • Deletions and deletion markers are not replicated from the source to target region

Security

S3 security is achieved by a number of elements, which include encryption in transit using TLS and at rest when the data is committed to the S3 bucket.

Dependent on how a business operates it may choose to either handle encryption at rest locally and then upload the encrypted object to the S3 bucket or trust AWS to encrypt the object within the bucket. This process is managed by keys to encrypt and decrypt the object.

  • S3 Managed Keys – Built Into S3, managed by AWS
  • AS Key Management Service – Managed by both AWS and the customer
  • Server Side Encryption with Customer Keys – Customer provides the keys

By default a bucket is private e.g. the objects within this are not accessible over the internet. You can apply access policies to a bucket either on the resource directly or via a user policy.

AWS Concepts – Billing Alarms

So you have set up your first AWS Account and want to make sure that the costs don’t spiral out of control? This quick guide will help you put things in place to ensure that you are notified when costs exceed a predefined limit.

First of all select your Organisation > My Billing Dashboard and then Billing Preferences

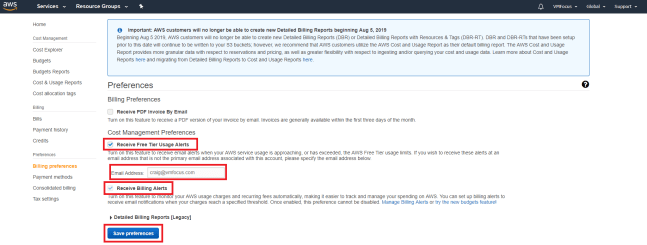
Next tick ‘Receive Free Tier Usage Alerts’ and enter an email address along with ticking ‘Receive Billing Alerts’. Finally click on Save Preferences.

This is the initial configuration at account level on how we want our billing preferences to be set. Now we need to use CloudWatch to send an alert when a metric his hit.

Select Services > CloudWatch. Then Select Alarms > Create Alarm.

Select Metric > Billing and then Total Estimated Charge > Currency USD > Select Metric, as shown below.

We now need to specify our metric conditions. Using a ‘Maximum’ value over a period of ‘6 Hours’ when it is Greater than 10 USD….do something!

In the notification screen select ‘in Alarm’ which essentially means when the alert is triggered, do something. We want that something to be a Simple Notification Service (SNS). Select NotifyMe. Finally we now need to click on the SNS Console to setup and verify the email address.

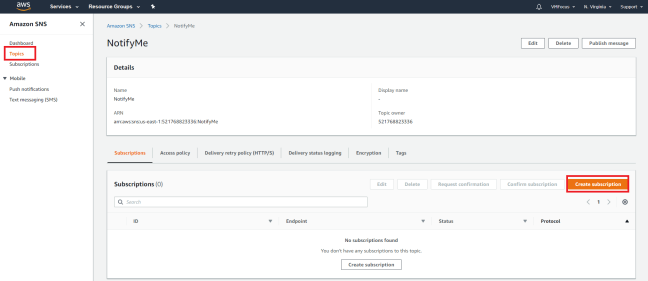
Within the SNS Dashboard, we should have a Topic named ‘NotifyMe’ without a Subscription assigned to it. Click ‘Create Subscription’

Select Protocol > Email and the Endpoint, in this example it’s craig@vmfocus.com. Finally select Create Subscription.

Before the alert subscription goes live, we need to confirm that we have access to the email endpoint. Check you inbox (or spam). Once confirmed you should receive a verification such as this.

Double check your Subscription in SNS to verify the status.

Back into the CloudWatch dashboard and if we remove and re-add NotifyMe, we should see the email (endpoint) change to our verified address.

Lets give the alarm a unique name. I have chosen BillingAlarm with the description Greater than 10 USD.

Finally click ‘Create Alarm’ and verify the details. Voila we will receive an email alert when our expenditure is over 10USD within a six hour window.

Azure Heavy Hitter Updates

Keeping up with Azure can be a full time task in itself with the plethora of updates. With this in mind, I thought I would share a couple of updates, which in my opinion are heavy hitters.

Account Failover for Azure Storage

Many of us use GRS storage for an added safety net, to ensure that data is available in a secondary paired region if the primary region has an outage. The kicker has always been that no SLA exists for this, it’s down to Microsoft to decide when they declare the primary region out and provide access to the replicated data.

Well that is all about to change with the announcement of ‘Account Failover for Azure Storage‘. This means that you are now in control of failing data over to your secondary region.

A couple of points which are worth noting:

  1. Having data available is only a single layer, think about security, identity and access, networks, virtual machines, PaaS etc in your secondary region
  2. Upon failover the secondary storage account is LRS, you will need to manually change this to GRS-RA and replicate back to your original primary region

Adaptive Network Hardening in Azure Security Center

I really enjoy updating an Access Control List, said no one ever!

Defining Network Security Groups (NSG) takes time and effort, with engagement across multiple stakeholders to determine traffic flow or you spend your time buried deep inside Log Analytics.

Microsoft have announced the public preview of Adaptive Network Hardening in Azure Security Center, which learns traffic flows (using machine learning) and provides recommendations for internet facing virtual machines.

A couple of points which are worth noting:

  1. This should be enabled when virtual machines are deployed to reduce the risk of rogue traffic
  2. As it mentions on the tin, this is for internet facing VMs only. However I’m sure this may be updated in due course.

Thanks for reading, tune in for the next post.

Using Azure Data Factory to Copy Data Between Azure File Shares – Part 3

This blog post is a continuation of Part 1 Using Azure Data Factory to Copy Data Between Azure File Shares and
Part 2 Using Azure Data Factory to Copy Data Between Azure File Shares. In this final part we are going to configure alerts to send an email on a failed pipeline run.

First of all select your Data Factory and then Select > Alerts > New Alerts Rule

In the previous configuration, the Azure Data Factory is running once a day. So with this in mind, we are going to Select ‘Add Condition’ then Failed Pipeline Runs.

Scroll down and Select Alert Logic. Ensure the conditions are set to Greater Than, Total 1. This essentially defines that if an issue occurs, perform an action.

Under the Evaluation based on, Select 12 Hours and Frequency Every Hour. This is how often the query is evaluated. It should look something like this:

Next we need to create an Action Group so when the above condition is met, an action is taken. I have called my Action Group VMF-WE-DFAG01, which stands for VMFocus, West Europe, DataFactory, ActionGroup 01.

For the short name, I have used Copy Failure, note this needs to be under 12 characters long.

Finally, I have chosen the ‘Action Type’ as Email/SMS/Push and entered in the appropriate contact details. Once done it should look something like this.

After a short while, you will receive an email from Microsoft Azure to confirm that you have been added to an Action Group.

Finally we want to give the Alert Rule a Name and a Description, such as the below.

That’s it your Azure Data Factory is all configured and ready for production use!

How To Configure WOL ESXi5

Distributed Power Management is an excellent feature within ESXi5, it’s been around for a while and essentially migrates workloads to fewer hosts to enable the physical servers to be placed into standby mode when they aren’t being utilised.

Finance dudes like it as it saves ‘wonga’ and Marketing dudettes like it as it give ‘green credentials’.  Everyone’s a winner!

vCenter utilises IPMI, iLO and WOL to ‘take’ the physical server out of standby mode.  vCentre tries to use IPMI first, then iLO and lastly WOL.

I was configuring Distributed Power Management and thought I would see if a ‘how to’ existed and perhaps my  ‘Google magic’ was not working, as I couldn’t find a guide on configuring WOL with ESXi5.  So here it is, let’s crack on and get it configured.

Step 1

First things first, we need to check our BIOS supports WOL and enable it.  I use a couple of HP N40L Microservers and the good news is these bad boys do.

WOL Boot

Step 2

vCenter uses the vMotion network to send the ‘magic’ WOL packet.  So obviously you need to check that vMotion is working.  For the purposes of this how to, I’m going to assume you have this nailed.

Step 3

Check you switch config. Eh don’t you mean my vSwitch config Craig? Nope I mean your physical switch config.  The ports that your vMotion network plugs into need to be set to ‘Auto’ as for WOL to work the ‘magic’ with certain manufacturers this has to go over a 100Mbps network connection.

Switch

Step 4

Now we have checked our physical environment, let’s check our virtual environment.  Go to your ‘physical adapters’ to determine if WOL is supported.

This can be found in the vSphere Web Client (which I’m trying to use more) under Standard Networks > Hosts > ESXi02 > Manage > Networking > Physical Adapters

WOL 1

We can see that every adapter supports WOL except for vmnic1.

Step 5

So we need to check our vMotion network to ensure that vmnic1 isn’t being used.

Hop up to ‘virtual switches’ and check your config.  Good news is I’m using vmnic0 and vmnic2 so we are golden.

WOL 2

Step 6

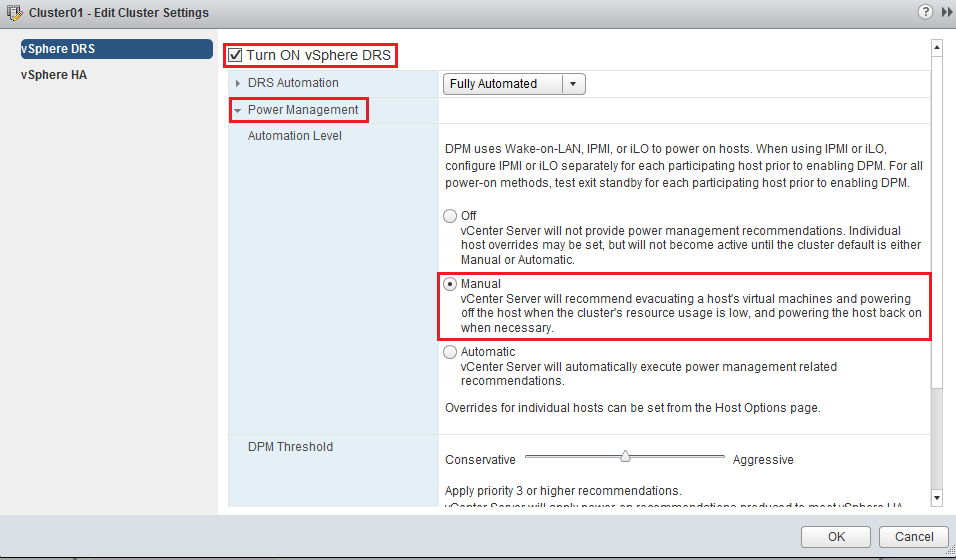
Let’s enable Distributed Power Management. Head over to vCenter > Cluster > Manage > vSphere DRS > Edit and place a tick in Turn ON vSphere DRS and select Power Management.  But ensure that you set the Automation Level to Manual. We don’t want servers to be powered off which can’t come back on again!

WOL 3

Step 7

Time to test Distributed Power Management! Select your ESXi Host, choose Actions from the middle menu bar and select All vCenter Actions > Enter Standby Mode

WOL 4

Ah, we have a dialogue box appear saying ‘the requested operation may cause the cluster Cluster01 to violate its configured failover level for high availability.  Do you want to continue?’

The man from delmonte he says ‘yes’ we want to continue!  The reason for the message is my HA Admission Control is set to 50%, so invoking a Host shut down is violating this setting.

WOL 5

vCenter is rather cautious and quite rightly so.  Now it’s asking if we want to ‘move powered off and suspended virtual machines to other hosts in the cluster’.  I’m not going to place a tick in the box and will select Yes.

WOL 6

We have a Warning ‘one or more virtual machines may beed to be migrated to another host in the cluster, or powered off, before the requested operation can proceed’.  This makes perfect sense as we are invoking DPM, we need to migrate any VM’s onto another host.

WOL 7

A quick vMotion later, and we can now see that ESXi02 is entering Standby Mode

WOL 8

You might as well go make a cup of tea as it takes the vSphere Client an absolute age to figure out the host is in Standby Mode.

WOL 9

Step 8

Let’s power the host back up again.  Right Click your Host and Select Power On

WOL 10

Interestingly, we see the power on task running in the vSphere Web Client, however if you jump into the vSphere Client and check the recent tasks pane, you see that it mentions ‘waiting for host to power off before trying to power it on’

WOL 11

This had me puzzled for a minute and then I heard my HP N40L Microserver boot and all was good with the world.  So ignore this piece of information from vCenter.

Step 9

Boom our ESXi Host is back from Standby Mode

WOL 12

Rinse and repeat for your other ESXi Hosts and then set Distributed Power Management to Automated and you are good to go.