How To: Perform a SRM Unplanned Failover & Maintain ‘Business As Usual’ Operations

SRM LogicalPurpose

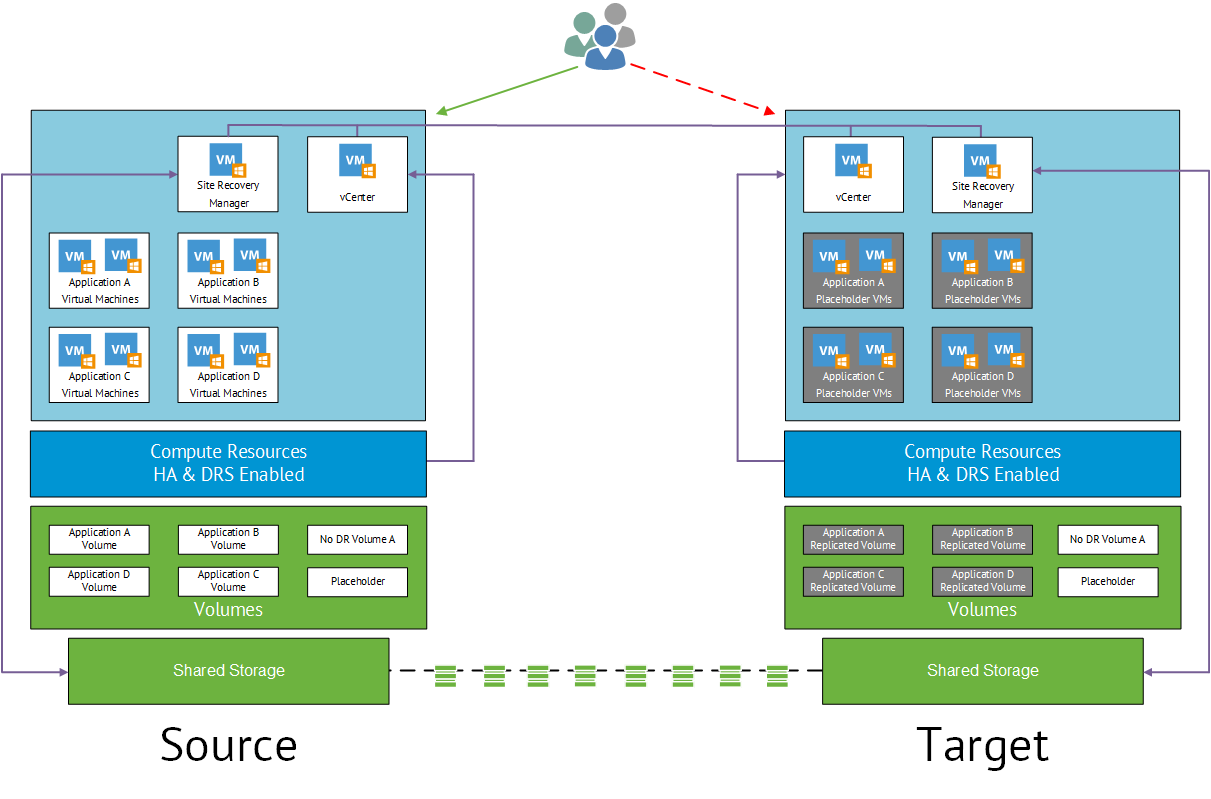
The purpose of this blog post is to provide the steps required to perform a Site Recovery Manager unplanned failover and maintain business as usual operations.  I performed these steps twice on a clients live production environment with users accessing production virtual machines at the ‘source’ site.  The users noticed no impact to their daily work activities.

Pre-Requisites

The pre-requisites listed below had been discussed with the client and change control invoked for the following items:

  • vCenter and Site Recovery Manager would not be accessible during the unplanned failover
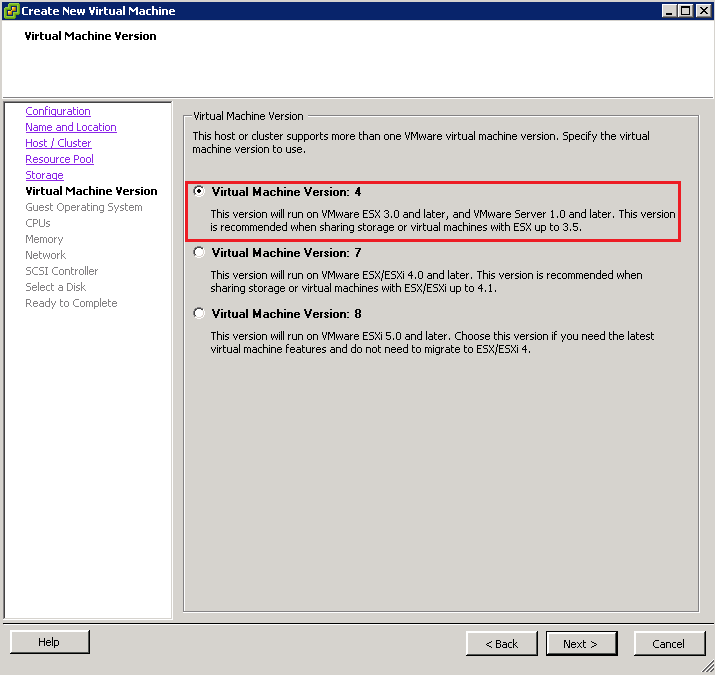
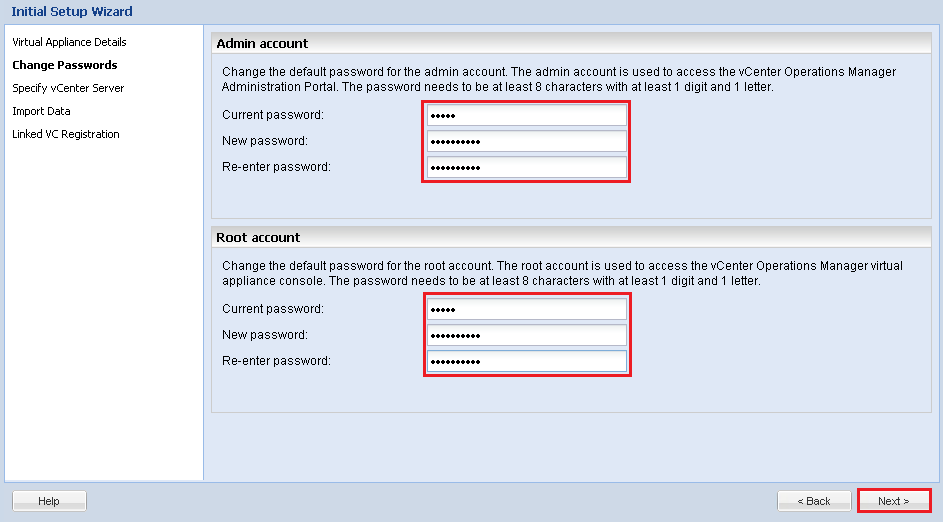
  • vSphere Client 5.5 U2 is used to enable editing of virtual machines with hardware level 10
  • Source vCenter and Site Recovery Manager ‘pinned’ to an ESXi Host using DRS Groups Manager ‘should’ rules to enable easy location of virtual machines
  • Replication stopped for the production remote copy virtual volumes for the duration of the test
  • Test virtual volume created and presented to ESXi Hosts using an existing Host Set
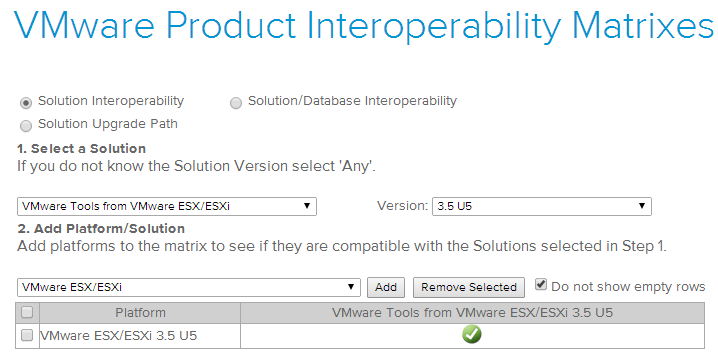
  • Test virtual machine created using Mike Brown’s Tiny VM to minimise inter site link bandwith consumption.  Note this doesn’t have VMware Tools installed.
  • Remote Copy IP and Management Interfaces for 3PAR StoreServ had been located on upstream switch

Steps One – Isolate Storage

Isolation of the 3PAR StoreServ at the ‘source’ site by issuing ‘shutdown’ command on the Management and Remote copy IP interfaces on the upstream switch.

If RCIP traffic and Management traffic are on the same subnet, RCIP traffic will traverse Management interfaces

Verify that you can no longer ping the RCIP interfaces and that your Remote Copy Group are in a ‘Stopped’ status.

Step Two – vCenter & SRM

Connect to the ESXi Host that runs the vCenter and Site Recovery Manager virtual machines and manually disconnect their virtual NIC’s

Result

Using the above process, we have isolated the 3PAR StoreServ, vCenter and Site Recovery Manager virtual machines.  This simulates having an inter site link failure, but enables users to continue to access virtual machines at the source site.

Perform your unplanned failover on the Test Virtual Volume and then issue the ‘no shutdown’ command against your 3PAR StoreServ Remote Copy and Management interfaces.  Then finally reconnect the virtual NICs on your vCenter and Site Recovery Manager virtual machines.

vSphere 4.x Planning For VM Tools & Hardware Upgrade

In most environments the upgrade of VMware Tools and Hardware causes issues, not in terms of actually performing the upgrade, but the time taken to co-ordinate the activity.

In no particular order:

  • Change control for VM downtime
  • Ensuring you have a known good working backup (snapshots aren’t always accepted)
  • Align application team to test services after reboot
  • Knowing the VM dependencies on and the effect it will have on another VMs
  • Potential issues after upgrade E1000 and vSphere 5.x PSOD for example VMware KB 2059053

We are currently in vSphere 4.x upgrade season as it goes end of support life on 21st May 2014, which leads me onto the purpose of this post.

Problem Statement

vSphere 4.1 environment which had been upgraded from ESX 3.5.  VM Tools still running at ESX 3.5 level.

Customer needs to know how many reboots are required to bring them up to the highest vSphere 5.x version, to enable the internal co-ordination of application teams to test services after reboots.

Step 1

Oldest servers are HP BL480c G1 (yes that’s right G1) nothing like sweating an asset!

VMware Compatibility Guide shows that ESXi 5.1 U2 is supported, however this didn’t ring true as I remembered a support statement from HP about DL380 G5.  A quick check on the HP VMware Support Matrix shows that 5.0 U3 is the highest supported.

Step 2

VMware Tools and Hardware Upgrade, was causing concern as I could only find information on upgrading the VM Hardware version from 4 or 7 to 8, see VMware KB1010675

The interoperability  matrix shows that VMware Tools is not supported, but that didn’t answer my question.  Did I need to reboot once or twice to get VMware Tools to the newest version?

Interoperability

Solution

I created a VM using ‘custom’ so I could choose Hardware version 4 and installed Windows Server 2008 R2 from an ISO.

HW 4

VMware have all the old versions of VMware Tools located at over here package.vmware.com/tools a manual download and installation ESX 3.5p27 for Windows, this correlated to version 7304.

Note: VMware tools to ESXi version can be found here

After the usual reboot, I can confirm the following

  1. You can go straight from VMware Tools at version 3.5 to version 8 with a single reboot.
  2. An upgrade of hardware is possible straight from 4 to 8 (but we already knew that from the VMware KB).

Only thing left to do is inform the customer about the potential issue with E1000 vNIC’s and PSOD!

How To: Remove vCenter Getting Started Tabs

If like me, you find the ‘vCenter Getting Started Tabs’ slightly annoying then you are in the right place!

vSphere Client

To disable them in vCenter using the vSphere Client, simply go to Edit > General Tab > Deselect ‘Show Getting Started Tabs’

vCenter Tabs

vSphere Web Client

To disable them in vCenter using the vSphere Web Client, simply go to Help > Select ‘Hide All Getting Started Pages’

vCenter Tabs 2

How To: Install vCenter Operations Manager

vCenter Operations Manager has been missing from the vmfocus.com lab for far to long!

With this in mind let’s walk through how to install vCenter Operations Manager.

IP Pools

VMware require IP Pools to be configured for most of their OVF’s nowadays.  Chris Wahl wrote a great blog post on Managing & Configuring IP Pools which is our first step.

Go into the Datacenter Object in vSphere and Select IP Pools Tab then Add

IP Pools 01

Give the IP Pool a name, Subnet Mask and Gateway

IP Pools 02

Note: We have specifically chosen not to enable the IP Pool

Then jump over to Associations and associate the IP Pool with a Port Group that your vCenter Operations Manager will reside on.

IP Pools 03

Once configured it should look something like this.

IP Pools 04

Install vCenter Operations Manager

The next step is to download vCenter Operations Manager which is located here. As of the time of this blog post the most recent version is VMware vCenter Operations Manager Standard 5.7.2.

I’m not going to talk you threw how to upload an OVF as it’s a simple case of going to File > Deploy OVF Template > Select Location and following the wizard.

When you get to the IP Address Allocation Policy select ‘Fixed’

VCOPS01

vCOPS is a vAPP which is made up of two VM’s the UI and Analytics VM both of which need an IP Address.

VCOPS02

The vAPP seems to take a large amount of time, so my suggestion is to make a cup of tea!

vCOPS Initial Configuration

Browse to your UI VM IP Address, in my case it is https://VMF-VCOPS01/admin as I thougth I would be clever and enter an A record.

Login with the following credentials:

U: admin

P: admin

The first task is to enter the Hosting vCenter Server details, in some scenarios for example a management cluster the vCenter the vCOPS resides in is different to the one that it monitors.

vCOPS03

Accept the Security Alert to trust your vCenter.

Next change the passwords for your admin account and root accounts, once done hit Next.

vCOPS04

TOP TIP: The root password is vmware

Enter your vCenter details, the collector has access to all the Objects within vCenter, so ideally you want to specify credentials for this as well.

If you receive an error ‘connecting to VC at https://vCenter/sdk failed’ see my blog post on this subject

vCOPS05

Click Next on the Import Data screen and then Finish on the Linked VC Registration page.

You will receive a security Warning on your vCenter Server stating that the vCOPS certificate is untrusted. Install the certificate and click Ignore

vCOPS06

If successful, you should be greeted with the vCenter Operations Manager Administration screen.

vCOPS07

You should be able to verify this by go to the Home Screen of your vSphere Client and you should have vCenter Operations Manager under Solutions and Appliances

vCOPS08

That’t it all you need to do now is assign your license key and you are ready to rock ‘n’ roll.

How To: Install vSphere Management Assistant

I must confess that I don’t use ESXCLI very much unless I’m in a situation which forces me to do so.  This blog post is more for me as I want to be able to run more commands on a regular basis from ESXCLI or VIFP rather than relie on the GUI.

The vSphere Management Assistant is a free OVF provided by VMware to allow you to access all your ESXi Hosts from a central location to run scripts or CLI commands.

We are going to look at the initial installation and configuration.

IP Pools

VMware require IP Pools to be configured for most of their OVF’s nowadays.  Chris Wahl wrote a great blog post on Managing & Configuring IP Pools which is our first step.

Go into the Datacenter Object in vSphere and Select IP Pools Tab then Add

IP Pools 01

Give the IP Pool a name, Subnet Mask and Gateway

IP Pools 02

Note: We have specifically chosen not to enable the IP Pool

Then jump over to Associations and associate the IP Pool with a Port Group that your vSphere Management Assistant will reside on.

IP Pools 03

Once configured it should look something like this.

IP Pools 04

Install vSphere Management Assistant

The next step is to download the vSphere Management Assistant ZIP file which is located here. As of the time of this blog post the msot recent version is vMA-5.5.0.0-1295338.

Extract the ZIP file to a location of your choice and fire up the vSphere Client.  I’m not going to talk you threw how to upload an OVF as it’s a simple case of going to File > Deploy OVF Template > Select Location and following the wizard.

When you get to the IP Address Allocation Policy select ‘Fixed’

VMA 01

On the next page enter the IP Address you are going to assign to your vSphere Management Assistant 5.5

VMA 02

Select ‘Power On After Deployment’ and you are good to go.

Fire up your vSphere Console for the vSphere Management Assistant Console and configure the following items:

  • Default Gateway
  • Hostname
  • DNS
  • Proxy Server (if any)
  • IP Address Allocation (eth0)

Once done it should look like this.

VMA 03

Enter 1 and change the password.  Note your old password will be ‘vmware’.  After this completes you will be able to access the vSphere Management Assistant by going to https://x.x.x.x:5480 to perform maintenance tasks such as appliance updates.

I suggest you login to your vSphere Management Assistant using the URL just to make sure that your password works.

TOP TIP: Your username is vi-admin

vSphere Management Assistant Initial Configuration

Use a client such as Putty to login to your vSphere Management Assistant by SSH

We have two ways to add ESXi Hosts and vCenter to our VMA, either by Domain or Local Authentication.

Join VMA to Active Directory

sudo domainjoin-cli join <domain-name> <domain-admin-user>

VMA 04

Once done reboot the system

Check the domain and OU

sudo domainjoin-cli query

VMA 06

Add ESXi Hosts/vCenter to VMA

vifp addserver VMF-ESXi01 –authpolicy adauth –username VMFocus.com\Service.vCenter

VMA 05

Check ESXi Hosts/vCenter joined to VMA

vifp listserver -l

VMA 07

Target A Specific Host

vifptarget -s VMF-ESXi01

VMA 08