
ESXi Installation
Launch VMware Workstation and choose New Virtual Machine
Click Next on Typical
Choose Installer Disk Image File and locate your ESXi 4.1 ISO
Click Next
Virtual Machine Name is ESXi01
Location V:ESXi01
Hard Disk Size is 10GB leave the rest as defaults
Next choose Customize Hardware
Change Memory to 4096MB
Change Network Adapter to Bridged
Then add a Network Adapter Custom: Specified Virtual Network VMnet1 (Host Only)
Next add another Network Adapter Custom: Specified Virtual Network VMnet1 (Host Only)
Finally add another Network Adapter Custom: Specified Virtual Network VMnet9 (Host Only)
Then click finish, it should look like this

A quick rundown of the network adapters:
Bridged will connect ESXi01 to the LAN network 10.0.0.0/24
The first VMnet1 will connect ESXi01 to the iSCSI network 192.168.1.0/24
The second VMnet1 will connect ESXi01 to the iSCSI network 192.168.1.0/24, this is for redundancy
VMnet9 will connect ESXi01 to ESXi02 for vMotion traffic
Next start up ESXi01 and then run through the install, it’s just next, next etc.
After you have finished the installation you will be greeted with the following screen:

Press F2 to Customize System
Press Enter and Enter as you currently do not have a password
Press Return on Configure Password and enter a password, then press Enter
Go down to Configure Management Network and press Enter
Choose IP Configuration and ensure it replicates this:
Next go down to DNS Configurations and enter the following:


Enter to OK this and then ESC to exit
Choose yes to Restart Network Management Card
Then ESC until you are at the login screen
Repeat the installation for esxi02, making sure the IP Address is 10.0.0.12
vSphere Client Installation
There are two main ways to interact with your ESXi clients either using SSH or using the vSphere Client. To use SSH you would need to log into the ESXi01 and ESXi02 via the VMware Workstation console and then go into Troubleshooting Options and Enable Remote Tech Support (SSH)

The preferred method for managing ESXi is using vSphere Client, this can be installed either by going to https://esxi01 or https://10.0.0.11 however be warned you are not downloading this from the ESXi01 but are re directed to a download from VMwares website. My preferred method is to install it from the vCentre installation which we will go through now:
Extract your VMware vCentre ISO
Double Click on Auto Run
Click on vSphere Client
Then follow the prompts clicking Next all the way
Once it is installed we can launch VMware vSphere Client and login into ESXi01. To do this type in ESXi01 in the IP Address/Name, then root as the username and then your password. Click Login and ignore the SSL Certificate issue.

Once logged in, Click OK to ignore the 60 Day Evaluation, this is now where the fun starts!
Managing ESXi With vSphere
Now that we have logged into the vSphere Client we need to configure two main areas:
1. Networking
2. Storage
Networking is perhaps the most fundamental part of VMware as this is what allows the vKernel to establish communication with the Virtual Machines it hosts, the iSCSI storage it is attached to and to perform tasks such as vMotion.
In this Lab we are going to configure the networking as follows:
1 x NIC for LAN which is bridged to our physical network
2 x NIC for iSCSI
1 x NIC for vMotion
Click ESXi01 at the top left and then onto Configuration
On the left had side choose Networking
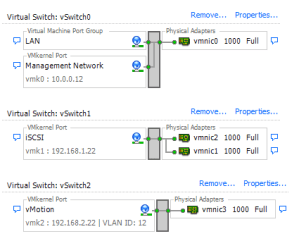
You will see Virtual Switch: vSwitch0 this is the default switch that VMware creates on installation of ESXi.
Click on Properties, then click onto Virtual Machine Port Group, and change the name to LAN. We do this so we can easily identify what the Port Group is being used for.
Underneath this is the VMKernel Port, this is our access to ESXi01 and ESXi02 and as you can see the IP Address is 10.0.0.11 I change this to Management Network, so again it is easily identifiable. Once configured it should look like this.
Next we are going to add the networking for our iSCSI traffic. At the top right hand side click Add Networking and choose VMKernel and Click Next
Select Create A Virtual Switch
The name is iSCSI
Choose vmnic1
Choose vmnic2
Click Next
Enter 192.168.1.21 for the IP Address
Click Finish
It should resemble this:


Now we are going to add in another Virtual Switch for the vMotion traffic.
Add Networking and choose VMKernel and Click Next
Select Create A Virtual Switch
The name is vMotion
VLAN ID is 12
Choose vmnic3
Click Next
Enter 192.168.2.21 for the IP Address
Click Finish
The way I perceive Virtual Switch’s is the left hand side are devices such as PC’s plugging into the switch (rectangle grey box) and then he physical adapter is the default gateway (router).
We now need to replicate these changes onto ESXi02, the only difference are the IP Address’s which should be:
iSCSI 192.168.1.22
vMotion 192.168.2.22
One of the most important things is that you HAVE to type in the names of your virtual switches in exactly the same way e.g. vMotion and vMotion.


That our networking sorted, the next stage is to configure storage. On the configuration tab you will see Storage, click this. You will see one Datastore, these are the Hard Drives that ESXi is installed on. Again for reference, I recommend you rename these to ESXi01HD and ESXi02HD so that you know they are the local disks.
This is achieved by right clicking and selecting rename.
We need to tell VMware that it is going to be using iSCSI storage, to do this click on Storage Adapters and then locate the one which is called iSCSI Software Adapter on mine is vmbha33

Click on Properties (right hand side in the middle) and then Configure which is located on the General Tab.
Select Enabled.
Choose the Dynamic Discovery Tab
Add
Enter 192.168.1.10 (this is our OpenFiler iSCSI SAN IP Address)
Click OK, you will be prompted to Rescan your Host Bus Adapter, Click OK
If we have been successful we will see our iSCSI LUN’s appear
Click Add Storage (top right)
Choose Disk LUN
Expand the Columns until you see VMISO in the iSCSI FQN
Select this and Click Next
Enter VMOS for the name
Click Next to format
Click Finish
Repeat this process for VMDATA, VMISO and VMTEMPLATE
Once done it should look like this


Now for ESXi02 you will only need to turn on the iSCSI Adapter and enter the OpenFiler IP Address. The LUN’s will appear automatically after the Host Bus Adapter scan.
So that’s out Networking and Storage sorted, next part will be adding the ESXi01 nodes into vCentre.
