VSAN Lab

Hands up, I confess I haven’t played with VSAN yet.  Even though I have three ESXi Hosts, these have been configured for use with HP StoreVirual and Site Recovery Manager.

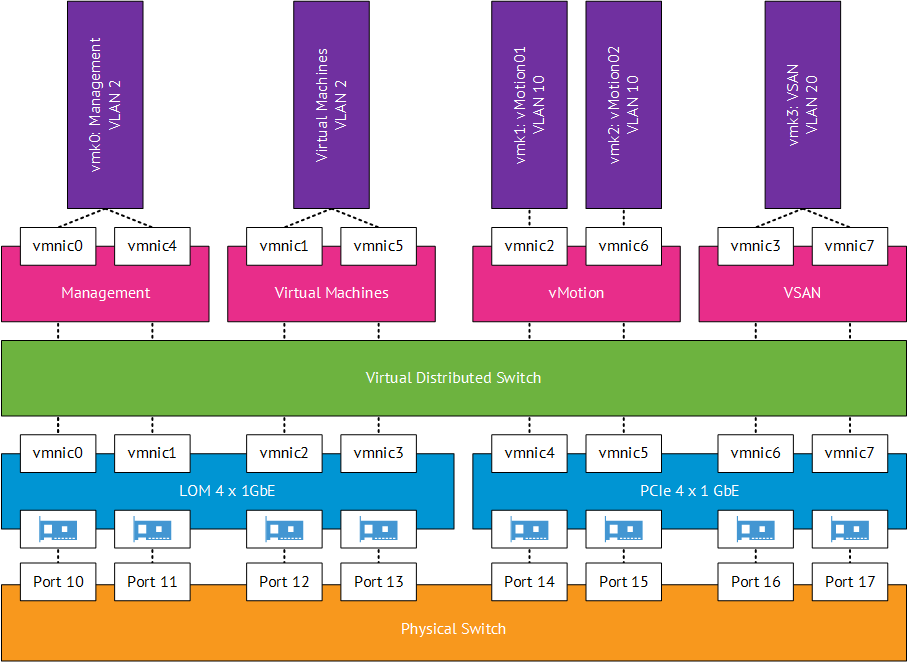
It’s time to shake things up a little and introduce VSAN into the VMFocus.com lab.  This will be the first in a series of blog posts installing and configuring VSAN on HP DL380 G6 servers.  So before we go any further a logical diagram of the configuration.

VSAN Logical

Hardware

ESXi Hosts

As menitioned in the VMFocus.com lab I have 3 x HP DL380 G6, each with the following specification:

  • 2 x Intel Xeon L5520 Quad Core 2.26GHz giving a total of 16 Hyper Threaded Cores
  • 56GB RAM
  • 8 x 1GB NIC’s (2 x Dual Port Built in, 1 x Quad Port,)
  • 1 x P410 Smart Array 6Gb/s
  • 1 x Samsung EVO 250GB 2.5″ SSD 6Gb/s
  • 1 x Hitachi Travelstar 7.2K 1TB 2.5″ SATA 6Gb/s
  • 2 x HP 72GB 15K SAS HDD
    • One Host has an extra 2 x 300GB 10K 2.5″ HDD
  • 2 x PSU
  • 1 x iLO
  • 1 x 8GB SD Card

Networking

  • 1 x HP v1910 24G Layer 2 switch with static routing

Configuration

ESXi Host

  • Boot
    • The plan is to boot ESXi from internal SD card
  • Management Network
    • vDS with a Port Group consisting of two active 1Gbps interfaces and providing a resilient VMkernel Management network.
  • VSAN Network
    • vDS with a Port Group consisting of two active 1 Gbps interfaces providing an resilient VSAN network.
  • vMotion Network
    • vDS with a Port Group consisting of two active 1 Gbps interfaces and will provide a Multi-NIC vMotion network.
  • Virtual Machine Network
    • vDS with a Port Group consisting of two active 1 Gbps interfaces and will provide an active active Virtual Machine network
  • Backups
    • Veeam 8 will be used as this is compatible with VSAN.  The ESXi Host which has the 2 x 300GB configured in RAID 1 will be used as the backup repository

VSAN

Initial Deployment

You get a bit of a chicken and egg scenario with VSAN as you need to have vCenter available for your VSAN Cluster to be created.  My plan is to use the 2 x HP 72GB 15K SAS HDD in RAID 1 which will provide storage capacity and performance for Active Directory, vCenter and SQL before the VSAN cluster is formed.  They can also then be used to place ISO’s on in the future.

Disk Group

This is going to be a simple configuration as I’m limited to one disk group only having one SSD in each ESXi Host.

Storage Policy

Again, this is going to be straight forward as it’s my home lab I want to have a mixture between capacity and performance, so I will use the default setting which is ‘number of failures to tolerate = 1’

Network

This could be a blog post in itself! VSAN has a number of requirements which have to be met, these are:

  • VSAN does not support multiple VSAN VMkernel interfaces on the same subnet for load balancing
  • VSAN does support IP Hash Load Balancing but if it is the only type of traffic on a 1Gb network, then you are unlikely to receive any benefits against using Route Based on Originating Port ID with Explicit Failover
  • VSAN does support multiple VSAN VMkernel interfaces on different subnets for load balancing
    • As I haven’t deployed VSAN yet, I’m not sure if that applies to different disk groups e.g. 1 x Disk Group in 192.168.1.x/24 and another 1 x Disk Group in 192.168.2.x/24.  Something which I will have to test.

With the above in mind and the constraints of my network being 1 GbE with 8 physical NIC’s I decided to go with a simple configuration using Load Based Teaming with resilience at the pNIC level (switch is a single point of failure) based on the following:

  • 2 x 1 GbE physical NIC’s per traffic type providing a simple configuration for troubleshooting (in case I encounter any issues)
  • A single Port Group with NIOC could be leveraged across the 8 x 1GbE physical NIC’s.  However shares would need to be configured and VSAN traffic would only be entitled to 572 Mbps in periods of congestion (think vMotion).
    • High – 4 Shares – 572 Mbps for VSAN traffic
    • Normal – 2 Shares – vMotion/Virtual Machine traffic 286 Mbps
    • Low – 1 Share – Management traffic – 143 Mpbs
  • NIOC on a 1GbE network is not supported
  • NIC teaming is used for availability not bandwidth aggregation
    • Route based on Port ID would be active / standby with Explicit Failover order
    • Route based on IP Hash would be active / active but unlikely to use extra bandwidth as source and destination will remain constant in the VSAN intra-cluster communication
    • Route based on physical NIC load (Load Based Teaming) provides an active / active configuration

A picture speaks a thousand words, so the proposed network logical diagram is shown below.

VSAN Network

Stay tuned for the next blog post in which I cover the prerequisites for the VMFocus home lab.

Reschedule Cloud or Desktop VCAP Exam Issue

Yesterday I received an email stating that the VDTD510 – VMware Certified Advanced Professional 5 – Desktop Design needed to be rescheduled as my exam was booked in for 14th March 2015.

No problem or so I thought, I contacted my local Pearson Vue test centre to reschedule the exam and they mentioned they couldn’t do it and to contact Pearson Vue customer services.   So I contacted Pearson Vue customer services and they mentioned the same problem, and suggested I contact VMware.

I have to say that VMware Education services have been the most helpful.  Even though they cannot schedule exams they did agree to conference in Pearson Vue to try and resolve the issue

Issue

The issue is that Pearson Vue have the last registration date as 2nd March 2015 which means they are unable to reschedule any of the VCAP exams that are ending.  This is an internal communication issue between VMware and Pearson Vue which is being escalated at VMware’s end.  This problem will effect anyone who is attempting to reschedule the following exams:

  • VCID510 – VMware Certified Advanced Professional 5 – Cloud Infrastructure Design
  • VCIA510 – VMware Certified Advanced Professional 5 – Cloud Infrastructure Administration
  • VDTA510 – VMware Certified Advanced Professional 5 – Desktop Administration
  • VDTD510 – VMware Certified Advanced Professional 5 – Desktop Design

I have a case open with VMware Education and will update this post once more information is known.

**Update**

The update I have received is my exam has been cancelled and I will receive a refund,  with no explanation.  This contravenes the details laid out by VMware Certification as part of the VCAP expiry notification.

It would be good to know why VMware decided to pull the VCAP certification before VCIX are released and why the exam could not be rescheduled?

My thoughts are that VMware and Pearson Vue clearly have internal communication issues which really needs to be resolved.  Clearly they have no concern for any individuals who have spent their personal time studying towards an exam.

HP StoreVirtual Multi-Path Extension Module (MEM) for vSphere

With the release of LeftHand OS 12.0, HP have introduced a Multi-Path Extension Module to replace the previously recommended path selection policy being ‘Round Robin’ and Storage Array Type Plugin VMW_SATP_DEFAULT_AA

By default Round Robin would send 1,000 I/O down each path.

Note: That this can be altered as per my previous article entitled ‘How To Change Default IOP Limit‘ but should normally only be done under the guidance of the manufacturer.

The issue with this is how a volume is created within a StoreVirtual node.  Let’s imagine we have two cluster nodes, A and B. When the first volume is created it is ‘owned by a master node’ in this case ‘node A’.  When the second volume is created it is owned by ‘node B and so on, as shown below.

  • Volume 1 – Node A
  • Volume 2 – Node B
  • Volume 3 – Node A
  • Volume 4 – Node B

Using the recommended bonding method of ‘Adaptive Load Balancing’ SCSI read and write commands are issued on all NIC’s in the bond which can result in data being accessed from a non-authoritative node, which means a trip across the network to the authoritative node.  I think a picture is in order!

VMFocus HP StoreVirtual DiagramThis was rather inefficient and meant that random reads (which are served from disk) could be accessed from a non-authoritative node.  This is where the StoreVirtual Multi-Path Extension Module (MEM) steps in.  It has knowledge on where the data resides and ensures that all:

  • Read I/O’s are always serviced by the storage node that holds the authoritative data.
  • Write I/O’s are always serviced by the storage node that receives a mirror copy of the data ensuring data integrity.  Remaining copies are then forwarded to the remaining storage nodes.

This results in the following data flow architecture.

VMFocus HP StoreVirtual MEM Diagram

The installation guide for HP StoreVirtual Multipathing Deployment Guide is fairly straight forward.  The only issue I ran into was ‘could not find trusted signer’ when trying to install the vib.

VIB Install

This was resolved by adding –no-sig-check to the end of the command esxcli software vib install -v /HPMEM.vib –no-sig-check

Once installed, you will need to change the path selection policy for your datastores to HP_PSP_LH

HP_PSP_LH


How To: Rehost HP StoreVirtual Licenses

I’m not sure exactly when, but HP changed the licensing portal from ‘Poetic’ to a new portal named ‘My HP Licensing Portal’.  All of the information looked exactly the same, however you could not rehost HP StoreVirtual Licenses.

The purpose of this blog post is to assist anyone who was in the same situation as me, scratching their head trying to figure it out!

Problem

You have an existing HP StoreVirtual license which ties the feature set to the first NIC MAC address on your StoreVirtual VSA.  You have changed, upgraded or redeployed your VSA and you need to rehost the license onto the new MAC address.

Solution

Browse to myhplicensing.hp.com and login for your email address and password that you use for your portal account.

Note: If you are not sure what email address is tied to your account login to HP Licensing for Software and select Administration > My Profile which will show your email address.

Once logged into My HP Licensing select Rehost Licenses

StoreVirtual License 01

Next select Rehost Licenses and click on the MAC Address you want to update

StoreVirtual License 02

Select the tick box to confirm this is the license that you want rehosting and then click Rehost.

StoreVirtual License 03

Select ‘Enter New Locking ID’ and enter the MAC Address of the first network adapter on your StoreVirtual.  Then click Next

StoreVirtual License 04

This bit takes a while but once done you will receive the license file which can be saved or emailed

StoreVirtual License 05