HP Discover – First Impressions

I wasn’t sure what to expect at my first HP Discover, however one thing is for sure.  The same community feel that ‘VMware’ has exists at HP.  I think that this starts with Calvin Zito @HPStorageGuy who takes care to ensure that you are welcomed and introduced to other community members.

Entering HP Discover, it felt the same as VMworld (probably linked to the fact that it is held at the same place), with the usual check in process.  I was expecting an abundance of ‘swag’, but was quite surprised with the distinct lack of it, with just an event guide and a sessions schedule.

SWAG
HP Discover SWAG

When entering the vendor floor, I started to see some major differences with other events.

  • The first being that HP Discover has a business feel to it, with most of the attendees wearing suits.
  • The second is the no ‘swag’ theme continues, with the approach focused on the technology to entice you into a conversation rather than a ‘free pen’.
  • The third is that the demo/stand staff seem to be well versed to answer technical questions, which is great. At other events you tend to get ‘we will look it that or you need to wait for Dave to come back’.
Vendor Floor
HP Discover Vendor Floor

Next on the agenda was a concept that HP call a ‘Coffee Talk’ which is an awesome concept.  Essentially, HP wheel in a person of standing, for example David Scott (Senior Vice President and General Manager, Storage).  It’s not often you get time with these individuals, so kudos for HP for making it happen.

The framework for the Coffee Talks is, and I quote ‘hosed down with information’ Chris Purcell @chrispman01 which usually lasts for around 20 minutes.  After this it’s a Q&A session, giving you the ability to find out or challenge the ‘HP leader’ on their particular area of responsibility.

A great question was posed to David Scott by Chris Evans @chrismevans which was along the lines of ‘how and why has HP managed to drop the price of the StoreServ 7450 all flash array?’ For me, these are the best type of questions as they are open.

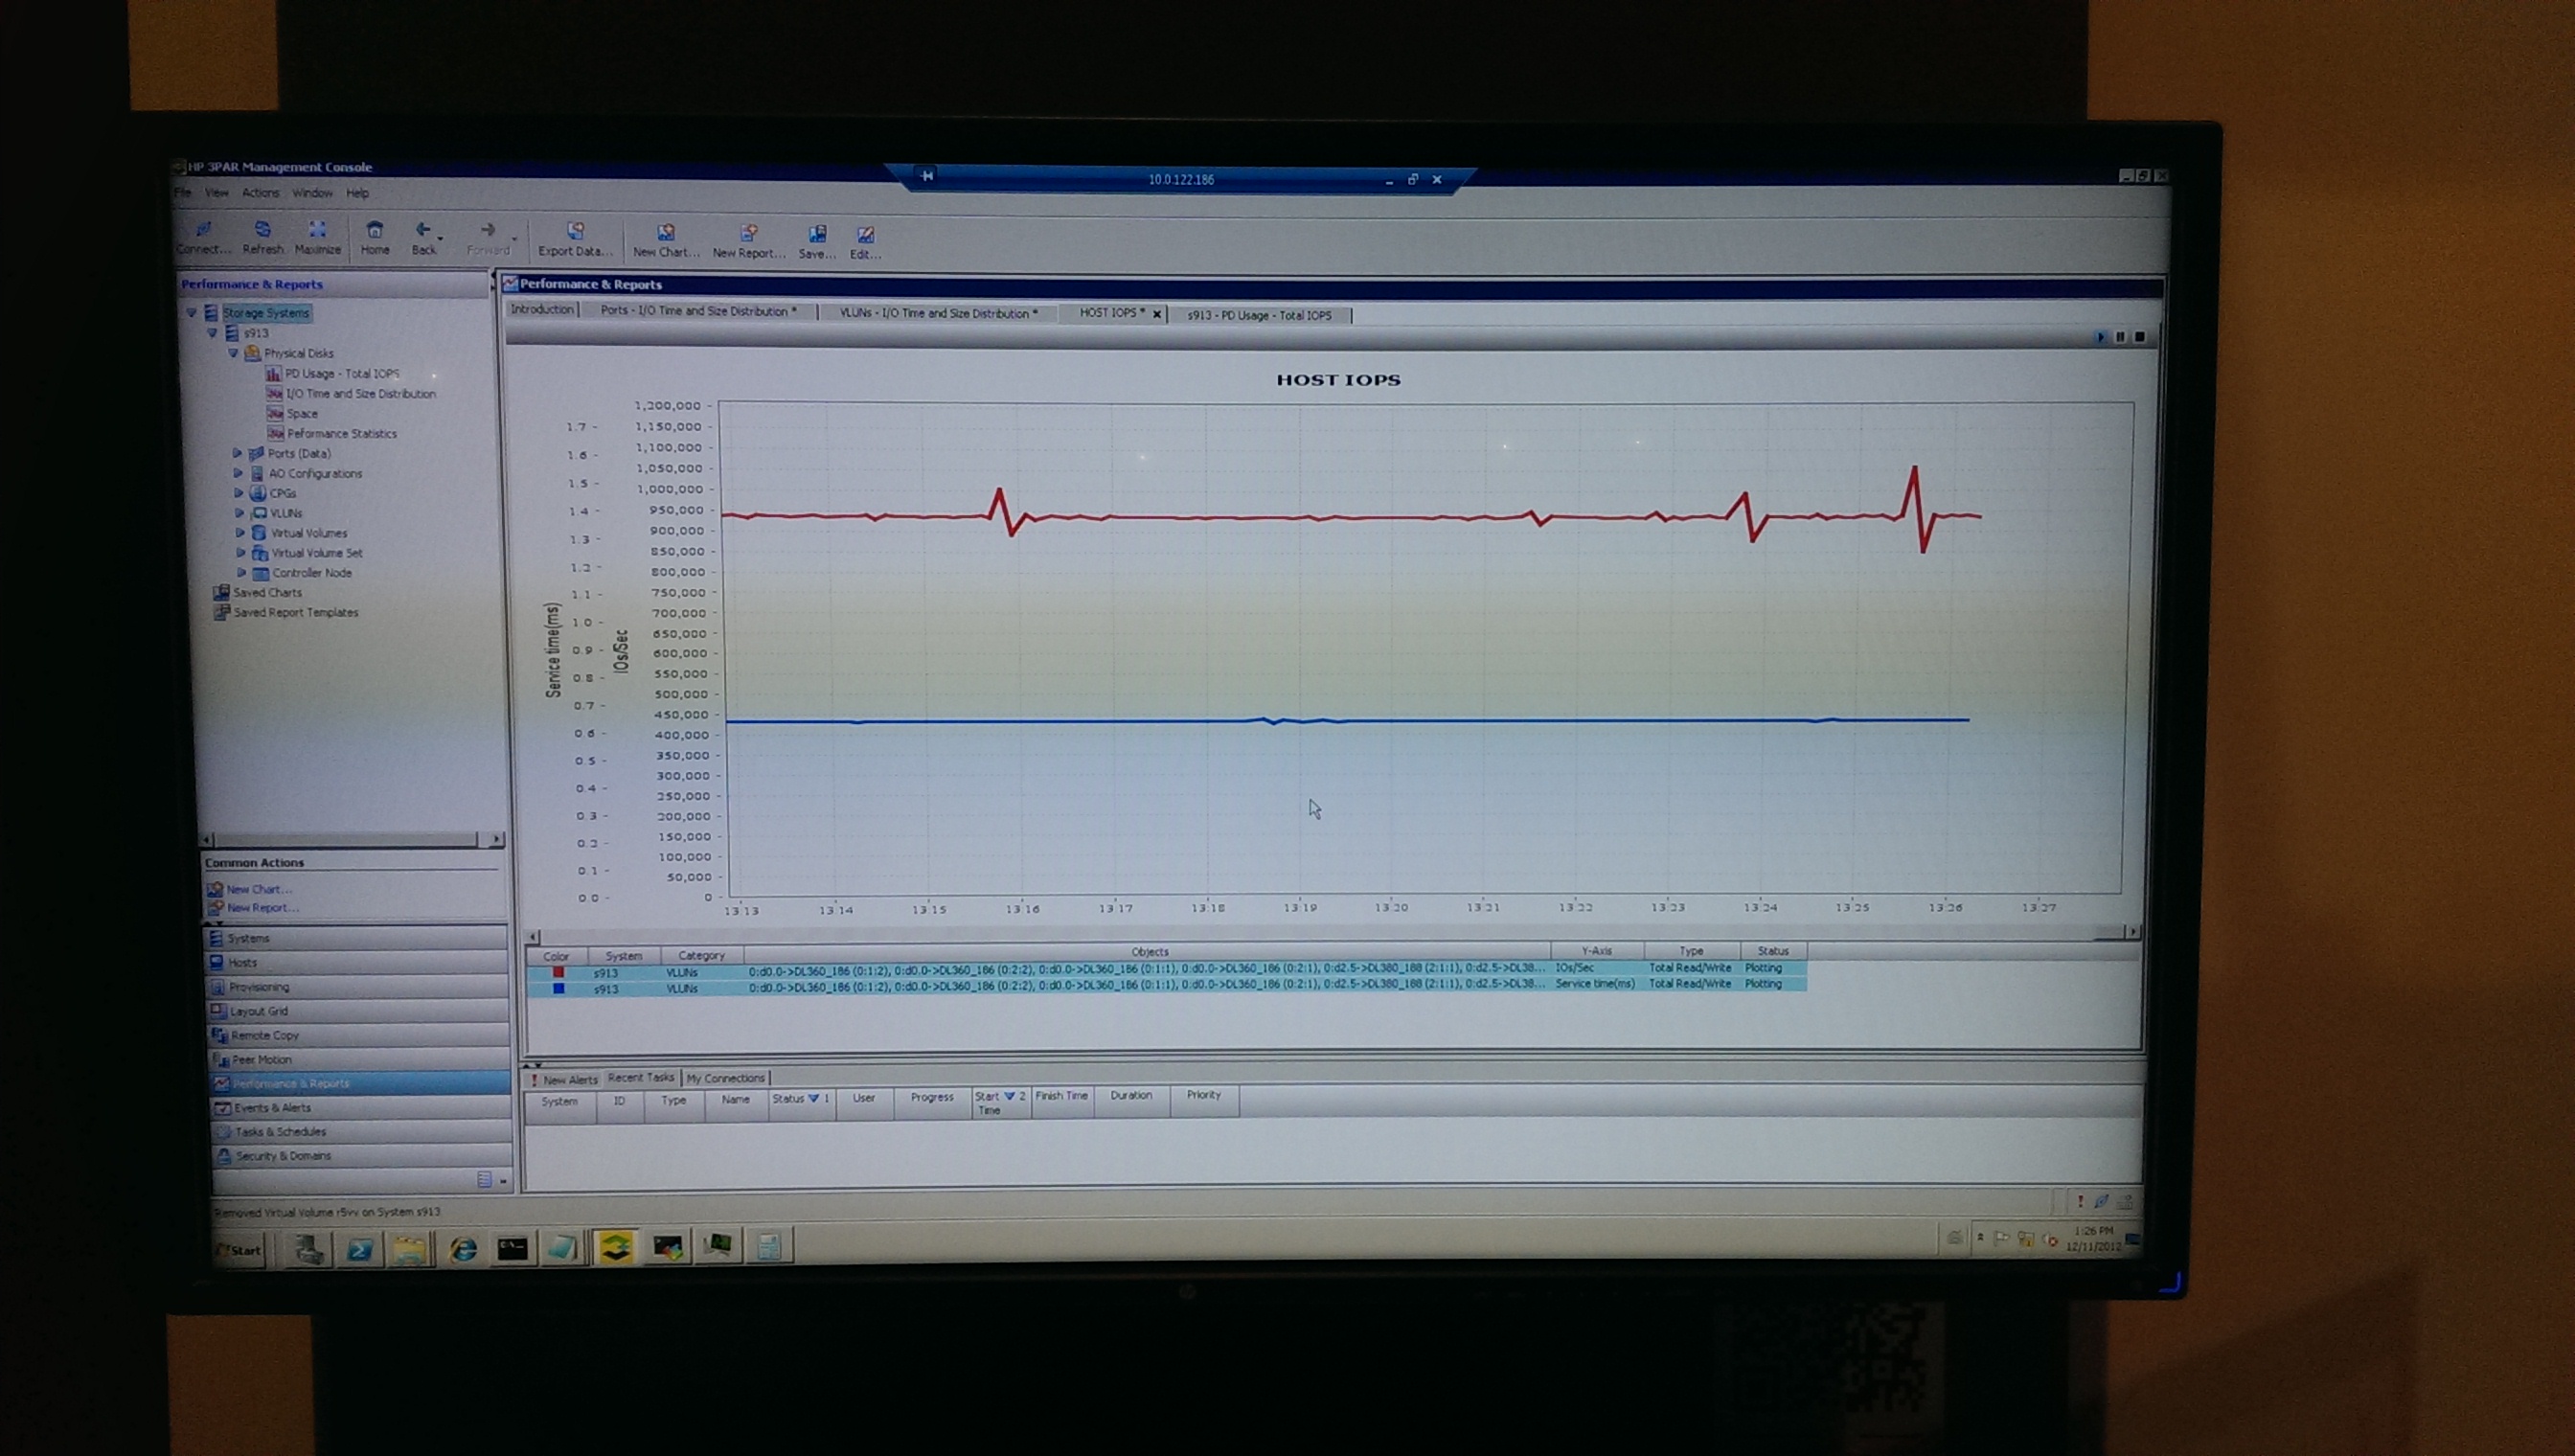
David answered this by explaining they had produced greater efficiency in software by modifying the OS for adaptive sparing (part of the SSD is hidden from use so when blocks can no longer be written to due to degradation they come from the adaptive sparing area) essentially making the adaptive sparing area smaller in space. So this with using a different MLC technology provider has driven down the costs by 50%.

David then went onto explain that they had have also introduced further efficiency by driving the IOPS from 550K to 900K just by a software upgrade to Inform OS 3.1.3 which is due to be released in January 2014.

3PAR 900K
HP Discover 3PAR StoreServ 7450 900K IOPS

Part of the reason for coming to HP Discover was to meet other bloggers who are interested in storage and all things HP.  HP have dedicated part of the conference to form the ‘Bloggers Lounge’.  In this area you can meet the likes of:

  • Calvin Zito @HPStorageGuy
  • Enrico Signoretti @esignoretti
  • Alastair Cooke @DemitasseNZ
  • Chris Wahl @ChrisWahl
  • Chris Evens @chrismevans
  • Luca Dell’Oca @dellock6
  • Luigi Tiano @ltiano
  • Federica Monsone @Fred_Monsone
Bloggers Lounge
HP Discover Bloggers Lounge

A couple of item’s I wasn’t aware of, which will require further investigation are:

  • 3PAR StoreServ QoS.  This works at the virtual volume level and guarantees, bandwidth IOPS or latency to the volume in question.  The use case for this is to remove the requirement for Enterprise Plus licensing in vSphere for SIOC avoiding the ‘noisy neighbor syndrome’ by placing your most valuable VM’s onto individual virtual volumes. QoS is part of the Optimization Suite which is likely to be in place already if your customer is using storage tiering.
  • 3PAR vCenter Operations Management Plug in.  vCOPS is great, but wouldn’t it be better to be able to drill down into your StoreServ to see what it thinks is going on?  With this addition, it gives you the complete view of your vSphere environment across all compute resources.

So to sum up my first impressions, HP Discover is a ‘business technical’ conference.

How To: Install vCenter Operations Manager

vCenter Operations Manager has been missing from the vmfocus.com lab for far to long!

With this in mind let’s walk through how to install vCenter Operations Manager.

IP Pools

VMware require IP Pools to be configured for most of their OVF’s nowadays.  Chris Wahl wrote a great blog post on Managing & Configuring IP Pools which is our first step.

Go into the Datacenter Object in vSphere and Select IP Pools Tab then Add

IP Pools 01

Give the IP Pool a name, Subnet Mask and Gateway

IP Pools 02

Note: We have specifically chosen not to enable the IP Pool

Then jump over to Associations and associate the IP Pool with a Port Group that your vCenter Operations Manager will reside on.

IP Pools 03

Once configured it should look something like this.

IP Pools 04

Install vCenter Operations Manager

The next step is to download vCenter Operations Manager which is located here. As of the time of this blog post the most recent version is VMware vCenter Operations Manager Standard 5.7.2.

I’m not going to talk you threw how to upload an OVF as it’s a simple case of going to File > Deploy OVF Template > Select Location and following the wizard.

When you get to the IP Address Allocation Policy select ‘Fixed’

VCOPS01

vCOPS is a vAPP which is made up of two VM’s the UI and Analytics VM both of which need an IP Address.

VCOPS02

The vAPP seems to take a large amount of time, so my suggestion is to make a cup of tea!

vCOPS Initial Configuration

Browse to your UI VM IP Address, in my case it is https://VMF-VCOPS01/admin as I thougth I would be clever and enter an A record.

Login with the following credentials:

U: admin

P: admin

The first task is to enter the Hosting vCenter Server details, in some scenarios for example a management cluster the vCenter the vCOPS resides in is different to the one that it monitors.

vCOPS03

Accept the Security Alert to trust your vCenter.

Next change the passwords for your admin account and root accounts, once done hit Next.

vCOPS04

TOP TIP: The root password is vmware

Enter your vCenter details, the collector has access to all the Objects within vCenter, so ideally you want to specify credentials for this as well.

If you receive an error ‘connecting to VC at https://vCenter/sdk failed’ see my blog post on this subject

vCOPS05

Click Next on the Import Data screen and then Finish on the Linked VC Registration page.

You will receive a security Warning on your vCenter Server stating that the vCOPS certificate is untrusted. Install the certificate and click Ignore

vCOPS06

If successful, you should be greeted with the vCenter Operations Manager Administration screen.

vCOPS07

You should be able to verify this by go to the Home Screen of your vSphere Client and you should have vCenter Operations Manager under Solutions and Appliances

vCOPS08

That’t it all you need to do now is assign your license key and you are ready to rock ‘n’ roll.

How To: Install vSphere Management Assistant

I must confess that I don’t use ESXCLI very much unless I’m in a situation which forces me to do so.  This blog post is more for me as I want to be able to run more commands on a regular basis from ESXCLI or VIFP rather than relie on the GUI.

The vSphere Management Assistant is a free OVF provided by VMware to allow you to access all your ESXi Hosts from a central location to run scripts or CLI commands.

We are going to look at the initial installation and configuration.

IP Pools

VMware require IP Pools to be configured for most of their OVF’s nowadays.  Chris Wahl wrote a great blog post on Managing & Configuring IP Pools which is our first step.

Go into the Datacenter Object in vSphere and Select IP Pools Tab then Add

IP Pools 01

Give the IP Pool a name, Subnet Mask and Gateway

IP Pools 02

Note: We have specifically chosen not to enable the IP Pool

Then jump over to Associations and associate the IP Pool with a Port Group that your vSphere Management Assistant will reside on.

IP Pools 03

Once configured it should look something like this.

IP Pools 04

Install vSphere Management Assistant

The next step is to download the vSphere Management Assistant ZIP file which is located here. As of the time of this blog post the msot recent version is vMA-5.5.0.0-1295338.

Extract the ZIP file to a location of your choice and fire up the vSphere Client.  I’m not going to talk you threw how to upload an OVF as it’s a simple case of going to File > Deploy OVF Template > Select Location and following the wizard.

When you get to the IP Address Allocation Policy select ‘Fixed’

VMA 01

On the next page enter the IP Address you are going to assign to your vSphere Management Assistant 5.5

VMA 02

Select ‘Power On After Deployment’ and you are good to go.

Fire up your vSphere Console for the vSphere Management Assistant Console and configure the following items:

  • Default Gateway
  • Hostname
  • DNS
  • Proxy Server (if any)
  • IP Address Allocation (eth0)

Once done it should look like this.

VMA 03

Enter 1 and change the password.  Note your old password will be ‘vmware’.  After this completes you will be able to access the vSphere Management Assistant by going to https://x.x.x.x:5480 to perform maintenance tasks such as appliance updates.

I suggest you login to your vSphere Management Assistant using the URL just to make sure that your password works.

TOP TIP: Your username is vi-admin

vSphere Management Assistant Initial Configuration

Use a client such as Putty to login to your vSphere Management Assistant by SSH

We have two ways to add ESXi Hosts and vCenter to our VMA, either by Domain or Local Authentication.

Join VMA to Active Directory

sudo domainjoin-cli join <domain-name> <domain-admin-user>

VMA 04

Once done reboot the system

Check the domain and OU

sudo domainjoin-cli query

VMA 06

Add ESXi Hosts/vCenter to VMA

vifp addserver VMF-ESXi01 –authpolicy adauth –username VMFocus.com\Service.vCenter

VMA 05

Check ESXi Hosts/vCenter joined to VMA

vifp listserver -l

VMA 07

Target A Specific Host

vifptarget -s VMF-ESXi01

VMA 08

HP iLO2: Firmware Upgrade Via Webpage Failed

Trying to firmware upgrade HP iLO2 from version 2.07 or 1.81 to 2.22 results in the error message ‘firmware upgrade via webpage failed’  Using a .bin file via a Windows Server.

HPiLO01

Troubleshooting Steps

  • Enabled compatibility mode in IE9, this resulted in Firmware loading to 99% and then timing out
  • Enabled compatibility mode in IE10, again this resulted in Firmware loading to 99% and then timing out
  • Tried using Google Chrome, again this resulted in Firmware loading to 99% and then timing out

Resolution

It seems strange but the firmware upgrade will work using Mozilla Firefox.  Using this browser results in success, I’m now on iLO2 firmware 2.22.

HPiLO02

PowerCLI Fails To Launch

I encountered a strange issue the other day after installing PowerCLI 5.0, as soon as I launched it, it closed.

Troubleshooting

Windows Event Logs for Windows PowerShell, Application and System, revealed erm nothing

Checking the properties of the PowerCLI Shortcut its is launched using the target from C:WindowsSystem32WindowsPowerShellv1.0powershell.exe -psc “C:Program FilesVMwareInfrastructurevSphere PowerCLIvim.psc1” -noe -c “. “C:Program FilesVMwareInfrastructurevSphere PowerCLIScriptsInitialize-PowerCLIEnvironment.ps1″”

and Starts in “C:Program FilesVMwareInfrastructurevSphere PowerCLI”

PowerCLI01

Trying to run the .ps1 from Powershell resulted in ‘the term’Initialize-PowerCLIEnvironment.ps1’ is not recognized as the term of a cmdlet.

PowerCLI02

Next, was to go into the Windows Folder C:Program FilesVMwareInfrastructurevSphere PowerCLI and right click Initialize-PowerCLIEnvironment.ps1 and Run with PowerShell

PowerCLI03

This time, I received the error message:

‘internal Windows PowerShell error com initialization failed while reading windows PowerShell console file with error 80010106’

Resolution

Googling the issue, I came across this PowerShell forum post which suggested changing the ‘Number of recent items to display in Jump Lists to 10’

PowerCLI04

After making this change, I was able to launch PowerCLI!

PowerCLI05