What NIC is my Virtual Server using?

We had a few network issues with a client site recently which meant that we had to perform some port mirroring to understand what was happening on the VMware side.  We didn’t have the luxury of Enterprise Plus licensing so couldn’t use the inbuilt port mirror features.  So it was manual time on the switch.

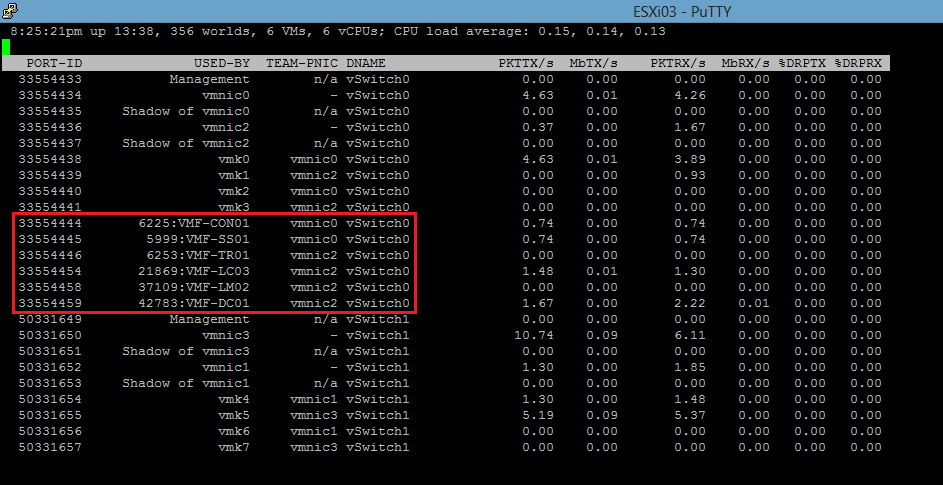
Most, if not all vSphere environment have redundancy built into them, with at least two uplinks (physical NIC’s) to the LAN.  They normally have ‘Route based on the originating virtual port ID’ as the load balancing policy. So vSphere uses an algorithm which states if I have 10 VM’s, then I will place 5 on each uplink.

So the question is, if I’m trying to perform some port mirroring on my Cisco/HP switch, which port should I mirror?

This is when we use esxtop.  First of all we need to login to the ESXi Host which is responsible for the Virtual Server using SSH.

Once in we run the command as follows:

esxtop (press enter)
n (press enter)

We now see which Virtual Servers are on which uplink (physical NIC)

ESXTOP

Fabric Zoning Best Practices

After yesterdays post on HBA’s I was thinking about fibre channel, which leads in nicely to todays post about fabric zoning best practices.

So, what is a ‘Single Initiator Zone’ and why do we implement them?

An initiator is the HBA in your ESXi Host, typically these are two port or perhaps in four port depending on your requirements.  Each port is known as an initiator.
Part of your VMware design would be to have at least two HBA’s with two ports (initiators) for redundancy. These would then connect to the storage processor on your SAN (the target) which would have four  ports, two on each disk controller.

We then have two fabric switches for redundancy to ensure that our SAN continues to recieve storage requests if a single fabric switch failes.

Following this through our ESXi Host has ports E1 & E2 on HBA1 and E3 & E4 on HBA2.  The SAN has S1 & S2 on disk controller 1 and S3 & S4 on disk controller 2.

From this we will end up with eight zones, as each zone has a single initiator and single target.

E1 to S1 via Fabric Switch 1
E1 to S3 via Fabric Switch 2
E2 to S2 via Fabric Switch 1
E2 to S4 via Fabric Switch 2
E3 to S1 via Fabric Switch 1
E3 to S3 via Fabric Switch 2
E4 to S2 via Fabric Switch 1
E4 to S4 via Fabric Switch 2

If your like me, then looking at a picture makes a lot more sense

Brocade produce a ‘Fabric Zoning Best Practices’ White Paper, which is the paper I tend to follow when implementing fabric zoning.

The white paper can be found here

Don’t forget that Fabric Zoning has nothing to do with LUN masking which is used to choose which servers are allowed to see which LUN.  For example in an vCenter environment you would normally want all of your hosts to be able to see all of the LUN’s for vMotion to work.  The only expection to this would be if you had multiple clusters where you would LUN mask each clusters hosts.

Installing HBA Drivers On vSphere 5

Bit of a personal post for me to be honest as I have to keep looking this up!

Depending on the size of the vSphere Cluster you are going to install, if you are like me, you might not always have the luxury of time and therefore cannot create a customised ESXi5 install.

I’m assuming that you have downloaded the ESXi5 HBA Drivers from the manufacturers’ website to your local machine and you have the vSphere Client installed.  In this demo I will be using some Brocade Drivers.

I generally rename any local HDD to the same name as the ESXi host for example ESXi08HDD

We then use the vSphere Client to browse the datastore, then create a new folder called ‘Brocade’ to upload the driver file to.

We now need to ensure that we have enabled SSH which can be done on the console of the ESXi Host by going logging in and going to ‘Troubleshooting Mode Options’ and then Enable ESXi Shell.

I use Putty as my SSH client, which is available from this link SSH onto the ESXi Host and enter your credentials. Note all of the following commands are after the #

cd /vmfs/volumes/ESXi08HDD/Brocade (Enter)
ls
We should be able to see the driver we uploaded
Then run the following commands:
cp brocade.tar.gz /tmp
cd /tmp
tar zxvf brocade.tar.gz
./brocade_install_esxi.sh -n

sync;reboot

Once the host is back online, you will see you HBA’s installed and ready for use under Storage Adapters.

VMware vSphere Metro Storage Cluster

Today VMware have annouced the support for ‘stretched storage cluster’ and have produced a white paper to this effect.

The purpose behind a ‘stetched storage cluster’ is to have two different geographical sites which reside on the same subnet (stretched VLAN) to enable routine tasks as high availability, vMotion and Storage vMotion to take place.  It is not intended to replace VMware Site Recovery Manager.

Essentially, you need to have an array which has the ability to perform reads to and writes to both locations at the same time.  The white paper mentions latency values up to 5ms, however, my experience with synchronous SAN based replication is that we encountered performance hits with latency above 2ms.

The white paper can be found at VMware vSphere Metro Stroage Cluster

VMware VCP 4.1 Study Guide & Lab Part 4

vCentre Installation & Configuration

vCentre gives us the ability to combine single ESXi hosts and form clusters enabling us to perform all the cool things such as vMotion, High Availability, Fault Tolerance and Distributed Resource Scheduler.

To install vCentre go into your V: Drive and locate your vCentre installation and follow the on screen prompts.

vCentre uses Active Directory authentication and as part of the installation it installs ADAM (Active Directory Application Mode) which uses the local administrators username and password (if you kept the defaults).

So when we launch vCentre on VM01 we can just tick the box to use Windows Credentials.

Now that we are in vCentre the first thing we are going to do is create a Datacentre, this is the top level in VMware.

In the top left hand corner you will see your Physical Computers name, in my case it’s VM01, right click this and choose New Datacentre and then give it a name.

Next we are going to add a Cluster to our Datacentre, right click the Datacentre and choose New Cluster and give it a name.

Last of all we add our host to the Cluster, so we right click the Cluster and choose Add Host, enter t Host DNS entry (I don’t recommend IP as vMotion relies on DNS). The username and password to access your ESXi Host and click next

VMware VCP 4.1 Study Guide & Lab-add-host.pngAccept the defaults on the Resource Pool, click next click Finish.

Repeat the process to add in Host esxi02.

We are now going to turn on VMware HA and VMware DRS. To do this right click your Cluster Name and choose Edit Settings.

Then on Cluster Features select ‘Turn On VMware HA’ and ‘Turn On VMware DRS’. Click OK