London VMUG 25/04/2013 – Get Involved

Crikey, the second London VMUG is just over a week away, so if you haven’t registered for the event yet, I urge you to get involved

If you are a techie, why would you attend one of these events? Well apart from being free (which is awesome) it allows you to learn from your peers, this may be about a project you are working on and you want to know some of potential pitfalls, or perhaps you are interested in a new area such as software defined networking.

Great line up as always, I’m looking forward to hearing from Shmuel Kliger (VMTurbo), Hans de Leenheer (Veeam) and Dave Burgess (VMware).

VMUG Agenda

Registration begins at 08:30 and doors close at 17:15.

Take a moment and pop the address in your mobile phone, so you don’t get lost on your way there!

London Chamber of Commerce and Industry
33 Queen Street
London EC4R 1AP

3PAR StoreServ 7000 Software – Part 7

Remote Copy is the term 3PAR StoreServ uses for replicating Virtual Volumes either synchronously or ‘a synchronously’.  The last time I spoke to HP, they mentioned that the highest supported latency for synchronous replication RTT was <1.7ms.

I have been fortunate enough to have configured a number of 3PAR’s with VMware’s Site Recovery Manager and setting up and configuring the Storage Replication Adapter (SRA) was a breeze.  The only downside was that when you performed a test failover it always failed until you changed the Advanced VMFS3 setting to

VMFS3.HardwareAcceleratedLocking 0

One of the things I disliked about Remote Copy was the fact that if you couldn’t have ‘synch’ and ‘a synch’ Remote Copy Groups.  The great news is this has now been changed and with 3PAR OS 3.1.2 we can have booth, hoorah!

However, something which I don’t really understand is that HP only support a two node system (which is a common deployment) using both Remote Copy Fiber Channel and Remote Copy IP for ‘synch’ and ‘a synch’ Remote Copy Groups.  Not sure how many people have both fiber and ethernet presented from intersite links?

3PAR StoreServ 7000 now supports vSphere Metro Storage Cluster using Peer Persistence (later in this blog post), it mentions that up to 5ms RTT is supported, however I’m pretty sure that the user experience would be somewhat dire to say the least, can you imagine waiting for the acknowledgement on the remote array?

vMSC

You can vMotion between sites, however a few things to consider when doing this:

  1. Think of the intersite link (ISL) usage, would enough bandwidth be available to continue synch replication?
  2. If a VM’s datastore is at the other end of the ISL then you are using very ineffective routing
  3. Should always be used with Enterprise Plus licenses so you can instigate should Storage DRS rules to ensure that VM’s should always use the datastores they are in the same site as.

From a 3PAR StoreServ perspective the Virtual Volume is exported with the same WWN to both arrays in Read/Write mode, however only the Primary copy is marked as Active, the Secondary copy is marked as Passive.

At the time of writing this post, the failover is manual, as a quorum holder has not been created yet.  I’m sure it won’t be long and 3PAR will have something like the Failover Manager (FOM) that StoreVirtual uses.

A few of other points to know about Remote Copy are:

  • Supports up to eight FC or IP links between 3PAR StoreServs
  • Supports replication from one StoreServ to two StoreServ for added redundancy

Sync Long Distance

My overall experience with Remote Copy in Inform OS 3.1.1 has been that of frustration, a lot of the work has to be done via the CLI as the GUI has a nasty habit of not sending the correct commands or for some reason Remote Copy Links not establishing.  A few of the commands that I have used on a regular basis are:

showport -rcip
showport -state
showrcopy links
stoprcopy
startrcopy
dismissrcopylink <3PARName> 2:6:1:<targetIP> 3:6:1:<targetIP>
admitrcopylink <3PARName> 2:6:1:<targetIP> 3:6:1:<targetIP>
controlport rcip addr <targetIP> 255.255.255.0 2:6:1
controlport rcip addr <targetIP> 255.255.255.0 3:6:1
controlport rcip gw <gatewayIP> 2:6:1
controlport rcip gw <gatewayIP> 3:6:1
controlport rcip speed 100 full 2:6:1

controlport rcip speed 100 full 3:6:1

One of the things I think is a great feature of Remote Copy on 3.1.2 is Remote Copy Data Verficiation, which allows you to compare your read/write (Primary) volume and your read (Secondary) volume.  To implement this you run the ‘checkrcopyvv’ command which creates a snapshot of the read/write (Primary) volume and then cmopares it to the read (Secondary) volume.  If inconsistencies are found then only the required blocks are copied across.

Note that only one checkrcopyvv can be run at a time.

With 3PAR OS 3.1.1. you have always been able to perform bi-directional remote copy, however now it is supported!

Remote Copy N+
I know everyone likes there configuration maximums, so just to let you know the limits are:
  1. Synchronous Remote Copy – 800 Volumes
  2. Asynchronous Remote Copy – 2400 Volumes

Peer Persistance

I mentioned above that Peer Persistence has been included to allow support for vSphere Metro Storage Cluster so how does it work?

  1. Asymmetric Logical Unit Access (ALUA) is used to define the target port groups for both primary and secondary 3PAR StoreServ.
  2. The Remote Copy volumes are created on both arrays and exported to the hosts at both sites using the same WWN’s in Read/Write mode, however only one site has active I/O, the other site is passive.
  3. When you switch over, the primary volumes are blocked and any ‘in flight’ I/O is trained and the group is stopped and failed over.
  4. Target port groups on the primary site become passive and the secondary site become active.
  5. The blocked IO on the primary volumes becomes unblocked and a sense error is created indicating a change of target port group to the secondary volumes
  6. Remote Copy Group is updated and the restarted replicating in the other direction.

To move across your would use the command setrcopygroup switchover <group> to change the passive to active without impacting any I/O.

Peer Persistance

There are a few risks with Peer Persistence  firstly it shouldn’t be used with a large number of virtual volumes (no exact numbers from HP yet).  The reason for this is the switch over could take more than 30 seconds as a snapshot is taken at both the primary and secondary site just in case the operation fails e.g. ISL goes down.  Worst case scenario you would need to promote a volume manually.

10 Things To Check (Quickly) in vCenter

As part of my day job, I review vSphere infrastructures giving recommendations on areas which could be potential concerns.  Many of the business’s that I see engaged consultants to perform the initial installation and configuration and hand vCenter/vSphere back to the internal IT department.  Overtime, changes are made and settings are updated without consideration to what they mean.

So with this in mind, I decided to put together this blog post ’10 Things To Check Quickly in vCenter’

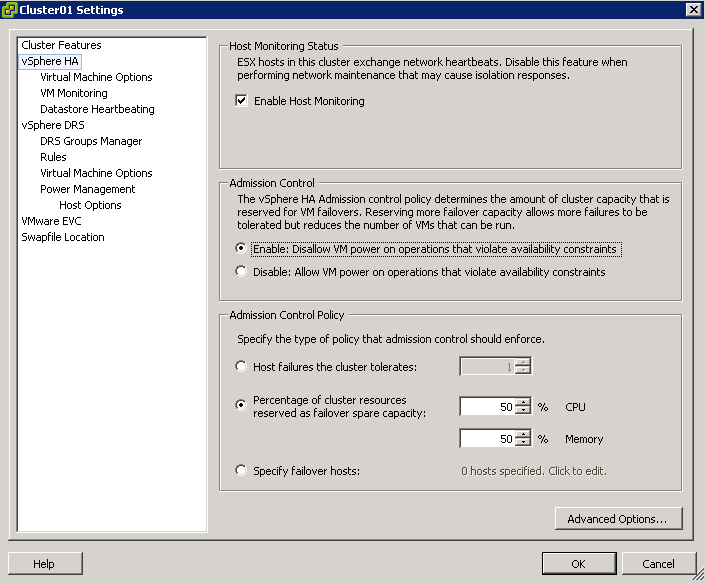
1. Admission Control

The whole point of admission control is to ensure that you have the redundancy within your infrastructure to tolerate a failure of some description, more often than not this is N+1.  So check your admission control is first of all enabled and secondary it is set correctly e.g. 2 x ESXi Hosts should be 50% CPU and 50% Memory

I have seen countless installations where this has been turned off to enable an new VM’s to be ran and the hosts where never upgraded to compensate for this increase in workload.

Admission Control

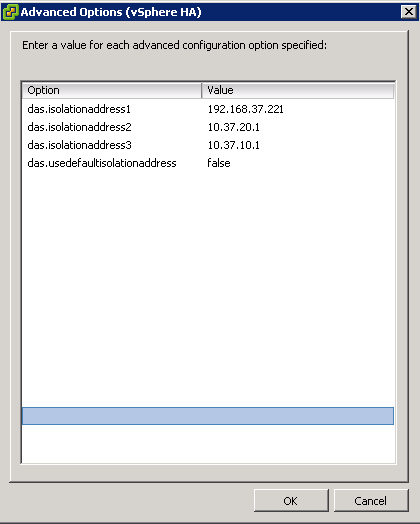
2. DAS Isolation Address

The default setting is a single isolation address which is your default gateway.  What happens if this goes down in a vSphere 4.1 environment? Well man down is the reaction!  Ensure that you specify numerous IP address, I commonly go for:

1. Layer 2 switch IP address used for vMotion/FT

2. SAN management IP address

3. LAN/Management  default gateway IP Address

DAS Isolation

3. VM Monitoring

Turn this on, I know the default is disabled, but that’s not an excuse.  Why wouldn’t you want vSphere to monitor your VM’s and restart them if it has no network or datastore activity?

VM Monitoring

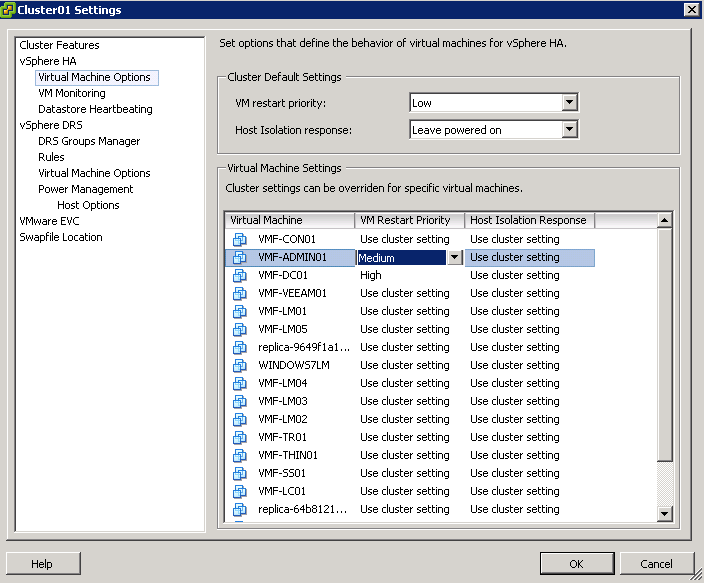
4. VM Restart Priority

Let’s start with the premise that not all virtual machines are equal.  If you have virtualised Domain Controllers you would want these to be high priority restarts, followed by SQL and then application servers that connect to SQL.  I wrote a blog post on this a while back click me.

Take a few minutes and check with your server team to ensure that if you do have a failure then you have done your best to bring applications up in the right order.

VM Restart Priority

4. DRS Rules

Spend some time working with application team creating sensible DRS Anti Affinity and Affinity rules.  Some examples are:

  • Anti Affinity – Domain controllers to be running on the same ESXi host?
  • Anti Affinity – SQL Cluster with RDM
  • Anti Affinity – XenApp/Terminal Server farm members
  • Affinity – BES and SQL

Anti Affinity

5. VMware Update Manager

I quite often see environments where VMware Update Manager hasn’t been installed and if it has you can almost guarantee that the ESXi Hosts/VM/vApp haven’t been patched.

Without being flippant, there is a reason my VMware release patches/updates which is generally for bug fixes or security issues.

VYM

6. Alerting

Check to make sure that you have a valid SNMP/SMTP server setup, as after infrastructure migrations these settings can often be wrong.

Also take some time to configure alerting at ‘root’ level in vCenter to make sure they meet you business needs.  If you aren’t sure what to implement, I wrote a couple of blog posts on this subject to get you started:

Setting Up & Configuring Alarms in vCenter 5 Part 1

Setting Up & Configuring Alarms in vCenter 5 Part 2

Alerts

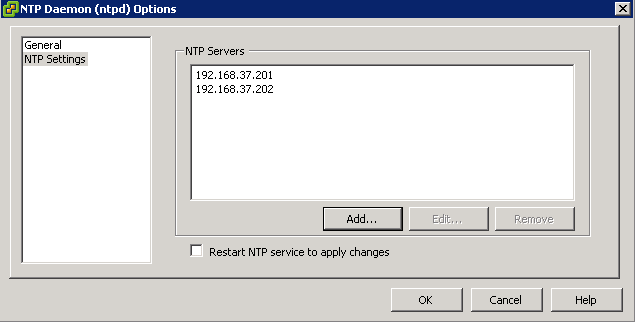
7.  Time Configuration

Virtual Machines take there initial time settings from the ESXi host.  We all know what dramas can happen if your virtual machines are more than 15 minutes out of sync with your domain controllers.  Use your internal domain controllers as your NTP Servers for your ESXi Hosts, it stops unnecessary NTP traffic going traversing firewalls and ensures that you won’t be affected with time skew.

NTP Servers

8. Virtual Machines With ISO’s Attached

We all pop ISO’ onto Local Storage on ESXi Hosts as it’s not taking up valuable space on our SAN.  The worse thing we can do is forget that we have them attached as if HA needs to come into action, these VM’s are going to fail.

Either check your Local Datastores on a regular basis or if you have lots of ESXi Hosts, then use tools such as PowerGUI with the VMware Management pack installed to script it.

HA Failure

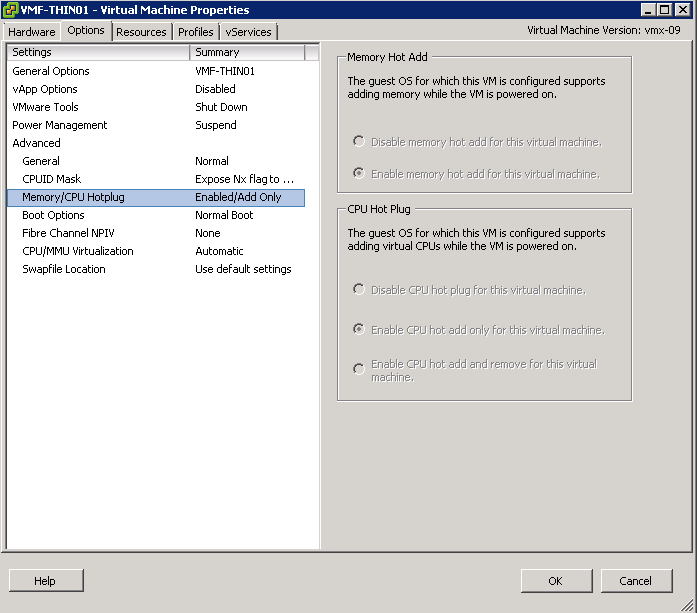
9. Hot Add Memory/CPU

Virtual Machine workloads change over time, why cause unnecessary downtime and potential evening or weekend work for yourself? Make sure that you enable Memory and CPU Hot Add on your templates.

Hot Add

10. Resource Pools

The golden rule is know what you are doing with resource pools as if you go into resource contention they are going to come into play. I have seen resource pools used as containers/folders, resource pools created at cluster level to protect ‘high importance’ VM’s which result in these VM’s having less resources to use! A quick explanation of this can be found over at Eric Sloof’s site NTPRO.NL

Resource Pools

3PAR StoreServ 7000 Software – Part 6

So you have got an awesome new 3PAR StoreServ 7400 and its all hooked up.  How do you get the data from your old array onto the 3PAR StoreServ? Well if you have vSphere no problem you could use Storage vMotion or if you are performing a data migration good old robocopy would do the trick.

However in some situations you don’t have the luxury of either of these, you just need to get the data from your old SAN to your new SAN.  This is where Peer Motion comes in strutting it’s stuff.

Peer Motion

Peer Motion allows non disruptive data migration from either 3PAR to 3PAR or selected EVA to 3PAR.  Essentially the destination SAN (3PAR StoreServ) connects to the source SAN as a peer and imports the data while the source SAN I/O continue.

The good news is that with each new 3PAR StoreServ you get a 180 day license for Peer Motion for free!

So how does it work?

Step 1 – 3PAR StoreServ is connected as a Peer to the Host via FC

Step 2 – 3PAR StoreServ is connected to the Host and the Virtual Volumes using admitvv

Step 3 – Old SAN is removed and the Virtual Volume is imported into the 3PAR StoreServ

Step 4 – Host links to the old SAN are removed

EVA Management & Configuration

I think all of us have known that the EVA has been slowly dieing, so below is a quick overview of how the software maps across.

Array Management
HP P6000 Command View Software = HP 3PAR Management Console (MC)
HP Storage System Scripting Utility (SSSU) = HP 3PAR 3PAR OS CLI

Performance Management
HP P6000 Performance Advisor Software = HP 3PAR MC (Real time)
HP P6000 Performance Advisor Software = HP 3PAR System Reporter (History)
HP Performance Data Collector (EVAPerf) = HP 3PAR System Reporter
HP EVAPerf = HP 3PAR 3PAR OS CLI

Replication Management
HP Replication Solutions Manager (RSM) = 3PAR MC /CLI
HP RSM =Recovery Manager (SQL/Exchage/Oracle/vSphere)

Recovery Manager

To be honest I haven’t ever used HP Recovery Manager and I can’t forsee a time when I will.  However for the purpose of the HP – ASE, I need to understand what it is and does.

Recovery Manager creates application consistent copies of Exchange and SQL using Microsoft VSS, it also works with Oracle, VMware, Remote Copy, Data Protector and NetBackup.

Recovery Manager

3PAR StoreServ 7000 Software – Part 5

I wanted to spend a little bit of time going over some 3PAR concepts, as this blog post won’t make a huge amount of sense without knowing them.

The basis for any storage system is some physical disks which provide hard disk capacity.  These physical disks and then placed into an enclosure (cage) and are sub divided into Chunklets. Chunklets are used to breakdown each physical disk into 1GB portions.  So a 146GB hard drive get’s broken down into 146 Chunklets.

The Chunklets then form the basis of the Logical Disk.  The Logical Disk is created from Chunklet’s from different physical disks.  The Logical Disks are then pooled together to create a Common Provisioning Group (CPG).  It’s at the CPG level where you set your RAID type which is either:

  • RAID 0 (this is explicitly locked out unless you enable it)
  • RAID 1
  • RAID 5 (explicitly locked out on NL drives unless enabled)
  • RAID 6

Virtual Volumes are then created which draw space from the CPG, and placed back into the CPG, if the Virtual Volume was thin provisioned by using tools such as sdelete at the Windows level or run vmkfstools -y 60 on an ESXi Host.

Sometimes a picture speaks a thousand words.

3PAR CPG Overview

With 3PAR StoreServ 7000 you have two availability options the first being High Availability Drive, this is the cheaper configuration option as you are protecting yourself from drive failure.  The other choice is High Availability Enclosure which strips the chunklets across enclosures, so that you are protected from enclosure failure, in the same way as StoreVirtual Replicated RAID 10.

Depending on your build the HA Enclosure option isn’t always massively expensive especially if you are starting with the same drive type.  An example of this, was when I was building a StoreServ 7200 config, which had the following requirements:

  • 10TB usable space
  • 7,200 IOPS

To achieve this, I used a basic config which consisted off 48 x 300GB 15K SAS HDD which gave 7,940 IOPS and 9.9TB of usable space.  Now the interesting thing with the configuration was that it was only 19% more expensive to use HA Enclosure.

Now we have covered off the above, I feel that we a re now in a position to cover Tunesys.

Tunesys

So we now know that 3PAR StoreServ works on Chunklets which are striped across physical disks to make Logical Disks, but what happens if a disk fails or you loose an enclose? how are the Chunklets re introduced?

This is where tunesys comes in, it essentially re balances an entire 3PAR StoreServ with a single command (Dynamic Optimization licenses are required). There are three types of tunesys which are.

Phase 1 – tunevv  this rebalances inter node when a new enclosure with disks is added

tunevv

  1. Create a new Logical Disks.
  2. Region moves are started to enable new Virtual Volumes to Logical Disks.
  3. The old virtual volumes is blocked.
  4. Regions are switched and the Virtual Volume is now mapped to the new Logical Disk
  5. Block is removed on the virtual vole
  6. Original Logical Disk is deleted.

Phase 2 – tuneodech this is when new disks are added to an existing enclosure paid.  Tuning is performed per disk type e.g NL, SAS, SSD.

tuneodech

Phase 3 – tuneld  this re-layout’s the CPG if it differs from the Chunklets on the existing logical disks.

The good news is tunesys does not interfer with AO.  A few things to note with tunesys

  • No administration is required after starting
  • Can perform a dry run to see what the tuning will do to the current configuration
  • Default settings should be fine for nearly all systems
  • If you add more enclosures or disks, only newly created Virtual Volumes will use the new capacity/IOPS
  • Tunesys can take along time to run
  • IO pauses are common during some phases

To start tunesys you can use the command

tunesys -nodepct % -chunkpct % -Diskpct %

Nodepct % default is 3%

Chunkpct % default is 5%

Diskpct % default is 10%

From the 3PAR Inform go to Provisioning > Select Tune System

tunesystem

How does tunesys work? Well what it does is pretty straight forward really.  First of all tunesys calculates the percentage utilization for each disk type per node.  It that checks the average utilization across all nodes.  If any of the nodes are more than 3% out (default) then each Virtual Volumes is checked to see if it is well balanced across nodes.  If it isn’t then tunesys does it’s magic and rebalances.

Thanks to Sheldon Smith a HP Technical Consultant who pointed out a couple of extra items.